
Use cases
This section provides a guide to the Use Cases available within the IBAN Management Service.
Available functionalities vary based on the specific deployment configuration and access rights.
Account Management
You have the ability to create and delete bank accounts, as well as retrieve their details based on the balance within the Verestro ecosystem. Virtual accounts generated for your users are directly linked to the balance.
Bank account creation
This process enables you to generate bank accounts for your users, assigned to balances in a specific currency. Depending on the configuration and permissions, various mechanisms for generating virtual accounts are available:
-
Automatically after balance creation – once the KYC process is approved and the balance is created, the account will be generated automatically for the user.

-
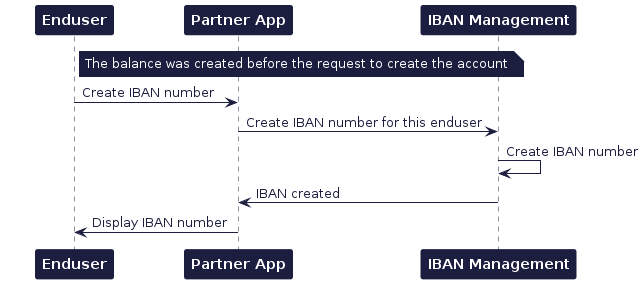
Via API – use the dedicated method
POST /secure/bank-accounts. To use this method, the balance must be created before attempting to create the account.
-
In the Admin Panel – by navigating to the section with endusers and their balances, it is possible to generate an account for a specific balance. This action requires appropriate permissions (primarily intended for Payment Institutions).
In the case of a corporation, a successfully completed KYB process is required, as well as providing the corporation entity with an address using the Lifecycle API.
Bank account details
The GET /secure/bank-accounts allows you to retrieve the full details of a virtual bank account linked to a specific balanceID.
Using this method, you can check the status of a generated bank account and display it to your users, allowing them to receive incoming transfers or top up their balance via external transfers. If an enduser initiates an outgoing transfer, the IBAN assigned to the balance from which the funds are being debited will appear as the sender's account number in the transfer history.
Bank account deletion
You have the option to delete a bank account:
- Directly, by using the dedicated method
DELETE /secure/bank-accounts– in this case, the balance remains active, and it will be possible to generate a new account linked to the same balance; - By deleting the balance – in this case, the virtual bank account will also be deleted.
Before removing your balance, remember that the balance is shared by all payment methods, including cards!
Transfers
The IBAN Management Service allows you to facilitate incoming and outgoing payments for your master account, as well as for your users' virtual accounts.
Incoming transfers
This functionality enables the enduser to receive transfers. Endusers of your application can share their IBAN with potential payers. This type of transfer tops up the enduser's balance.
When funds are transferred to a virtual bank account, the transaction is processed automatically. To receive notifications about such transfers, appropriate configuration within the Transaction History Core (THC) is required.
Outgoing transfers
By using the POST /secure/bank-accounts/transfers method, you can enable your users to execute transfers, as well as initiate transfers directly from the master balance. The user balance serves as the primary identifier for initiating a transfer. However, for transfers originating from the master balance, both the master balance and the master account are required.
As available transfer options vary depending on the sender and beneficiary details, we recommend using the POST /secure/bank-accounts/transfers/options method. By submitting transfer data before initialization, you can verify the correctness of the input, identify potential error causes, check available transfer options, and determine if any additional fields are required. You can find transfer types here.
Reporting
At Verestro, we provide various channels for retrieving transfer information. Using the methods and services below, you can verify the status and check the details of your transactions.
Transfer details
- Use the
GET /secure/bank-accounts/transfers/{transactionId}method to retrieve full details of a specific outgoing transfer. This returns comprehensive data includingpayment data,delivery mode,payment system,receiverandstatus. - Use the
GET /external/transactions/{id}method to retrieve detailed information about a specific transaction based on its unique identifier.
Transfer history
Transaction history can be retrieved via the Transaction History Core or monitored directly through the Administration Panel.
- To retrieve and display transaction lists to your endusers, use the
GET /external/transactionsendpoint. This allows for automated, paginated data fetching directly into your application. - For back-office operations and manual verification, use the dedicated tab in the Admin Panel. Detailed information about the IBAN Management Service functionalities available in the panel can be found here.
Transfer notifications
Integration with the Transaction History Core enables you to receive notifications for both transfer creation and related status updates. To enable this:
- Expose an endpoint: you must expose a dedicated
POST /transaction-eventendpoint on your server. - Receive event: when a transaction status changes, our system will send an event to your endpoint.
- Fetch details: each event contains a unique identifier. Use this ID to call the
GET /external/transactions/{id}method and retrieve the full, latest record.
@startuml
skinparam ParticipantPadding 30
skinparam BoxPadding 30
skinparam noteFontColor #FFFFFF
skinparam noteBackgroundColor #1C1E3F
skinparam noteBorderColor #1C1E3F
skinparam noteBorderThickness 1
skinparam sequence {
ArrowColor #1C1E3F
ArrowFontColor #1C1E3F
ActorBorderColor #1C1E3F
ActorBackgroundColor #FFFFFF
ActorFontStyle bold
ParticipantBorderColor #1C1E3F
ParticipantBackgroundColor #1C1E3F
ParticipantFontColor #FFFFFF
ParticipantFontStyle bold
LifeLineBackgroundColor #1C1E3F
LifeLineBorderColor #1C1E3F
}
participant "IBAN Management" as ims
participant "Transaction History Core" as THC
participant "Partner's Server" as issuer
ims->THC: Report performed transfer
THC->issuer: Send notification event on the Partner endpoint
issuer->THC: Get transaction details by received transaction id
issuer<--THC: Return transaction details
@enduml