Use cases
Donate Widget is a solution for making cash donations. This functionality does not require any type of session or user account in the Verestro System. Donation is in fact one-time payment e-commerce transaction, therefore it is based on a form in which the user simply enters his card details. This chapter describes the business process from the user's point of view, extended by technical elements.
Donation process
The donation process in the Verestro system begins when user decides to make a donation while still on the Customer website. At this point, the transaction pre-initialization process takes place. 3D Secure process takes place fully on the Verestro side. The sequence diagram below shows the entire transaction process step by step. The diagram below shows a successful transaction process:
@startuml
skinparam ParticipantPadding 30
skinparam BoxPadding 30
skinparam noteFontColor #FFFFFF
skinparam noteBackgroundColor #1C1E3F
skinparam noteBorderColor #1C1E3F
skinparam noteBorderThickness 1
skinparam sequence {
ArrowColor #1C1E3F
ArrowFontColor #1C1E3F
ActorBorderColor #1C1E3F
ActorBackgroundColor #FFFFFF
ActorFontStyle bold
ParticipantBorderColor #1C1E3F
ParticipantBackgroundColor #1C1E3F
ParticipantFontColor #FFFFFF
ParticipantFontStyle bold
LifeLineBackgroundColor #1C1E3F
LifeLineBorderColor #1C1E3F
}
participant "Customer App (Browser)" as browser
participant "Donate Widget Frontend" as pfront
participant "Donate Widget SDK" as psdk
participant "Donate Widget Backend" as pback
participant "Customer Server" as custback
participant "Acquirer" as acq
note right of browser: User chooses "Pay with Merchant Paytool" (1)
browser->pfront
pfront->psdk: Begin transaction (2)
psdk->pback: Transaction preinitialize /preinit (3)
pback->pback: Store transaction session data (4)
pback->psdk: OK - returns transactionId (5)
psdk->pfront: Redirect with transactionId (6)
pfront->pback: Get transaction (from point 3) (7)
pback->pfront: Returns transaction details (8)
pfront->pfront: User filling data (CN, CVC, EXP) (9)
pfront->pfront: Encrypt data (from point 9) (10)
pfront->pback: Perform transaction /transaction/TRX_ID + enc body (11)
pback->acq: Transaction with 3DS (12)
note left of acq: At this point 3D Secure process takes place
acq->pback: Response (13)
pback->pfront: Transaction Result (14)
pback->custback: Send postback to provided URL (15) (Optional - configurable)
pfront->browser: redirect User (success/failure) (16)
custback->pback: Get transaction status (17) (optional but hardly recommended in case when postbacks are disabled)
pback->custback: Return transaction status (18)
custback->browser: Provide transaction result (19)
@enduml
For easier understanding of the process, each of the steps listed in the diagram are described below:
-
The user which is using the Customer's application, selects the option of making the donation, providing amount and accepts terms of use.
-
The Customer application starts the transaction process by communicating with Donate Widget SDK.
-
Donate Widget SDK performs the transaction pre-initialization by making a request to Donate Widget Backend.
-
Donate Widget Backend creates an entry in the system about initiating the transaction and returns the unique id (in the form of UUID) of the transaction.
-
Donate Widget Backend returns transaction id to the Donate Widget SDK.
-
Donate Widget SDK redirects the user to a form in Donate Widget Frontend.
-
Donate Widget Frontend retrieves from the backend information about the created transaction (in point 4) using the previously obtained transaction id.
-
Donate Widget Backend returns transaction details to the Donate Widget Frontend.
-
The user fills in the form with card data and personal data and clicks “Confirm and Pay” button.
-
Donate Widget Frontend encrypts data with JWE standard.
-
Donate Widget Frontend makes a payment request (based on the previously received transaction id) to the Donate Widget Backend providing encrypted data collected from the user.
-
Donate Widget Backend makes transaction with 3D Secure request to the Acquirer.
-
Acquirer returns transaction with 3D Secure status.
-
Donate Widget Backend provide transaction status to Donate Widget Frontend.
-
Donate Widget Backend sends a postback about the completed transaction along with transaction status and a unique transaction id to the Customer Server (this step takes place if the Customer wants to use this option).
-
Donate Widget Frontend displays transaction status to the user and redirects him to the approciate site (redirect URL provided by the Customer).
-
Customer Server gets transaction details from Donate Widget Backend calling get transaction details method using transaction id (this step takes place if Customer wants to use this option).
-
Donate Widget Backend returns transaction details to the Customer Server.
After the user completes the transaction, it is highly recommended that the Customer gets the transaction details from Donate Widget Backend (as shown in point 17 & 18 of the diagram above) or listen for postbacks (as shown in point 15 of the diagram above).
User flow
This section describes each of the steps from end user point of view. Each of the steps is reflected in the pictures which are showing default application design.
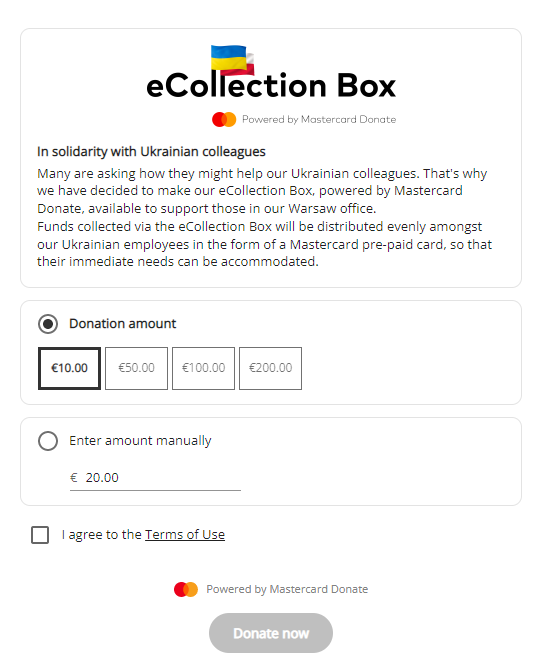
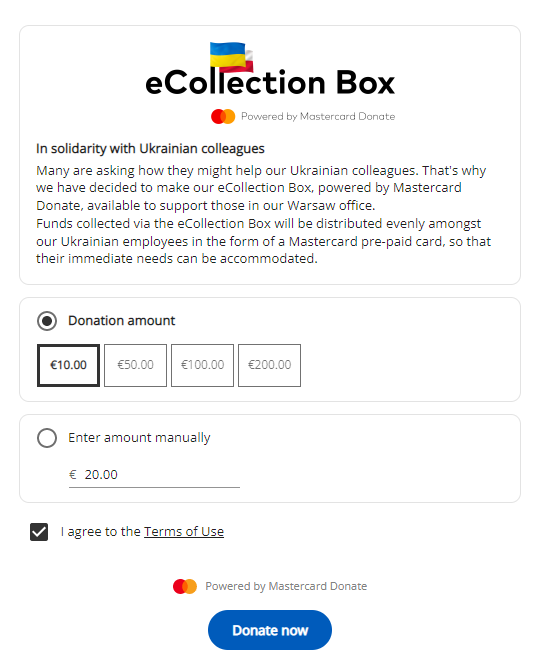
After the user selects the “make a donation” option, the redirection to a separate web page happens – hosted by Verestro – where the view for selecting the donation amount and accepting the terms of use appears:
The appearance of the donation form can be adapted to the expectations of the Customer, e.g. by adding his company's logo to the form.
|
|
|
| The default grant amounts and the minimum grant amount are configurable. The "Donate" button remains inactive until the user selects the amount of the donation and accepts the terms of use (this button is responsible for ordering the donation). After filling in all the required fields with the data, the "Donate" button is unlocked. |
|
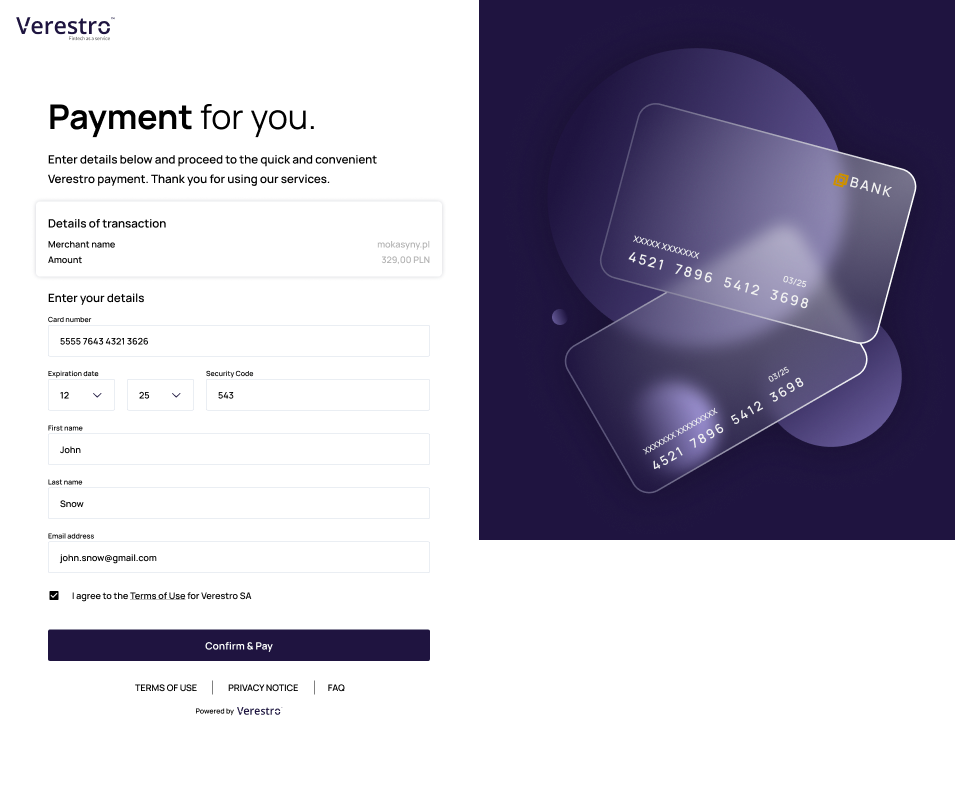
After clicking the "Donate" button, user will be redirected to the payment form - hosted by Verestro. Pictures and descriptions presented in the form example below are configurable depending on the needs of Customer a form for card data and personal data is displayed to the user. The picture below shows this form:
The appearance of the payment form can be adapted to the expectations of the Customer, e.g. by adding his company's logo to the form.
|
|
|
The user must fill in each of the fields with the appropiate data. Each parameter must meet the validation requirements, e.g. The card number must comply with the Luhn algorithm. The user must also confirm the acceptance of the terms of use. If the field's validation requirement is not met, the field is highlighted in red and the „Confirm and Pay” button remains inactive. The picture below shows a form with correctly filled data: |
|
|
|
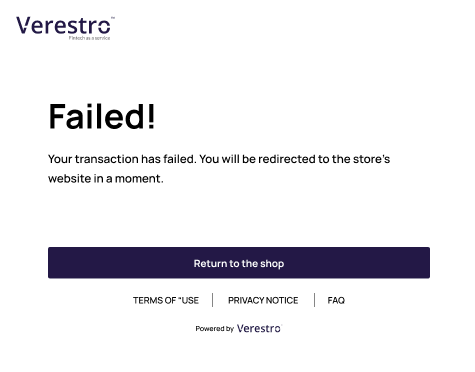
After pressing the "Confirm & Pay" button, the process of communication with the bank takes place. Upon its completion, the status of the transaction will be shown to the user. The pictures below show "success" and "fail" status view: |

|
|
|
|
Regardless of the transaction status, the user is redirected to the address provided by the Customer. The user can go to this address by clicking „Return to the shop” button or simply wait for an automatic redirection. |
|

At the each stage, the user can view the “Term of use”, “Privacy notice”, “FAQ” by clicking approciate option as shown on the screen below: