Paytool
A solution based on the Web Checkout product but extended by various payment methods such as Google Pay™, Apple Pay or Blik. The whole solution is based on the two integration models: payment using the Paytool frontend application or via a direct server to server connection. Our solution frees you from the need to integrate with acquiring institutions and banks. The payment process and threeDs authentication are performed on the Verestro side.
- Article
- What is an ACS in the 3DS Ecosystem?
- Multi-acquiring in eCommerce Payments
- How to increase approval rates in eCommerce?
- Payment service providers as eCommerce payment aggregators
- Direct Debit Payments from eWallet in eCommerce Environment
- Introduction
- Overview
- Use cases
- Onboarding
- How to integrate
- Test Guide
- Quick start sandbox in your app
- Paytool External API
- Paytool Internal API
- Paytool SDK
Article
You can find more knowledge about products on this site.
What is an ACS in the 3DS Ecosystem?
In today's rapidly evolving digital landscape, online card-not-present (CNP) fraud remains a persistent challenge for financial institutions and merchants alike. 3D Secure (3DS), particularly its modern iteration, EMV 3-D Secure (3DS 2.x), stands as the industry's answer to this threat. This sophisticated security protocol introduces an essential layer of authentication for online credit and debit card transactions, aiming to drastically reduce fraud while simultaneously improving the customer experience.
ACS in the 3DS Ecosystem
The "3D" in 3DS refers to the three interconnected domains:
- Acquirer Domain: Encompassing the merchant and their acquiring bank, which processes card payments.
- Issuer Domain: Representing the cardholder's issuing bank, responsible for the card itself.
- Interoperability Domain: The underlying infrastructure and systems that facilitate seamless communication between the acquirer and issuer during a transaction.
At the heart of the Issuer Domain lies the Access Control Server (ACS). This is the technology that Verestro has now secured EMVCo approval for. The ACS is the brain behind the cardholder's authentication experience, operating in real-time to assess transaction risk and, when necessary, challenge the cardholder for verification.
Why Choose the Verestro ACS?
Building and certifying your own ACS can take over a year and cost upwards of €100,000. Verestro ACS provides a ready-to-use, fully certified solution that eliminates these barriers - offering rapid deployment, reduced costs, and full compliance.
Core functions of Verestro ACS
-
Verifying whether a card number is eligible for 3-D Secure authentication
-
Determining if the consumer's device type supports 3-D Secure
-
Authenticating the cardholder or confirming account information during transactions
Benefits of Verestro ACS
-
Enhanced Customer Experience: Offer a fast, intuitive, and secure checkout process - reducing cart abandonment and improving satisfaction.
-
Optimized Authentication Performance: Benefit from fast, reliable authentication flows that minimize delays and reduce failed transactions.
-
Device-Agnostic Compatibility: Ensure seamless operation across all channels - web, mobile browsers, and mobile apps.
-
Frictionless and Low-Friction Authentication: Support risk-based authentication and modern low-friction methods like biometrics, helping reduce step-up challenges.
-
Higher Approval Rates with Lower Fraud: Improve authorization rates by up while maintaining high security standards. Reduce fraud on 3DS-enabled transactions compared to non-3DS transactions.
-
Regulatory Compliance Made Easy: Stay fully aligned with evolving EMV® 3-D Secure standards and PSD2 SCA requirements - no additional development needed.
-
Faster Time-to-Market: Avoid long certification cycles and heavy infrastructure costs.
Key Features
-
EMVCo Certified
-
SaaS Model: Scalable, reliable, and maintenance-free
-
Simple API Integration: Fast time-to-market
-
Powerful Admin Panel
-
Browse and review authentication events in detail
-
Manage challenge screens and user flows via a flexible UI builder
-
Define custom rules with a highly configurable Rule Engine
-
Dashboard providing insights and key statistics at a glance
Authentication Flows
Frictionless Flow
- The cardholder is authenticated without any additional input, based on a real-time risk assessment using data such as transaction history, device information, and behavioral analytics.
- Best for low-risk transactions – no user disruption.
Challenge Flow
- The cardholder is required to complete a step-up authentication, such as entering a one-time passcode (OTP) or using biometrics.
- Used for higher-risk or non-recognized transactions.
3RI (Three Requestor Initiated)
- Authentication initiated by the merchant or payment service provider without the cardholder actively being involved (e.g., for subscriptions or card-on-file payments).
- Enables secure recurring or delayed transactions.
SPC (Secure Payment Confirmation)
A new flow supported by some browsers (notably in the EU), using WebAuthn and device biometrics to allow strong customer authentication in a streamlined, secure manner.
Combines strong security with an excellent user experience.
Authentication methods
- One-time passcode (OTP) sent via SMS
- Out-of-band verification through a mobile app
- Decoupled authentication
- Biometric authentication
- Other methods supported by EMV® 3-D Secure 2.3.1 and EMV® 3-D Secure 2.2.0
Device Channels
- App-based
- Browser-based
Regulatory Compliance
Verestro ACS is fully compliant with major standards and certifications, including:
- EMV® 3-D Secure 2.3.1
- EMV® 3-D Secure 2.2.0
- PCI-DSS
- PCI 3DS
Verestro is excited to continue empowering the future of payments by providing our clients with the cutting-edge technology - Access Control Server. This milestone reinforces Verestro's position as a trusted innovator, dedicated to making online transactions safer, smarter, and more seamless for everyone. If you are interested in our solution, don't hesitate to contact us.
Multi-acquiring in eCommerce Payments
Acceptance of eCommerce payments
When you are thinking of starting acceptance of eCommerce payments via cards or other payment methods, you should definitely consider a long term strategy and a multi-acquiring scenario.
The starting point for any merchant, marketplace or other digital platform is the way you are going to charge users on the Internet. Normally, you are thinking of choosing an acquirer like Stripe, Adyen or local providers from your country. Let’s think of strategic implications.
Strategic implications
Assuming you have one acquiring partner at a time and you customize your platform to their requirement you are actually building a very strong dependency on this partner. Very often you will ask this acquirer to provide Card-on-File functionalities, cards of your users will be stored by this acquiring partner. Sometimes the acquirer will have features that support easier transaction conversion but they will be hosted on the partner side to avoid PCI DSS requirements and costs. By implementing such functionalities that will be good for your users and UX, you are actually becoming more and more dependent on your acquiring partner. It means that your negotiating power is going down and the cost of transaction processing will grow.
The bigger your business is, the bigger the problem is. What is the solution to such a situation?
Multi-acquiring
It is called multi-acquiring. You should choose a technology platform, compliant with PCI DSS requirements that can integrate with multiple acquirers globally so that you are not dependent on a single acquirer but have a technical platform which enables switching transactions from one acquirer to another one.
Such a platform should enable tokenization of cards and transactions, should take all PCI DSS problems from your shoulders, and should be integrated with multiple acquirers from the moment of start. Thanks to it, you can switch VISA transactions through one acquirer, Mastercard through another one. You can use one acquirer on Mondays and another one on Fridays. You can switch transactions done in Europe with one acquirer and performed by users from America with another acquirer.
It gives you flexibility. It improves conversion rates. It gives you the opportunity to negotiate transaction fees regularly. It does not increase costs on your side as you have multiple partners integrated to the platform which means that you do not need to cover all costs of integration yourself.
Multi-acquiring is a very powerful tool for developing your eCommerce business.
Thanks for reading.
How to increase approval rates in eCommerce?
Many merchants, especially in high risk area, face the problem of low approval rates. There are situations where 20-40% of transactions are declined. This is a real issue as it means a concrete loss of sales opportunity. In this article we will explain how it is possible to increase approval rates by using a multi-acquiring approach.
A standard eCommerce merchant signs a contract with one acquirer and enables users to use various ways of payment with this acquirer or payment gateway. This leads to the situation that the merchant is dependent on this acquirer and the choice of choosing payment methods is usually on the customer's side. It also means that there is no way to use active management of a payment method depending on transaction and user behavior.
Main reasons of declines are the following:
- 05 - Generic decline (do not honor, transaction not allowed ...) - around 30-40% of cases. It is possible to optimize acceptance by using another acquirer, changing payment methods etc.
- 51 - Insufficient funds - around 20-30% of declines. In such case the only way to improve approval rate is offering loan to customer, kind of Buy Now Pay Later solution
- 14, N7 - Incorrect number/account, wrong CVC - 10% of declines - requires good UX for data improvement
- 41 - Lost/Stolen card - 10% of declines
- 54 - Expired card - possibility to use automatic upgrade of card data in database
- and a few other reasons
Improvements in approval rates will appear once you start managing this situation by storing user and payment data, learning user and transactional behavior, and proposing to users such methods which are best suited for him. It requires that you build or use a card-on-file system or even "payment-on-file system" that is independent from your main acquirer and you start actively proposing and testing payment methods to your customers.
When you learn that a particular payment method does not work, your gateway should propose an additional method of payment, especially using tokens and local payment methods which can improve approval rates a lot.
Once you (or your partner like Verestro) store payment methods, you can automatically update the user payment method data to avoid reasons of an incorrect number, wrong CVC, expired card. By using tokenization and wallet solutions you can also improve approval rates substantially.
Contact us if you want to go into details of this process.
Payment service providers as eCommerce payment aggregators
In the digital age, where online shopping has become everyday life for millions of consumers around the world, eCommerce payments play a key role in shaping the shopping experience. Convenience and security are factors that influence purchasing decisions, and technological innovations make the payment process more and more complex and diverse.
ECommerce payment - what is it?
ECommerce payments are financial transactions carried out over the Internet that allow users to purchase for their shopping online. They include various payment methods such as:
- Credit and debit cards - the most popular payment method. It involves providing your payment card (e.g. Visa or Mastercard) details in the payment form issued by the payment gateway.

- Electronic wallets - services such as Apple Pay or Google Pay where card tokens generated for a specific card are returned to make a payment.


- Open banking - direct transfers from your bank account.

- Crypto - an increasingly popular method, although less common. This is a way of making transactions in which digital currencies based on blockchain technology are used instead of traditional fiat currency (such as dollars, euros or zlotys), e.g. Bitcoin, Ethereum, Litecoin or Ripple




ECommerce payments place a strong emphasis on security and convenience to meet the needs of both sellers and consumers. Additionally, they often involve various security systems, such as SSL, to protect users' personal and financial information and to
prevent them from frauds.
As this field develops, more and more eCommerce payment methods are being created, and therefore there is a need for entities to aggregate available payment options in one place and allow them to manage sensitive card data in the name of the merchants that are not PCI DSS compliant. Such an entity is the Verestro Paytool, a payment gateway and a payment service provider that supports above mentioned payment methods such as credit and debit cards, payment with Google Pay and Apple Pay wallets and payment using the BLIK code.
How does it work?
- Selection of goods or services
- The customer selects the products or services he or she wants to buy and adds them to a shopping cart on the online store's website.
- Moving to checkout
- After completing the purchase, the customer goes to the “checkout” section, where he or she enters his/her contact information, shipping address and chooses a payment method.
- Choosing a payment method
- Online stores offer various payment methods, such as: Credit or debit card payments (Visa, Mastercard, etc.).
- Credit and debit cards - the most popular payment method. It involves providing your payment card details in the payment form issued by the payment gateway.
- Electronic wallets - services such as Apple Pay or Google Pay where card tokens generated for a specific card are returned to make a payment.
- Open banking - direct transfers from your bank account.
- Crypto - an increasingly popular method, although less common.
- Online stores offer various payment methods, such as: Credit or debit card payments (Visa, Mastercard, etc.).
- Payment authorization
- Depending on the payment method selected, the authorization process can be carried out in different ways:
- Card payment: the customer enters the card data (number, expiration date, CVV code) and approves the transaction. The payment system (e.g. Stripe, PayPal) then sends the data to the bank for authorization.
- Online transfer: the system redirects the customer to his/her bank's website, where he/she logs into his/her account and approves the transfer.
- Electronic wallet: after selecting a payment method, the customer logs into his/her wallet (e.g. PayPal), where he/she approves the payment.
- Depending on the payment method selected, the authorization process can be carried out in different ways:
- Transaction security
- Transactions are usually secured with encryption protocols, such as SSL (Secure Socket Layer), to prevent third parties from intercepting payment data.
- In addition, some payment methods (such as card payments) require identity verification, such as 3D Secure, which is an additional verification step (such as an SMS code or approval in a bank app).
- Transfer of funds
- After a successful payment, the funds are transferred to the seller's account. Transaction processing time may vary depending on the payment method selected.
ECommerce payment flow using the Paytool payment service provider
The first step of each transaction always takes place in a merchant's application. Such an application is usually integrated with the various payment gateways (payment service providers) such as the Verestro Paytool. Choosing to pay using a particular payment service provider redirects the payer to the PSP's web view, where all payment methods offered by the PSP are listed. The view of such a use case from the end user's perspective has been shown below.
|
|
|
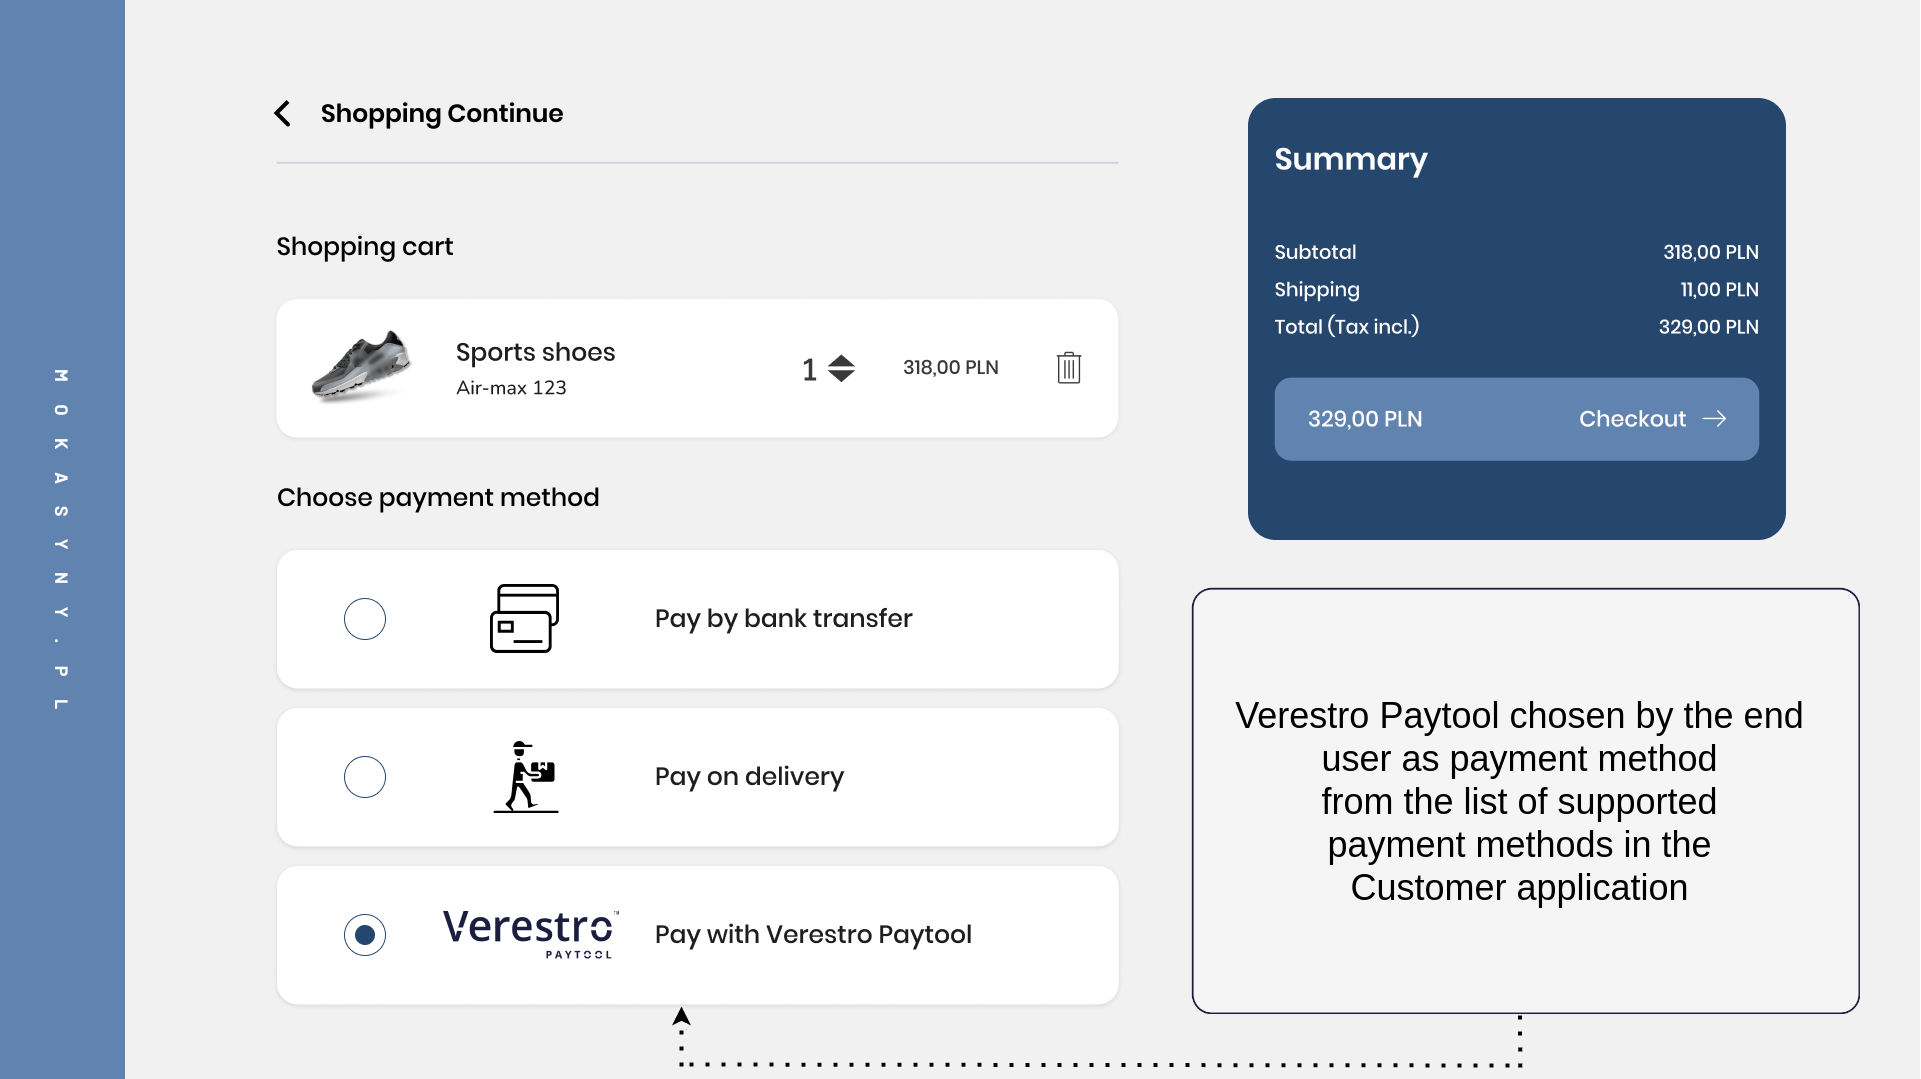
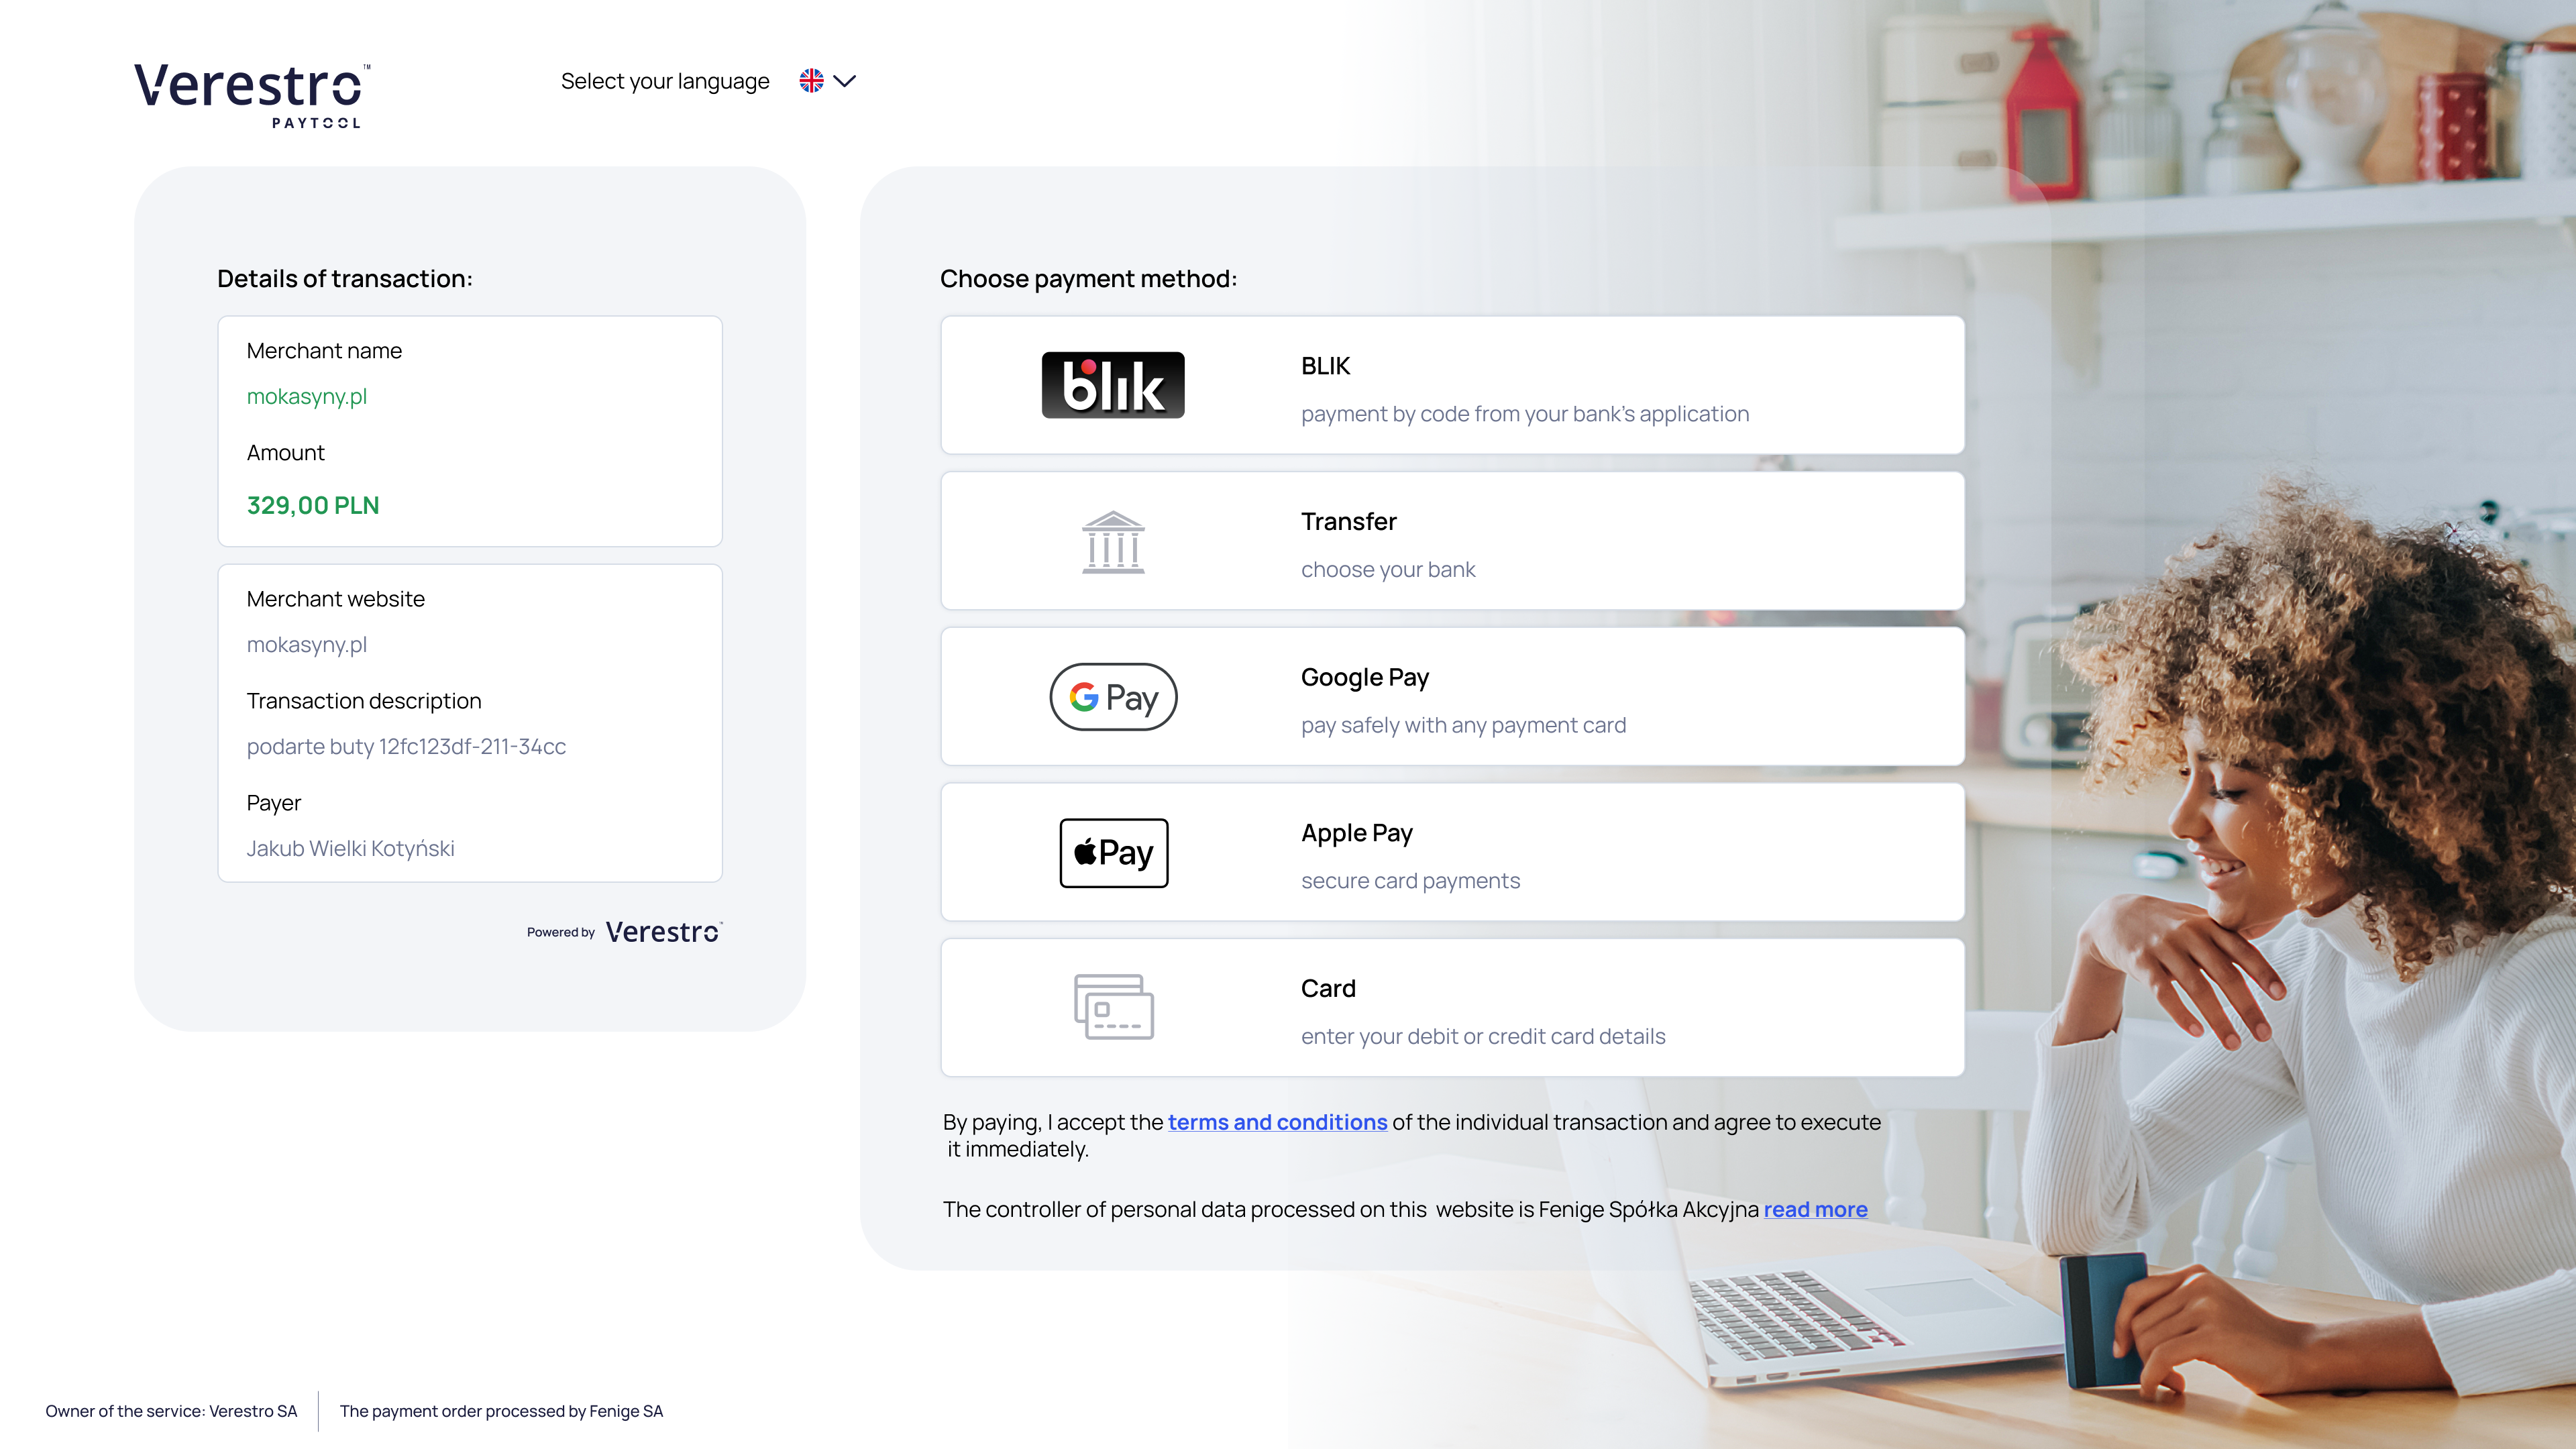
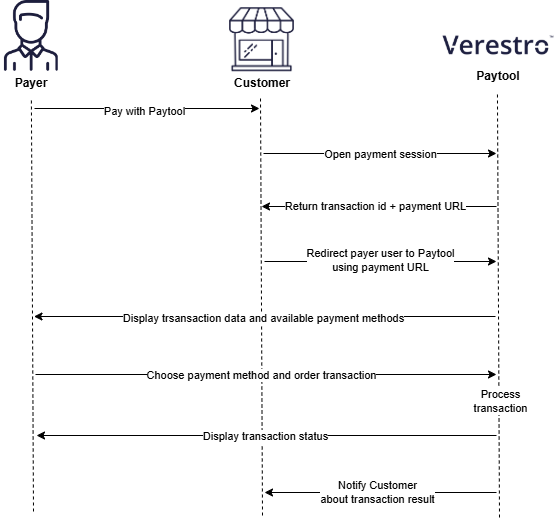
At the level of the view of the list with all available payment methods, the payment service provider - in this case the Verestro Paytool - is already responsible for the entire transaction. Regardless of which eCommerce payment method the payer chooses, the payment service provider must enable the payer to write out the card data or retrieve it from the mobile wallet (e.g. Google Pay, Apple Pay or Click to Pay), check the correctness of the data, perform payer and their card authentication (e.g. 3D Secure) or finally perform the transaction itself and inform the merchant and the payer about transaction final status.
How to integrate with the Verestro Paytool?
Leverage our quick and easy integration! Here you'll find instructions on how to integrate the Verestro Paytool solution: How to integrate | Verestro Developer Zone. Before using this solution, you must complete the onboarding process and create an account in the Verestro Paytool system.
If you are interested in Verestro's payment gateway, visit our website and contact us.
Direct Debit Payments from eWallet in eCommerce Environment
There is a new payment scenario appearing in the eCommerce landscape – payments directly from a wallet account. Let me describe this use case in this article.
Let’s imagine you are a merchant or a marketplace where multiple users are using cards or various local payment methods for payments. It is obvious that Merchant Fee becomes an important cost factor in your business. Sometimes you pay 1%, but sometimes it can go up to 2-3-5%. There are several ways of limiting this cost – like multi-acquiring described in another article, but one of the interesting ways of doing so is to create a wallet account with an IBAN for the user at the moment of transaction and enable him/her to make a banking transfer in order to charge this account later.
This process can work in the following way:
1. User chooses a product to purchase
2. Merchant informs the user that they will receive a 0.5% discount if they pay by banking transfer
3. User confirms payment and gets an IBAN
4. User transfers money to the IBAN
5. Merchant charges this account
This process can be very useful as after making this transaction it is more likely that the user will repeat this payment process in the next transaction. Thanks to this the merchant can limit their acquiring fees because eventual transaction costs are moved to the user who is initiating a banking transfer in this case. In many countries, a local banking transfer or SEPA transfers are for free, so the users do not have obstacles and can use this payment method any time they come back to the merchant.
In the case of marketplaces, this IBAN can also be used for merchants registered at a marketplace to process a transaction in and out in an effective way.
Please contact us if you are interested in similar use cases.
Introduction
This section briefly describes what Paytool is used for and how to use it. You will find more detailed information about the solution in the following sections.
Paytool is a secure and convenient payment solution offered by Verestro. It enables merchants to accept card payments through multiple channels, including Google Pay™, Apple Pay and BLIK.
With Paytool, you are not required to handle sensitive card data or manage PCI DSS compliance. Verestro manages the security, authorization, and authentication processes, including support for 3D Secure transactions.
Depending on your business needs, you can integrate Paytool as a standalone solution (Web integration) or as part of a more comprehensive system (API integration).
Tip: Check it now. Verestro Paytool demo application is available here.
How to connect with us?
The Paytool solution provides three independent integration paths.
Note: It is required that you have an account in Acquirer's system which will settle your transactions. For more informations please contact our Sale Department. Check our Onboarding chapter for more info. We are suggesting to use Fiserv Polska S.A. as this is our partner acquiring institution and we are fully integrated with this Acquirer
Web integration
The first way is that after opening a payment session, your browser should redirect the payer to the Paytool application or open it in iframe. Verestro will be fully responsible for the execution of transactions and handling 3D Secure authentication. In the application the payer can see the transaction metadata and chooses payment method he wish to pay. All required payment data is transferred to the Verestro Paytool backend over the Verestro internal network.
Iframe integration
Another method of integration with Paytool is to embed our solution on your store’s website in the form of an iframe. In this case, the payer is not redirected to our payment gateway page. Instead, the gateway is loaded directly within your application. Here, the payer selects a payment method from the list of options displayed by Paytool. However, the payment confirmation takes place within your application, since your app provides the “Pay” button. This implementation is designed to prevent situations in which the payer completes a payment within Paytool while the merchant’s application also offers alternative external payment methods that could still process a payment for the same product.
API integration
The last option of the integration is to use communication server to server. In this case, after opening a payment session, you can carry out the payment process using the API methods provided by us. Your server should then integrate with our API, which allows you to make payments and carry out the 3D Secure process. Verestro does not provide any frontend application in this way of integration.
Overview
This document provides a description of functionalities offered by Verestro Paytool. Our solution supports various payment methods such as Google Pay™, Apple Pay, Blik and Debit/Credit Card in the form of the payment gateway. In addition, you can decide which payment methods should be enabled. Simply put, you may decide that, for example, you want Verestro Paytool to provide payment via Google Pay but payment via Debit/Credit Card should be disabled. In such a situation, the end user will see the Google Pay as the availabe payment method in the Verestro Paytool payment form, but the Debit/Credit Card payment method will not appear at all.
Transaction process mainly takes place on Verestro's side. This means that you are completely relieved of responsibility for processing the transaction and/or performing 3D Secure authentication. The only action that the you must do is to provide metadata of the transaction, which includes order number, description, amount, currency and some optional parameters.
Important! Note that if you require the settlement of the transaction by an Acquirer to which Verestro is not integrated there will be required new integration between Verestro and the new Acquirer. You should provide the specification of the new Acquirer which will allow us to perform integration.
Abbreviations
In this chapter there are abbreviations and acronyms used in the document listed in below table.
|
Abbreviation |
Description |
|
ACQ |
Acquiring Institution / Acquirer |
|
ACS |
Access Control Server |
|
SDK |
Software Development Kit |
|
PSP |
Payment Service Provider |
|
OS |
Operative System |
|
Mid |
Merchant Identifier |
|
PCI DSS |
Payment Card Industry Data Security Standard |
|
PAN |
Permanent Account Number |
|
CVC |
Card Verification Code |
|
3DS |
3-D Secure |
|
DCC |
Dynamic currency conversion |
Terminology
This section explains a meaning of key terms and concepts used in the document.
|
Name |
Description |
|
Customer/Merchant |
Institution which uses Verestro products. This institution decides which payment method should be available in the solution and how transaction should be processed. |
|
End user/payer |
The entity which uses Paytool solution to pay for ordered good from Customer. It is root of entity tree. End user is an owner of the wallet/card and he decides to pay for the purchase using Paytool solution, selecting it from the list of payment methods available in the Customer application. |
|
Payment service provider |
The entity which provides a payment services for external Customers who do not have direct integration with acquirers or are not PSI DSS compilent. From the perspective of he Paytool application, Verestro is the PSP. |
|
Card |
Card belongs to the user. If user intends to pay with the Paytool solution using plain card payment method, then has to insert required card's data to the appropriate fields shared by the Paytool solution payment form. Card data will not be stored in the Verestro system. They will be provided to Acquirer. |
|
Card payment token |
It is a numerical value in the form of a PAN number. It shows a given card from Google Pay or Apple Pay wallet. The card payment token replaces the card number and is delivered by Google Pay/Apple Pay to Verestro if the end user selects one of the two above mentioned payment options. Verestro passes this value to Acquirer for the payment to be made. |
|
Authorization Method |
The way of the authentication of the Google Pay™ card transaction. Verestro supports followed authorization methods: |
|
Gateway Id |
Phrase/value that identifies a given Payment Service Provider in the Google Pay™ system. The Merchant provides gateway Id to Google Pay™ to obtain a card payment token. By provided gateway Id, Google Pay™ encrypts the card payment token with the appropriate public key. Verestro is defined by a gateway Id with the value |
|
Gateway Merchant Id |
Unique Customer identifier assigned by Verestro during the onboarding process. This identifier is in the form of a |
|
Acquirer |
Institution that settles payments. Paytool communicates with the Acquirer to order the transaction and authenticate the card holder using the 3D Secure protocol. |
|
MID |
Merchant identifier. This entity is represending Customer in the Acquirer's system. Customer has to provide the mid information to enable mid configuration in the Verestro system. Required to process transactions and 3DS process via Verestro system. |
|
Bank/Issuer |
Card issuing institution. In the case of an e-commerce transaction, this entity is responsible for checking whether the cardholder's balance has the appropriate amount of funds to perform a given transaction, determining whether 3D secure authentication is necessary or simply checking whether the card is active. |
|
Cardholder |
This is the end user who pays for his purchases using one of the available payment options in Verestro Paytool. |
|
PAN |
It is 7-16 digits of the credit/debit card number. These digits contain the Permanent Account Number assigned by the bank to uniquely identify the account holder. It is necessary to provide it when end user wants to pay with a card for purchases via Verestro Paytool solution. |
|
CVC |
Card Verification Code. It is a type of security code protecting against fraud in remote payments. CVC is necessary to provide it when end user wants to pay with a card for purchases via Paytool solution. |
|
Expiration date |
It is a date of the card validity ending and contains two values – month/year - for example 01/28. Card will be valid to the last day of the month of the year showed on it. It is necessary to provide it when end user wants to pay with a card for purchases via Verestro Paytool solution. |
|
3DS |
3-D Secure is a method of authorization of transaction made without the physical use of a card, used by payment organization. The 3DS process in the Verestro Paytool solution is performed internally in the Verestro system which means the Customer is not responsible for end user authentication. |
|
PCI DSS |
It is a security standard used in environments where the data of payment cardholders is processed. The standard covers meticulous data processing control and protection of users against violations. |
|
Dynamic currency conversion |
Dynamic currency conversion is a process whereby the amount of a credit card transaction is converted to the currency of the card's country of issue. |
|
Tokenization |
A security measure where sensitive payment data, like credit card numbers, is replaced with a unique string of characters called a "token". |
|
Card on file |
Verestro PCI DSS cards storage. It allows for storing the card data of a given payer and using it in subsequent transactions without having to re-enter this data. |
Implementation models
Integration with Paytool should be performed by API call. To initiate a payment, you must request an transaction initialization method, which in response opens a payment session with a unique identifier. Once you have an active payment session and its identifier, you can choose one of three available payment processing methods described in Redirect your payer (Web integration), Payment process via API (API integration) and Embed - Payment in iframe chapters.
Note: The X-509 certificate data will be signed during the onboarding process.
Redirect your payer
The first integration path is to redirect your payer to the payment web view. This implementation model is more comprehensive because when redirecting the payer, you only need to provide us with transaction metadata and the payment session identifier. We are responsible for the rest of the payment process. Do not forget to initialize the payment session for the transaction before redirecting the payer to the Paytool web view. To initialize payment session use the transaction initialization method.
Tip: We highly recommend using Redirect your payer integration model because most of the processes and responsibilities are handled on our side and the integration process is very smooth.
Example request body of the transaction metadata provided by Customer
{
"transactionId": "42be3d06-4577-4a9f-b525-2cfaba244557",
"currencyCode": "PLN",
"amount": 100,
"description": "Test transaction",
"formLanguage": "en",
"redirectUrl": {
"successUrl": "https://paytool.verestro.com/demo/?success=1",
"failureUrl": "https://paytool.verestro.com/demo/?success=0"
},
"sender": {
"firstName": "Yoshimoto",
"lastName": "Imagawa",
"address": {
"countryCode": "PL",
"city": "Kyoto",
"postalCode": "12-345",
"street": "Ichijo",
"houseNumber": "1"
}
},
"merchantUrl": "https://paytool.verestro.com/demo/",
"orderNumber": "1"
}Sequence diagram of the payer redirection process
@startuml
skinparam ParticipantPadding 30
skinparam BoxPadding 30
skinparam noteFontColor #FFFFFF
skinparam noteBackgroundColor #1C1E3F
skinparam noteBorderColor #1C1E3F
skinparam noteBorderThickness 1
skinparam sequence {
ArrowColor #1C1E3F
ArrowFontColor #1C1E3F
ActorBorderColor #1C1E3F
ActorBackgroundColor #FFFFFF
ActorFontStyle bold
ParticipantBorderColor #1C1E3F
ParticipantBackgroundColor #1C1E3F
ParticipantFontColor #FFFFFF
ParticipantFontStyle bold
LifeLineBackgroundColor #1C1E3F
LifeLineBorderColor #1C1E3F
}
actor payer
participant "Customer front" as cfront
participant "Customer backend" as cback
participant "Paytool front" as pfront
participant "Paytool backend" as pback
payer->cfront: Pay with Paytool
cfront->cback: Payer choosed Paytool
cback->pback: Customer authorization + transaction metadata
note left of pback: Store transaction metadata + open payment session
cback<-pback: OK + transaction id + redirect url
cfront<-cback: OK + transaction id + redirect url
cfront->pfront: Redirect + transaction id
pfront->pback: Get transaction data + merchant payment methods
pfront<-pback: OK response
payer<-pfront: Display transaction + payment methods
@enduml
Payment process via API
The second integration path allowing to continue the payment process is to integrate your application directly to Paytool API. As the first step of this approach you should request transaction initialization method to create a payment session in our system. In return you will receive a transactionId parameter which can be used in the pay method and the rest of the Paytool API methods in the context of the current transaction. In the pay method you determine which of the available payment methods you want to use. The payment methods available for this integration path are listed in the Payment methods section.
Info: In this model we do not provide a frontend view.
Example request body of the transaction metadata provided by Customer
{
"transactionId": "42be3d06-4577-4a9f-b525-2cfaba244557",
"currencyCode": "PLN",
"amount": 100,
"description": "Test transaction",
"formLanguage": "en",
"redirectUrl": {
"successUrl": "https://paytool.verestro.com/demo/?success=1",
"failureUrl": "https://paytool.verestro.com/demo/?success=0"
},
"sender": {
"firstName": "Yoshimoto",
"lastName": "Imagawa",
"address": {
"countryCode": "PL",
"city": "Kyoto",
"postalCode": "12-345",
"street": "Ichijo",
"houseNumber": "1"
}
},
"merchantUrl": "https://paytool.verestro.com/demo/",
"orderNumber": "1"
}Sequence diagram of the payment via API process
@startuml
skinparam ParticipantPadding 30
skinparam BoxPadding 30
skinparam noteFontColor #FFFFFF
skinparam noteBackgroundColor #1C1E3F
skinparam noteBorderColor #1C1E3F
skinparam noteBorderThickness 1
skinparam sequence {
ArrowColor #1C1E3F
ArrowFontColor #1C1E3F
ActorBorderColor #1C1E3F
ActorBackgroundColor #FFFFFF
ActorFontStyle bold
ParticipantBorderColor #1C1E3F
ParticipantBackgroundColor #1C1E3F
ParticipantFontColor #FFFFFF
ParticipantFontStyle bold
LifeLineBackgroundColor #1C1E3F
LifeLineBorderColor #1C1E3F
}
actor payer
participant "Customer front" as cfront
participant "Customer backend" as cback
participant "Paytool backend" as pback
payer->cfront: Payer wants to pay
cfront->cback: Order payment
cback->pback: Customer authorization + transaction metadata
note left of pback: Store transaction metadata + open payment session
cback<-pback: OK + transaction id
cback-->cfront
note right of cfront: At this point, the Customer decides how to present the transaction to the payer
cfront-->cback
cback->pback: Request proper payment method / executing 3D Secure
cback<-pback: Transaction result
note right of cfront: At this point, the Customer decides how to present the transaction result to the payer
cfront<--cback
@enduml
Embed - Payment in iframe
Note: Unlike the other integration models, the transaction initialization method in this flow is executed only after the payer's data and payment instrument details have been successfully collected.
The last of the supported integration paths involves embedding Paytool directly into your application, which requires the use of a dedicated SDK. The process begins with the backend requesting a list of the user's saved cards via the paymentMethods endpoint. Depending on the response and the availability of the "Card on File" service, the initialized SDK displays either a list of available cards or a form for new card entry within a secure iframe. Once the user confirms their selection by clicking the "Pay" button, the application retrieves the data from the iframe using the getFormState method. Based on this information, the backend creates a payment session via the transactionInitialization endpoint to obtain a transaction identifier (transactionId). Finally, this identifier is passed to the SDK's pay method to authorize and finalize the payment process. The payment methods available for this integration path are listed in the Payment methods section.
[Simplified sequence diagram from tech docs]\
Note: If you intend to use Paytool iframe, ensure that strict domain whitelisting (e.g., Content Security Policy) is disabled in your application. This is necessary because the cardholder authentication process often requires loading HTML templates directly from the card-issuing bank. Since each bank operates on a unique domain, restrictive whitelisting may block these resources, preventing the user from completing the transaction.
Important! It is crucial to understand that in this integration model, the "Pay" button must be a component of your application's UI. The Paytool iframe does not render its own submission button. Your application is fully responsible for controlling the payment flow by listening for user events (like the "Pay" button click) and invoking the corresponding Paytool SDK methods at each step.
Example request body of the transaction metadata provided by Customer
Sequence diagram of the payment via API process
@startuml
skinparam ParticipantPadding 30
skinparam BoxPadding 30
skinparam noteFontColor #FFFFFF
skinparam noteBackgroundColor #1C1E3F
skinparam noteBorderColor #1C1E3F
skinparam noteBorderThickness 1
skinparam sequence {
ArrowColor #1C1E3F
ArrowFontColor #1C1E3F
ActorBorderColor #1C1E3F
ActorBackgroundColor #FFFFFF
ActorFontStyle bold
ParticipantBorderColor #1C1E3F
ParticipantBackgroundColor #1C1E3F
ParticipantFontColor #FFFFFF
ParticipantFontStyle bold
LifeLineBackgroundColor #1C1E3F
LifeLineBorderColor #1C1E3F
}
actor payer
participant "Customer front" as cfront
participant "Customer backend" as cback
participant "Paytool backend" as pback
@enduml
Application components
Application components are all Verestro's internal services which are taking part in the Paytool processes. This chapter describes every component of the Verestro Paytool solution along with it's responsibility.
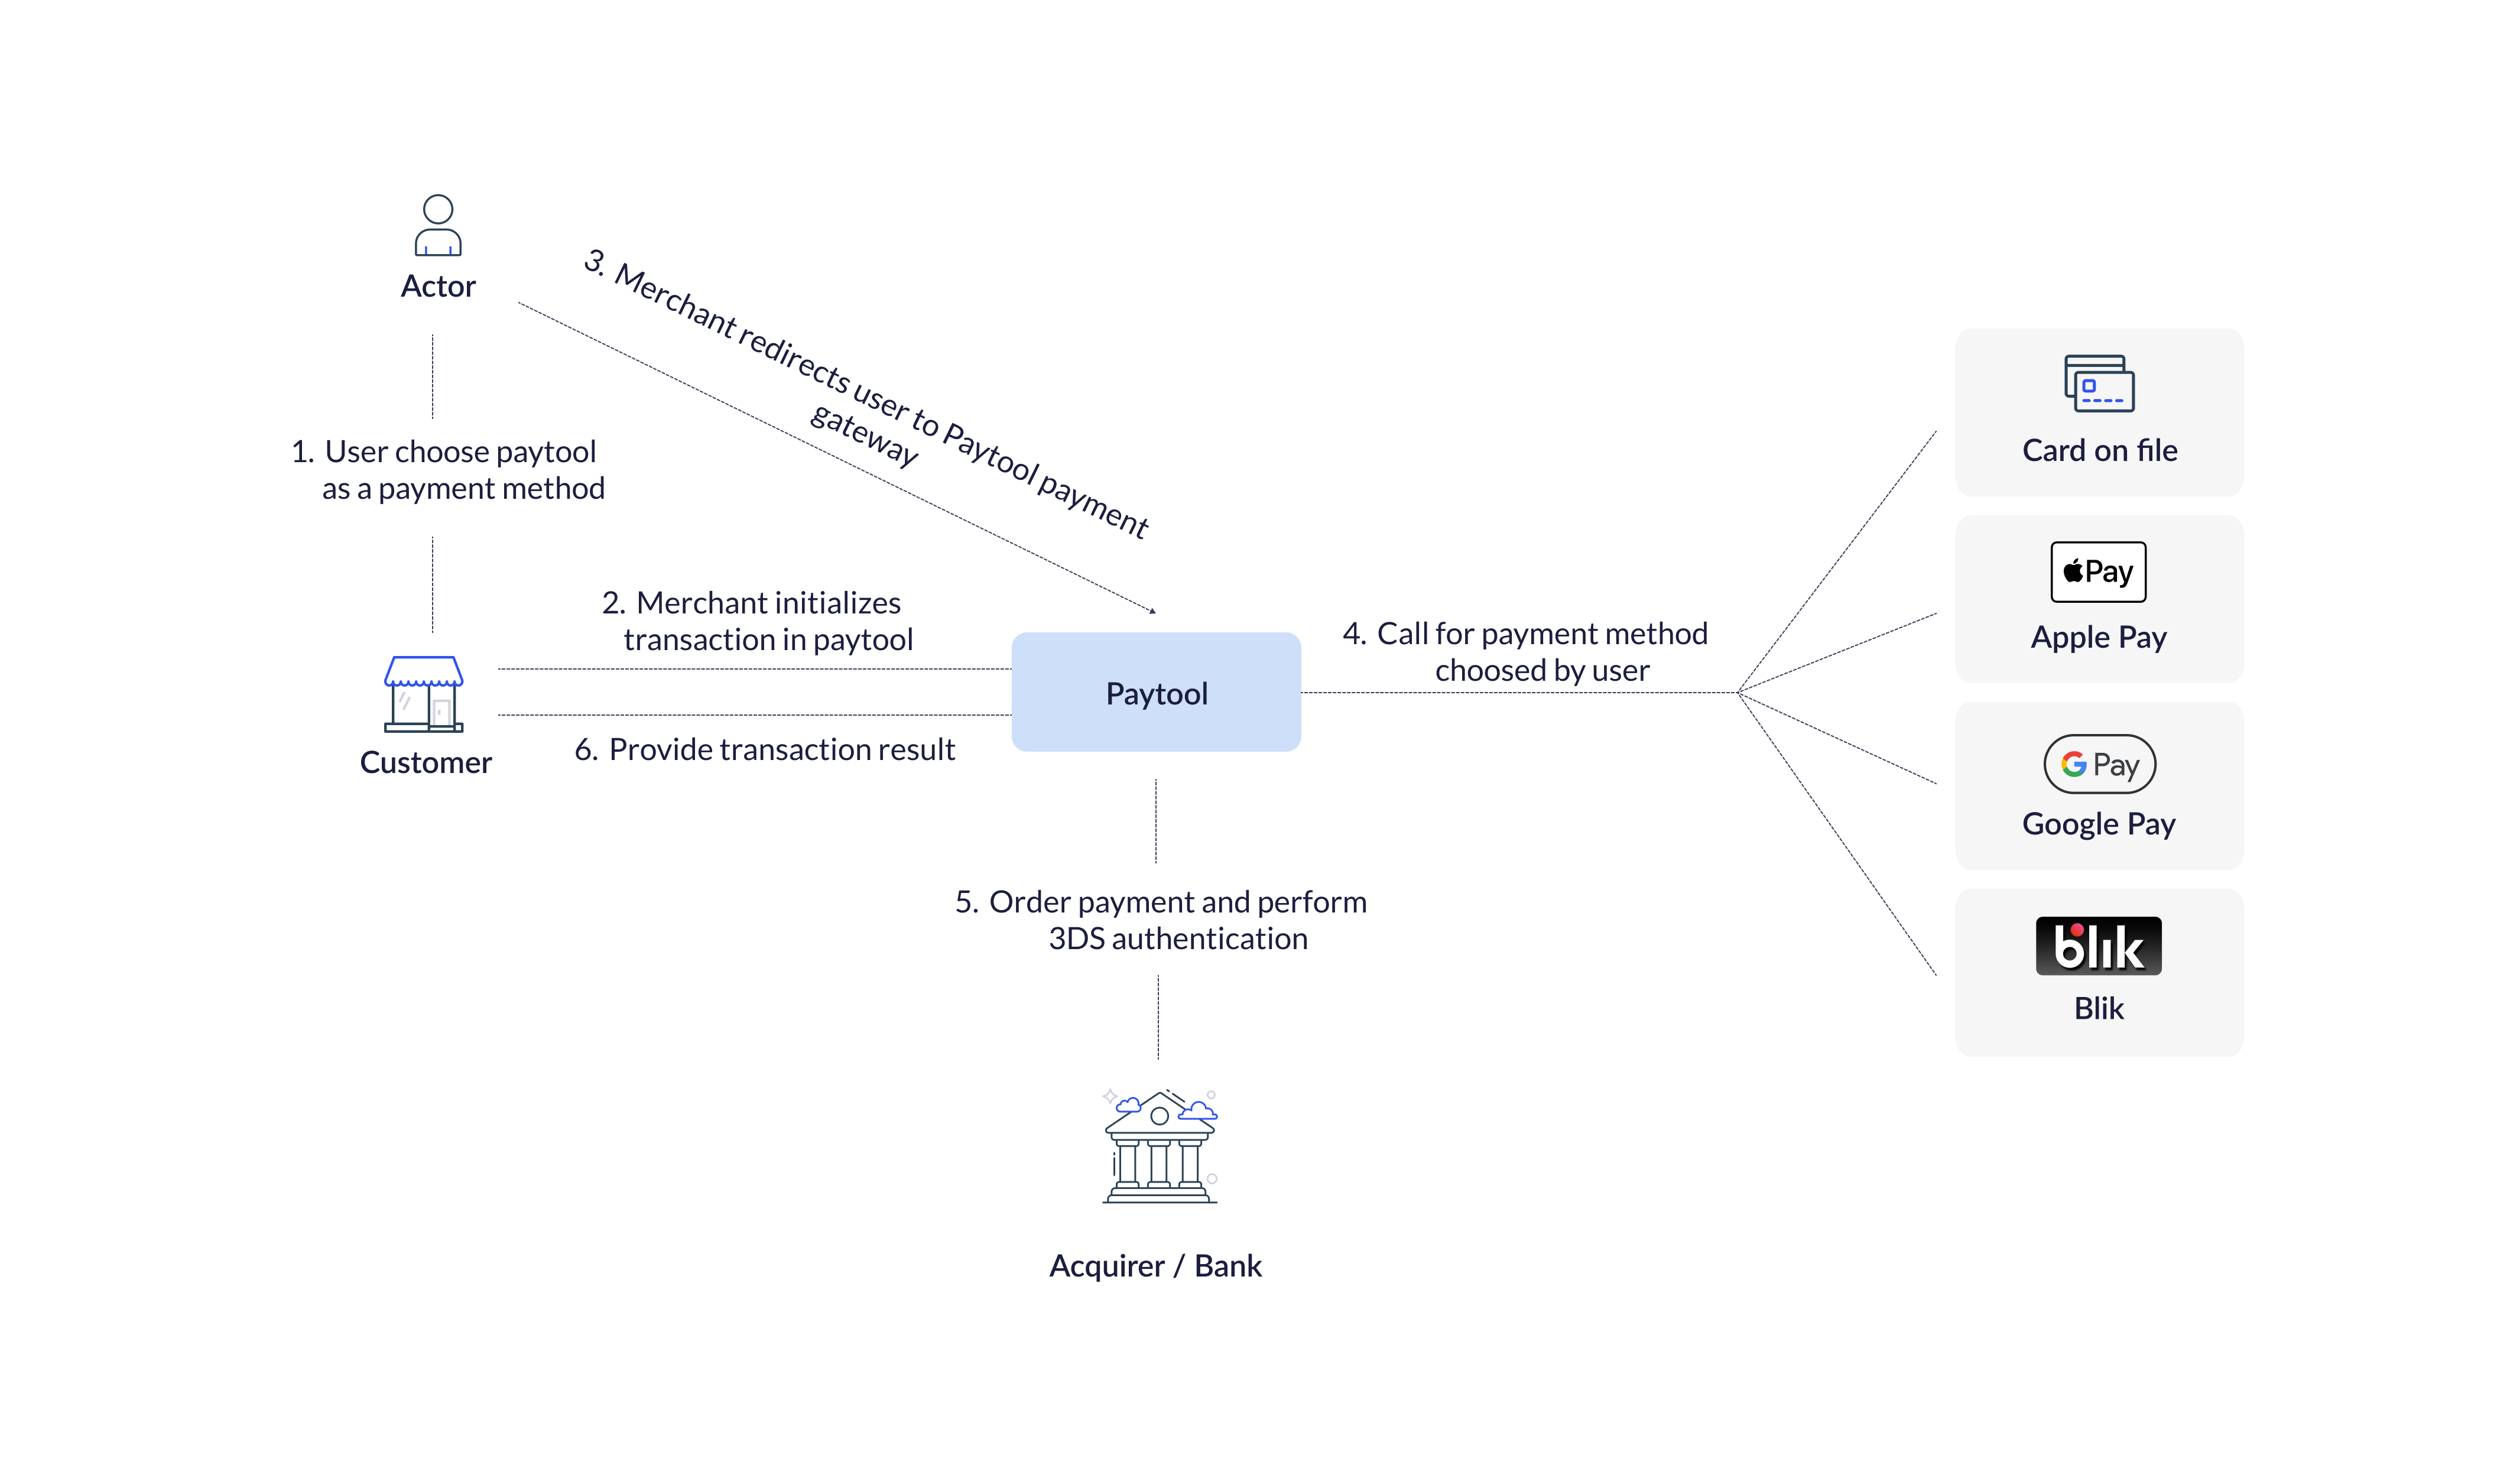
Verestro Paytool Server
Verestro Paytool Server is the backend component which consists of few internal services responsible for managing cards, card payment tokens and user data, processing transactions and 3D Secure, send notification to the Customer and enduser and storing transaction history. This component is also responsible for connection with Acquirers. Services included in the Verestro Paytool backend can be divided into two groups:
|
Services that are the part of the Verestro Paytool Solution. |
|
Services supporting the functionalities offered by Verestro Paytool Solution. |
|
Services that are the part of the Verestro Paytool Solution |
|
|
Component |
Description |
|
Paytool API |
A service with all methods required to complete the entire transaction process. The methods are called by Paytool Frontend App or by your API in the right order to make the entire payment and 3D Secure process. This service also communicates with the Verestro Acquirer Connector, which orders the execution of the transaction. The last and probably the most important element for which the Paytool API is responsible is opening a payment session and saving the transaction entities in the Verestro system.
Another role of this component is to communicate between the Verestro system and the Acquirer's system. This service transfers transaction requests to the Acquirers and also informs if the 3D Secure authentication process is required.
This component stores cards in our PCI DSS database in the case of Card on File payment method usage. |
|
Services supporting the functionalities offered by the Verestro Paytool Solution |
|
|
Component |
Description |
|
Notification Service API |
A service responsible for sending notifications to end users and Customers. Notifications to end user can be sent via e-mail. The Customer can receive transaction postback via a specific URL he provided. |
Verestro Paytool Frontend
Verestro Paytool Frontend is the frontend component consists of two internal services which are responsible for displaying all necessary data comming from Paytool API. Verestro Paytool Frontend can be divided into two services:
|
Component |
Description |
|
Paytool Frontend App |
This is a frontend application hosted by Verestro. This is where you redirect the user when you are using the Redirect your payer integration path. This service is intended to display transaction data to the end user, enable him to select a payment method and confirm payment. To perform the above actions, the Paytool Frontend App communicates directly with the Paytool API. This service does not participate in the payment process at all if you use the Payment process via API integration path. |
|
Paytool SDK |
The Paytool SDK is a component that facilitates embedding the Paytool application within the merchant's application as an iframe - this applies to the Paytool in iframe integration path. The embedding process eliminates the need to redirect the user to the Paytool web application. Note: The iframe integration is still under development. Currently, we support card payments in Paytool in iframe integration path. |
Allowed card networks
Listed below are the types of cards supported in transactions using Paytool application:
|
Card type |
|
|
|
|
|
|
Security
Due to the need to process card data and perform money operations, we had to create security measures that would not allow violations of the transaction process and prevent unauthorized entities from using the solution. In this chapter, we described the main security elements for customers and their transactions.
The sequence diagram below illustrates the application workflow
@startuml
skinparam ParticipantPadding 30
skinparam BoxPadding 30
skinparam noteFontColor #FFFFFF
skinparam noteBackgroundColor #1C1E3F
skinparam noteBorderColor #1C1E3F
skinparam noteBorderThickness 1
skinparam sequence {
ArrowColor #1C1E3F
ArrowFontColor #1C1E3F
ActorBorderColor #1C1E3F
ActorBackgroundColor #FFFFFF
ActorFontStyle bold
ParticipantBorderColor #1C1E3F
ParticipantBackgroundColor #1C1E3F
ParticipantFontColor #FFFFFF
ParticipantFontStyle bold
LifeLineBackgroundColor #1C1E3F
LifeLineBorderColor #1C1E3F
}
participant "Customer Frontend" as browser
participant "Customer Backend" as psdk
participant "Paytool Frontend" as pfront
participant "Paytool Backend" as pback
participant "Acquirer" as acq
note right of browser: User chooses "Pay with Verestro Paytool"
browser->psdk: Transaction initialization + metadata
psdk-->pback: Transaction initialization + metadata
pback->pback: Validate transaction metadata
pback->pback: Store transaction session data
pback->psdk: OK + transactionId
psdk->pfront: Redirect end user to Paytool Frontend + transactionId
pfront-->pback: Get transaction metadata + list of the supported payment options
pback-->pfront: Return transaction metadata + list of the supported payment options
pfront->pfront: Display transaction metadata + list of the supported payment options
pfront->pback: Process transaction by chosen payment option
pback->pback: Consisteny validation between current transaction data and provided when opening the session
pback->acq: Order transaction
@enduml
Payment session
In order to start a payment in Paytool, a payment session must first be opened. Opening a payment session involves authorizing your merchant account and sending transaction metadata to Paytool API. Transaction metadata should be encrypted using JWE encryption standard. Based on the obtained transaction data, validation of each data is performed and then a transaction object is created and saved in the internal Verestro database. Thanks to authorization, the context of your merchant account is assigned to the created transaction. Once you have created a payment session, you will receive an identifier for this transaction. Using this identifier you will be able to continue the payment process and we will be able to check whether there has been any interference in the transaction data you provided and interrupt the process if necessary.
Note: We does not store any sensitive data such as PAN or CVC in our system. The obtained data are only required to be transferred to the Acquirer to perform transaction.
Authorization
Use cases
This chapter is mainly dedicated to the appearance of the application and a description of the individual paths that the end user will follow depending on the payment method he choosed. Each of the payment method available in Paytool application is described in a separate section. Additionally, every chapter contains diagrams depicting the entire transaction process per payment method.
Tip: Check it now. Verestro Paytool demo application is available here.
Transaction initialization
The first step of the each transaction always takes place in your application. Your application integrated with the Verestro Paytool solution should have exposed option allowing to pay using Paytool available in your application. Your backend should deliver the initial transaction data to the Paytool API to open new transaction session when your payer selects the Paytool as payment option.
Redirect
The first option of the integration is by redirecting the payer to our payment gateway, which lists all available payment options. When you request to create a payment session, the Paytool API responds with a transaction ID and a redirect URL. Simply redirect the user to this address to allow them to choose a payment method and finalize the transaction. The view of transaction initiatialization from the end user's perspective has been shown below. This view refers to the Redirect your payer integration path:
|
|
|
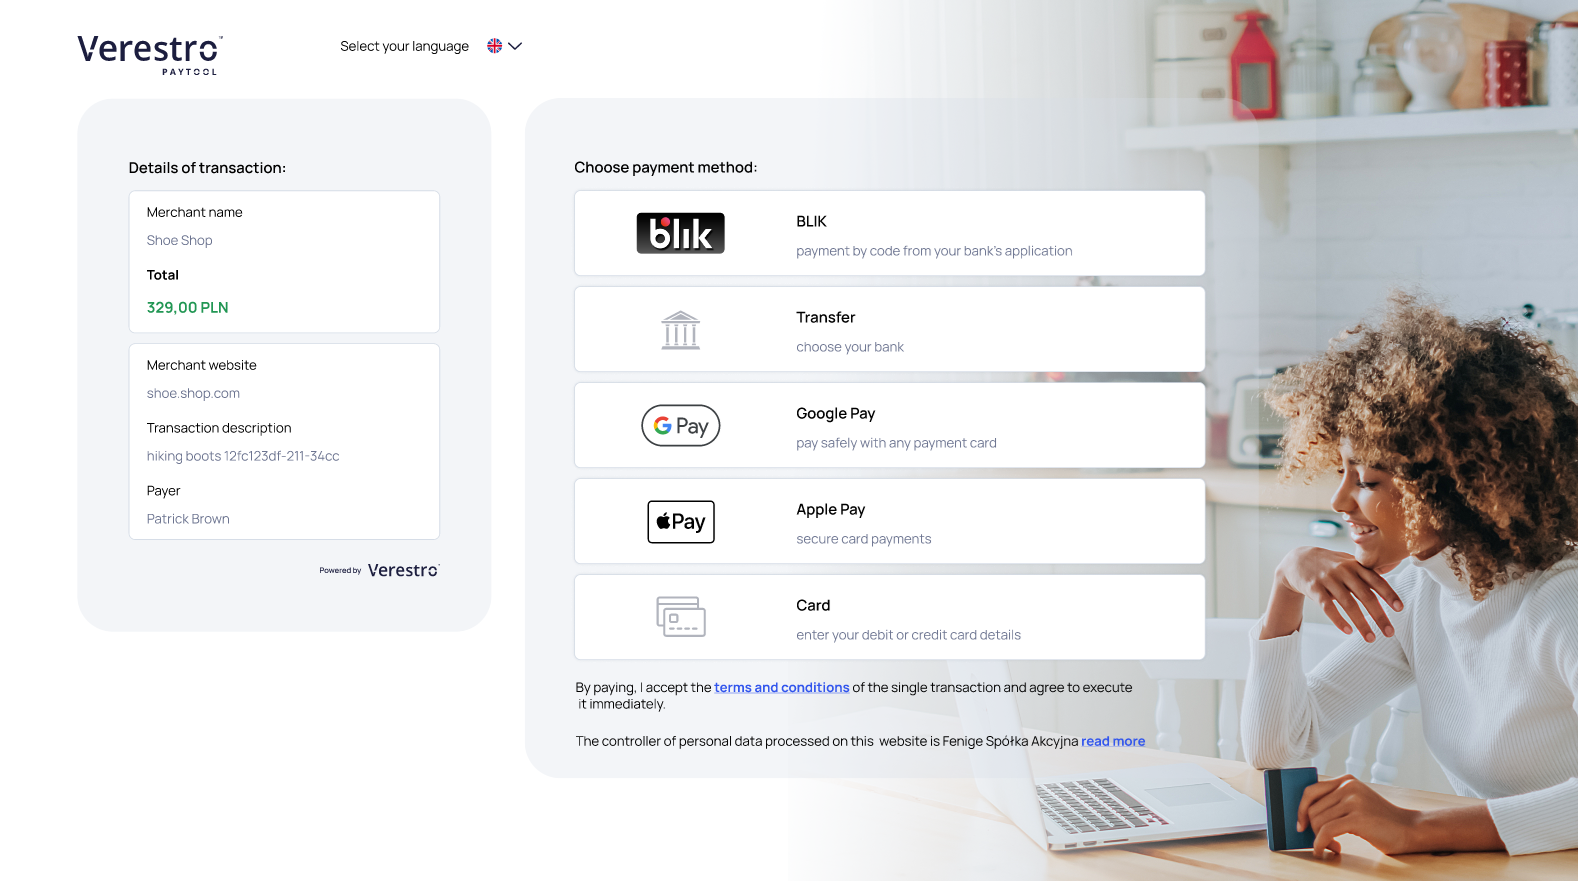
Tip: In this implementation model your application makes a request to the transactionInitialization method to create a payment session and then redirect your payer to the Paytool application. From this point on, are fully responsible for all other steps in the process such as execution of the transaction and threeDs authentication.
The sequence diagram below illustrates the transaction initialization process step by step
@startuml
skinparam ParticipantPadding 30
skinparam BoxPadding 30
skinparam noteFontColor #FFFFFF
skinparam noteBackgroundColor #1C1E3F
skinparam noteBorderColor #1C1E3F
skinparam noteBorderThickness 1
skinparam sequence {
ArrowColor #1C1E3F
ArrowFontColor #1C1E3F
ActorBorderColor #1C1E3F
ActorBackgroundColor #FFFFFF
ActorFontStyle bold
ParticipantBorderColor #1C1E3F
ParticipantBackgroundColor #1C1E3F
ParticipantFontColor #FFFFFF
ParticipantFontStyle bold
LifeLineBackgroundColor #1C1E3F
LifeLineBorderColor #1C1E3F
}
actor payer
participant "Customer front" as cfront
participant "Customer backend" as cback
participant "Paytool front" as pfront
participant "Paytool backend" as pback
payer->cfront: 1. Pay with Paytool
cfront->cback: 2. Payer choosed Paytool
cback->pback: 3. Customer authorization + transaction metadata
pback->pback: 4. Store transaction metadata + open payment session
cback<-pback: 5. OK + transaction id + redirect url
cfront<-cback: 6. OK + transaction id + redirect url
cfront->pfront: 7. Redirect payer to Paytool + transaction id
pfront->pback: 8. Get transaction data + merchant payment methods
pfront<-pback: 9. OK response
payer<-pfront: 10. Display transaction + payment methods
@enduml
- Payer being in the Customer's application has selected Paytool as the payment method.
- Customer's application accepts payer's decision on payment method.
- Customer's API communicates with Paytool API to initiate a payment session and transmitting data about that payment.
- Paytool API stores payment data and opens payment session for this transaction.
- Paytool API returns status of the payment session initialization to Customer's API. If the status is success then the transaction ID and the URL to which the payer should be redirected are returned (If integrating directly with our API without a frontend redirect, only the transaction ID will be returned).
- Customer's API passes received data to it's application to redirect payer.
- The Customer's application redirects the payer to the Paytool application.
- Paytool application gets transaction data stored by Paytool API in point 4.
- Paytool API returns all stored data to Paytool application.
- Paytool application shows to the payer every available payment method (Card, Google Pay, Apple Pay, BLIK) and all stored transaction data (Customer's name, amount of the transaction, currency, etc.).
Iframe
Important! This part of the documentation is work in progress...
Server to server
An alternative path to carry out a transaction is a Payment process via API integration path. Paytool Frontend does not appear in this path. You make all requests directly from your server to the Paytool API methods we described in technical integration guide. Paytool API responds with transaction ID and you should use this transaction ID to execute a proper payment method choosed by your payer.
The sequence diagram below illustrates the transaction initialization process step by step
@startuml
skinparam ParticipantPadding 30
skinparam BoxPadding 30
skinparam noteFontColor #FFFFFF
skinparam noteBackgroundColor #1C1E3F
skinparam noteBorderColor #1C1E3F
skinparam noteBorderThickness 1
skinparam sequence {
ArrowColor #1C1E3F
ArrowFontColor #1C1E3F
ActorBorderColor #1C1E3F
ActorBackgroundColor #FFFFFF
ActorFontStyle bold
ParticipantBorderColor #1C1E3F
ParticipantBackgroundColor #1C1E3F
ParticipantFontColor #FFFFFF
ParticipantFontStyle bold
LifeLineBackgroundColor #1C1E3F
LifeLineBorderColor #1C1E3F
}
actor payer
participant "Customer front" as cfront
participant "Customer backend" as cback
participant "Paytool backend" as pback
payer->cfront: 1. Pay with Paytool
cfront->cback: 2. Payer choosed Paytool
cback->pback: 3. Customer authorization + transaction metadata
pback->pback: 4. Store transaction metadata + open payment session
cback<-pback: 5. OK + transaction id
note right of cfront: At this point, the Customer decides how to present the transaction to the payer
cback->pback: 6. Request proper payment method / executing 3D Secure
cback<-pback: 7. Transaction result
note right of cfront: At this point, the Customer decides how to present the transaction result to the payer
@enduml
- Payer being in the Customer's application has selected Paytool as the payment method.
- Customer's application accepts payer's decision on payment method.
- Customer's API communicates with Paytool API to initiate a payment session and transmitting data about that payment.
- Paytool API stores payment data and opens payment session for this transaction.
- Paytool API returns status of the payment session initialization to Customer's API. If the status is success then the transaction ID along with a list of every available payment method.
- Customer's API executes proper Paytool API method (specified payment method or 3D Secure).
- Paytool API returns result of the executed payment method and/or 3D Secure.
Payment methods
Verestro as a PSP provides several different payment methods in Paytool solution. You decide which payment method should be available in Paytool payment form. You decide this during the onboarding process but it is editable whenever necessary. The end user, seeing the available payment methods, can choose the option that is most convenient for him. This chapter describes all payment methods supported by our application.
Note: Some of the payment methods available in the Paytool frontend may not be available with an API to API connection.
|
Payment methods in Paytool |
Redirect your payer (open Paytool in webview) |
Payment in iframe (open Paytool iframe embed in your app) |
Payment via API (call Paytool API methods) |
|
Google Pay™ |
Available |
To be implemented |
Available |
|
Apple Pay |
Available |
To be implemented |
To be implemented |
|
Blik |
Available |
Not available |
To be implemented |
|
Card & Card on file |
Available |
Available |
Available |
Note: It is required that you have created account in the Acquirer's system which will settle your transactions. Verestro Paytool solution has been implemented so that it is possible to process transactions with the participation of various Acquirers. If you require the settlement of the transaction by a new Acquirer – to which we are not yet integrated – there will be required new integration between Verestro and the new Acquirer. You should provide a specification of the Acquirer API.
Card
The most common payment method available in our application is payment using plain card details. This payment method consists in providing a payment form in which the end user can enter his payment card details. The option to pay with plain card details is available at the button shown below:

After clicking on the payment option using plain card details, the end user is redirected to the specially prepared payment form. Now he is able to provide the appropriate card details and clicks the Pay button at the bottom of the screen. At this point, the card details are encrypted and sent to the Paytool backend which requests Acquirer to process transaction. At this moment threeDs authentication process may be required. The payment process using plain card details from the end user's perpective has been shown below:
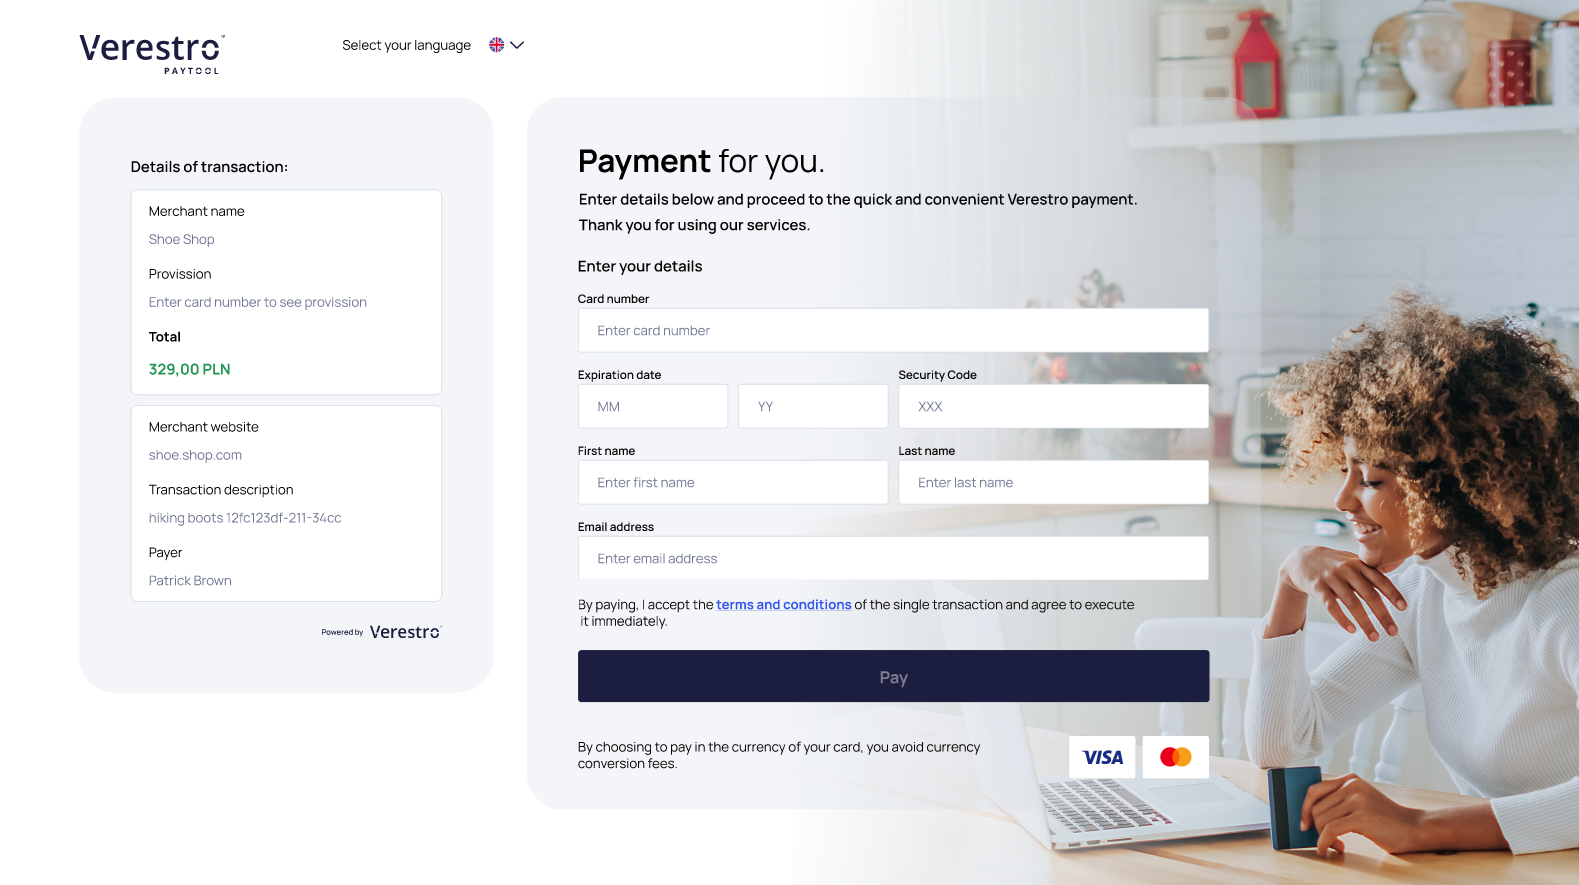
The sequence diagram below illustrates the transaction with plain card details process step by step
@startuml
skinparam ParticipantPadding 30
skinparam BoxPadding 30
skinparam noteFontColor #FFFFFF
skinparam noteBackgroundColor #1C1E3F
skinparam noteBorderColor #1C1E3F
skinparam noteBorderThickness 1
skinparam sequence {
ArrowColor #1C1E3F
ArrowFontColor #1C1E3F
ActorBorderColor #1C1E3F
ActorBackgroundColor #FFFFFF
ActorFontStyle bold
ParticipantBorderColor #1C1E3F
ParticipantBackgroundColor #1C1E3F
ParticipantFontColor #FFFFFF
ParticipantFontStyle bold
LifeLineBackgroundColor #1C1E3F
LifeLineBorderColor #1C1E3F
}
actor "End User" as user
participant "Paytool Frontend" as pfront
participant "Paytool Backend" as pback
participant "Customer Server" as custback
participant "Acquirer" as acq
user->pfront: User chooses payment by plain card details
user<-pfront: Redirect end user to the payment form
user->pfront: User filling data (CN, CVC, EXP)
pfront->pfront: Encrypt data
pfront->pback: Perform transaction providing encrypted payment request body
pback->pback: Decrypt encrypted payment request body
pback->acq: Order transaction
note left of acq: At this point 3D Secure process may occur
acq->pback: Response
pback->pfront: Transaction Result
pback-->pback: Store transaction result
pfront->pfront: Redirect end user (success/failure)
pback->custback: Send transaction postback to provided URL (optional - configurable)
note right of pback: Verestro can also send the notification after transaction to the end user(optional)
custback->pback: Get transaction status (optional)
pback->custback: Return transaction status
@enduml
Card on file
The Paytool application also provides the option to store card data in Verestro PCI DSS Storage. It works on the basis of a mobile wallet, allowing returning payers to select previously used cards without the need to re-enter card details for each subsequent transaction.
When using the card on file option, you must remember that you are responsible for authenticating the payer. When initializing the transaction, you must provide a specific identifier based on which we will either add a new cardholder to our database or, if the cardholder already exists in our system, return a list of their previously added cards and/or allowing him to add new card to his card list. The identifier and the technical process of this use case are described in the section of the technical documentation dedicated to the transactionInitialization method.
The card on file option is an extension of the plain card number payment method and it is optional feature. Once selected, the payer can follow one of three possible card selection paths. All of these paths are described in the table below:
|
Payer has no saved cards |
Payer has saved cards |
Payer has saved cards and provides new card |
|
In this scenario, the payer selects the card on file payment option without having any previously saved card. A form is immediately displayed, allowing them to enter the details of the card they wish to use.
To see more details of the current transaction, the user can click "Expand" button.
|
In this flow, the payer selects the card on file payment option while already having a previously saved card in our system. Two options are displayed: pay with the saved card or use a new card. When choosing to pay with the saved card, 3D Secure authentication will be skipped.
When selecting the option to use a new card (by clicking the "Pay with new card" button), a form for entering the new card details is displayed.
|
If the payer has more than one saved card, they can open the list of all their saved cards to choose a card other than the default one for the transaction. From the card selection view, it is also possible to:
In the edit mode, the user can:
It is not possible to edit sensitive data such as the card number or expiration date.
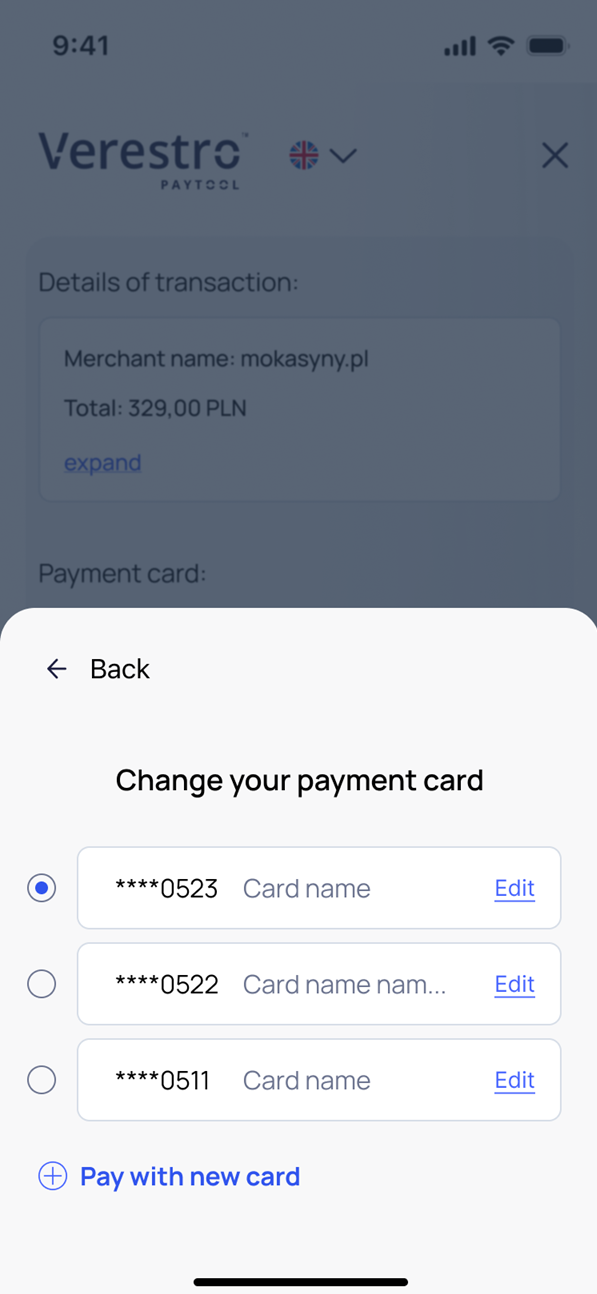 |

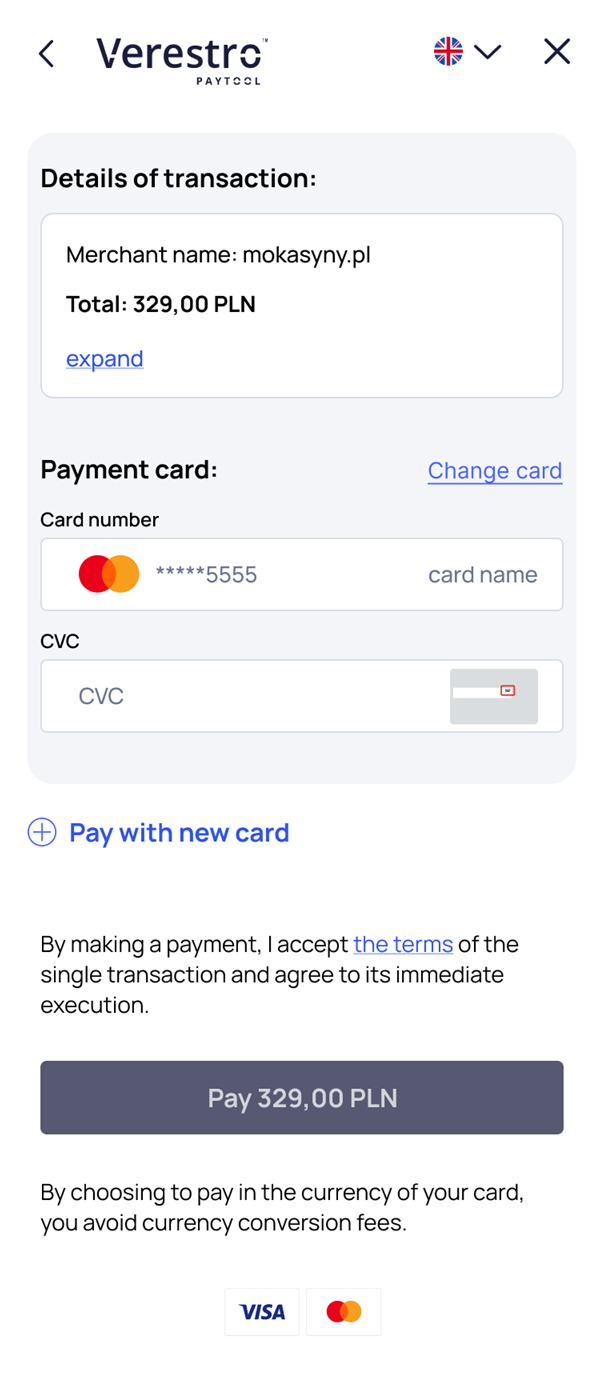
The sequence diagram below illustrates the transaction with stored card process step by step
@startuml
@startuml
skinparam ParticipantPadding 30
skinparam BoxPadding 30
skinparam noteFontColor #FFFFFF
skinparam noteBackgroundColor #1C1E3F
skinparam noteBorderColor #1C1E3F
skinparam noteBorderThickness 1
skinparam sequence {
ArrowColor #1C1E3F
ArrowFontColor #1C1E3F
ActorBorderColor #1C1E3F
ActorBackgroundColor #FFFFFF
ActorFontStyle bold
ParticipantBorderColor #1C1E3F
ParticipantBackgroundColor #1C1E3F
ParticipantFontColor #FFFFFF
ParticipantFontStyle bold
LifeLineBackgroundColor #1C1E3F
LifeLineBorderColor #1C1E3F
}
actor "Sender" as sender
participant "Customer front" as cfront
participant "Customer backend" as cback
participant "Paytool front" as pfront
participant "Paytool backend" as pback
==Choose COF==
sender -> cfront: Choose paytool
cfront -> cback: Order payment
cback -> pback: /secure/transactions(transaction metadata, userReference)
pback --> cback: response(transactionId, redirect url)
cback --> cfront: response(transactionId, redirect url)
cfront -> pfront: Redirect payer
note right of pfront: Payer choose to pay with COF
note right of pfront: Cards will be mapped with user by userReference
==Order payment==
pfront -> pback: Get list of user's cards
pfront <- pback: Return card list
sender <- pfront: Display card list
sender -> pfront: Choose card and proceed
pfront -> pback: processPayment(transactionId, cardId)
pfront <- pback: response(result)
sender <- pfront: Display transaction result
note left of pfront: Redirect payer back to Customer
cback <-- pback: Transaction postback(result)
@enduml
Dynamic currency conversion
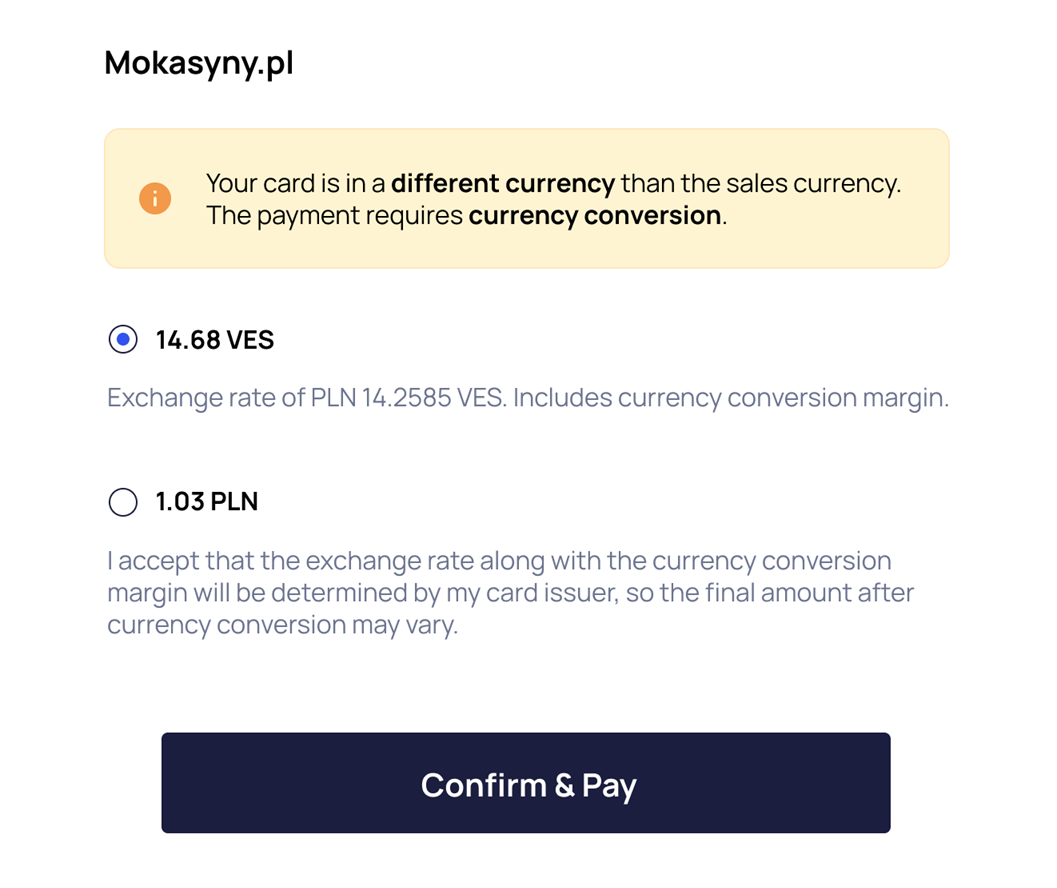
The DCC functionality is to determine the currency of the payer's card, compare it with the currency used by the merchant selling the goods, and provide the payer with the option of converting currency at our rate or ordering payment leaving the currency conversion to the bank that issued the card. The DCC mechanism is triggered when the currency of the payer's card is different from the sales currency then.
Important: Implementation is work in progress...
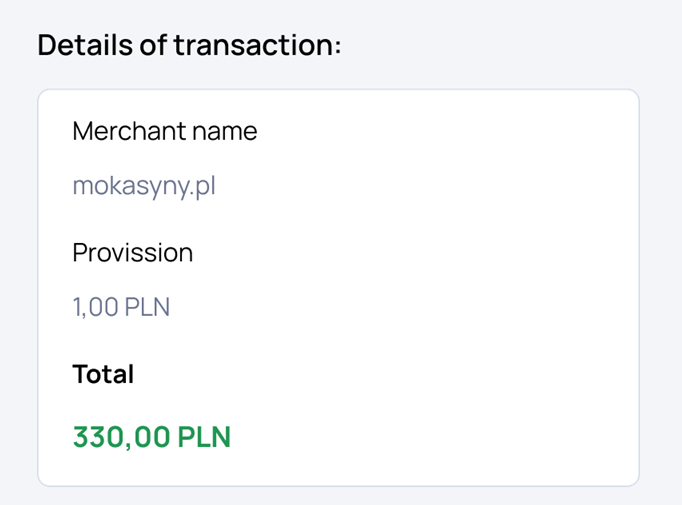
After entering the card data in the correct field, the currency of the card is determined. If the dynamic currency conversion has been triggered, the following popup will be displayed to the payer and the total amount in the transaction details will be updated:
|
|
 |
Google Pay
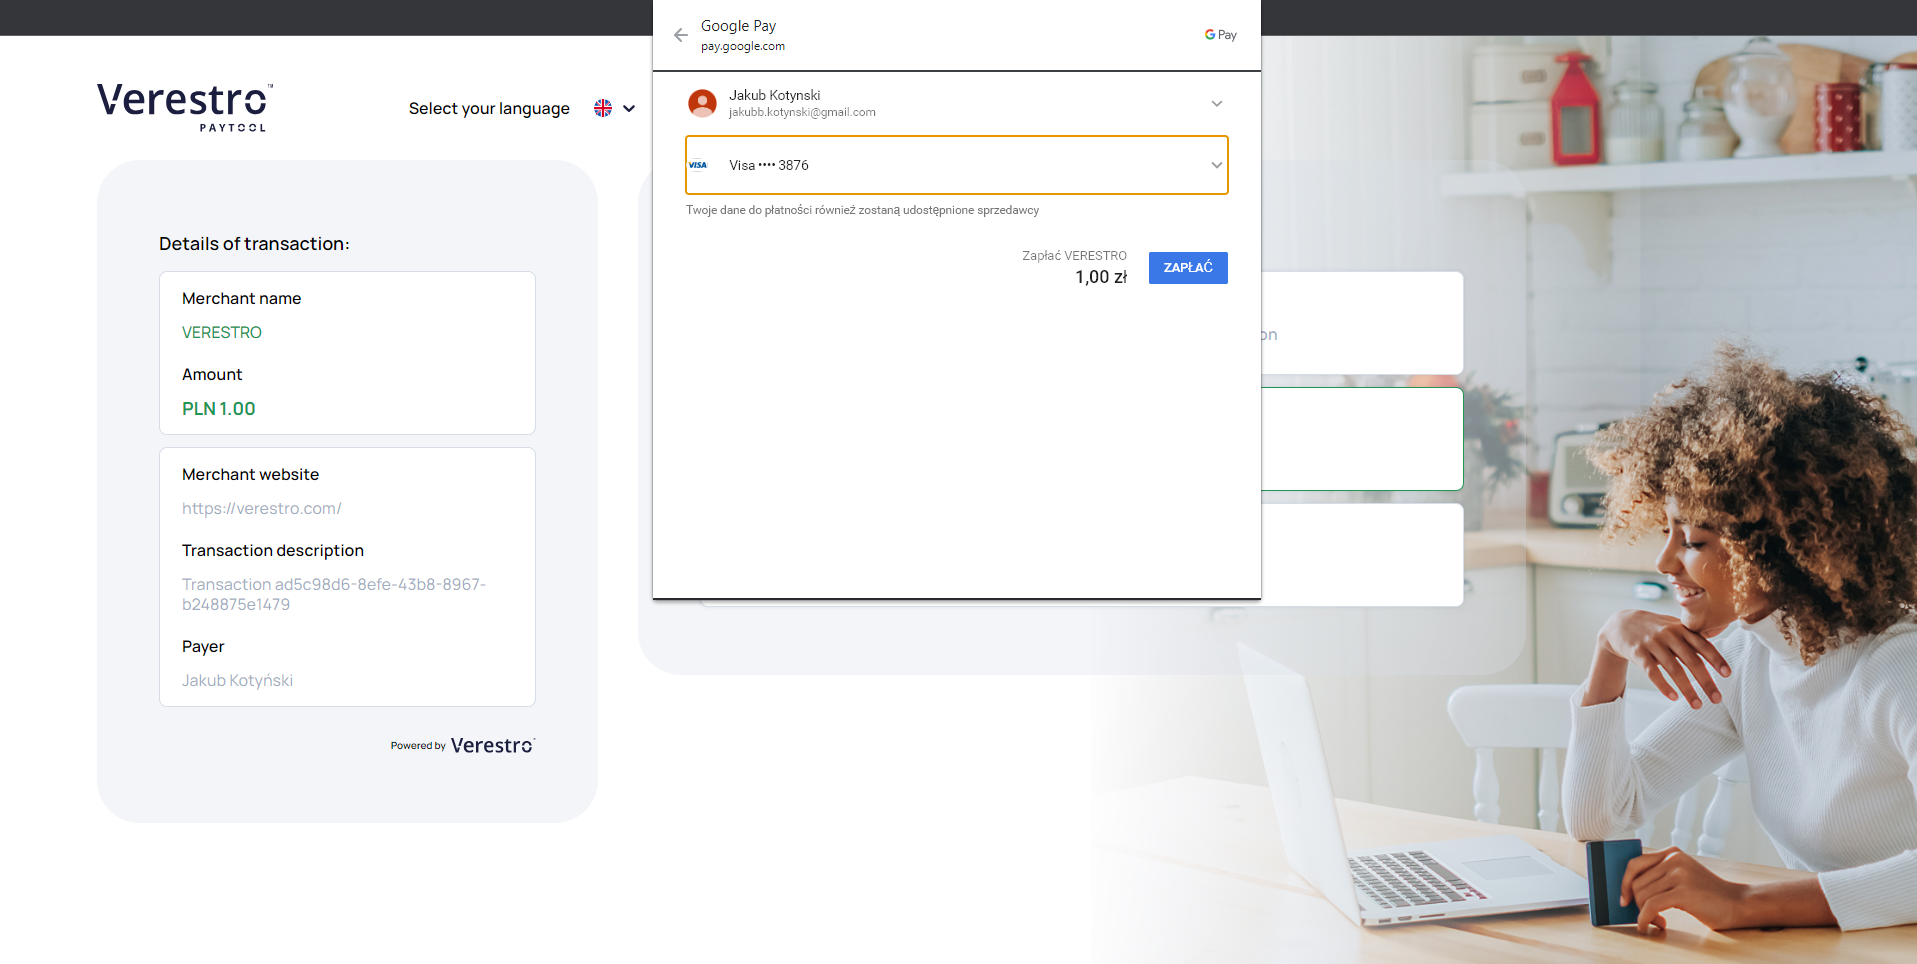
Paytool as a registered hosted checkout in the Google Pay™ allows to perform a payment with the card from the Google Pay™ Wallet. Using our application your payer can choose the Google Pay™ as the payment method from the Verestro Paytool payment methods list. The option to pay with Google Pay™ card token is available at the button shown below:

After clicking on the Google Pay™ payment option, the Google Pay™ Wallet popup is displayed. The payer should select the appropriate card from the Google Pay™ Wallet which is then encrypted on the Google Pay™ side and transferred to our application. We will decrypt obtained data and transfer them to the Acquirer in the transaction request. At this moment threeDs authentication process may be required but it will be handled on our side. The payment process using Google Pay™ card payment token from the end user's perpective has been shown below:
The sequence diagram below illustrates the payment process using Google Pay™ card payment token step by step
@startuml
skinparam ParticipantPadding 30
skinparam BoxPadding 30
skinparam noteFontColor #FFFFFF
skinparam noteBackgroundColor #1C1E3F
skinparam noteBorderColor #1C1E3F
skinparam noteBorderThickness 1
skinparam sequence {
ArrowColor #1C1E3F
ArrowFontColor #1C1E3F
ActorBorderColor #1C1E3F
ActorBackgroundColor #FFFFFF
ActorFontStyle bold
ParticipantBorderColor #1C1E3F
ParticipantBackgroundColor #1C1E3F
ParticipantFontColor #FFFFFF
ParticipantFontStyle bold
LifeLineBackgroundColor #1C1E3F
LifeLineBorderColor #1C1E3F
}
actor "End User" as user
participant "Paytool Frontend" as pfront
participant "Paytool Backend" as pback
participant "Google Pay" as gpay
participant "Customer Server" as custback
participant "Acquirer" as acq
user->pfront: End user chooses payment by Google Pay
pfront->gpay: Open end user Google Wallet
user<--gpay: Opens end user's Google Wallet
user-->gpay: Choose card from Google Wallet
gpay->gpay: Encrypt chosen card token data
pfront<-gpay: Provide encrypted card token data
pfront->pback: Order transaction
pfront-->pback: Provide encrypted card token data
pback->pback: Decrypt encrypted card token data
pback->acq: Order transaction
note left of acq: At this point 3D Secure process may occur
acq->pback: Response
pback->pfront: Transaction Result
pback-->pback: Store transaction result
pfront->pfront: Redirect end user (success/failure)
pback->custback: Send transaction postback to provided URL (optional - configurable)
note right of pback: Verestro can also send the notification after transaction to the end user (optional)
custback->pback: Get transaction status (optional)
pback->custback: Return transaction status
@enduml
Google Pay payment via API
Alternatively Verestro allows you to perform a payment with Google Pay card token by calling directly our API method. This is a backend to backend oriented solution. In this payment model you must be registered merchant in Google Pay™ to be able to get a card payment token from Google Pay™.
To use this option your API should be integrated with the googlePayTransaction method provided by Paytool API. By using this solution you need to display Google Pay™ Wallet in your application by your own. After selecting the Google Pay™ as the payment option a payer chooses proper card from Google Pay™ Wallet. After that action you get encrypted card payment token from Google Pay™. Card payment token is encrypted on the Google Pay™ side with Verestro's public key. You have to provide this encrypted token to Paytool API by using googlePayTransaction method. If you do this, we will handle transaction process on our side. At this moment 3D Secure process may be required and you need to handle it on your side using threeDs authentication methods provided by Paytool API.
The sequence diagram below illustrates the payment process using Google Pay™ card payment token API to API step by step
@startuml
skinparam ParticipantPadding 30
skinparam BoxPadding 30
skinparam noteFontColor #FFFFFF
skinparam noteBackgroundColor #1C1E3F
skinparam noteBorderColor #1C1E3F
skinparam noteBorderThickness 1
skinparam sequence {
ArrowColor #1C1E3F
ArrowFontColor #1C1E3F
ActorBorderColor #1C1E3F
ActorBackgroundColor #FFFFFF
ActorFontStyle bold
ParticipantBorderColor #1C1E3F
ParticipantBackgroundColor #1C1E3F
ParticipantFontColor #FFFFFF
ParticipantFontStyle bold
LifeLineBackgroundColor #1C1E3F
LifeLineBorderColor #1C1E3F
}
participant "End user" as user
participant "Customer Application" as app
participant "Google Pay" as gp
participant "Paytool Backend" as tps
participant "Acquirer" as acq
note right of user: User wants to pay with Google Pay
user->app: Pay with Google Pay and choose card
app->gp: Requests for card token
gp->gp: Encrypts card token with Verestro pub key
app<-gp: Returns encrypted card token
app->tps: Requests token payment
tps->tps: Decrypts card token
tps->acq: Orders transaction
tps<-acq: Transaction status
note left of acq: At this point 3D Secure process may occur
app<-tps: Transaction status
user<-app: Transaction status
user<--tps: Sends email notification - optional
@enduml
Important: If you use Paytool with Payment process via API integration path, make sure you are a registered merchant in the Google Pay™ system. This does not apply to Customers using the Redirect your payer route.
Note: Google Pay™ provides a Google Pay Web integration checklist that will help you with the integration step by step. The documentation is available after whitelisting in Google Pay™ system. The whitelisting process is performed by Google Pay™ during the Customer's merchant account registration process.
Note: Google Pay™ provides Google Pay Web Brand Guidelines that presents branding requirements for web merchants registered in Google Pay™. You must meet these requirements so that you can allow his payers to pay via the Google Pay™ solution.
Apple Pay
Verestro as a PSP registered in the Apple Pay™ allows to perform a payment with card token generated by Apple. Using our application your payer can choose the Apple Pay™ as the payment method from the Paytool payment methods list.
Tip: Please note that as a third-party iOS application, you are allowed to use Apple Pay only for the sale of physical goods. The sale of digital goods with external payment system providers such as Paytool is prohibited by Apple. To enable the sale of digital goods using Apple Pay, you must follow Apple requirements listed here.
The option to pay with Apple Pay™ card token is available at the button shown below:

Warning! Apple Pay payment method is available in Safari web browser only.
After clicking on the Apple Pay™ payment option, the Apple Pay™ Wallet popup is displayed. End user should select the appropriate card from the Apple Pay™ Wallet popup which is then encrypted on the Apple Pay™ side and transferred to our application. We decrypt obtained data and transfer them to the Acquirer in the transaction request. At this moment threeDs authentication process may be required. The payment process using Apple Pay™ card payment token from the end user's perpective has been shown below:
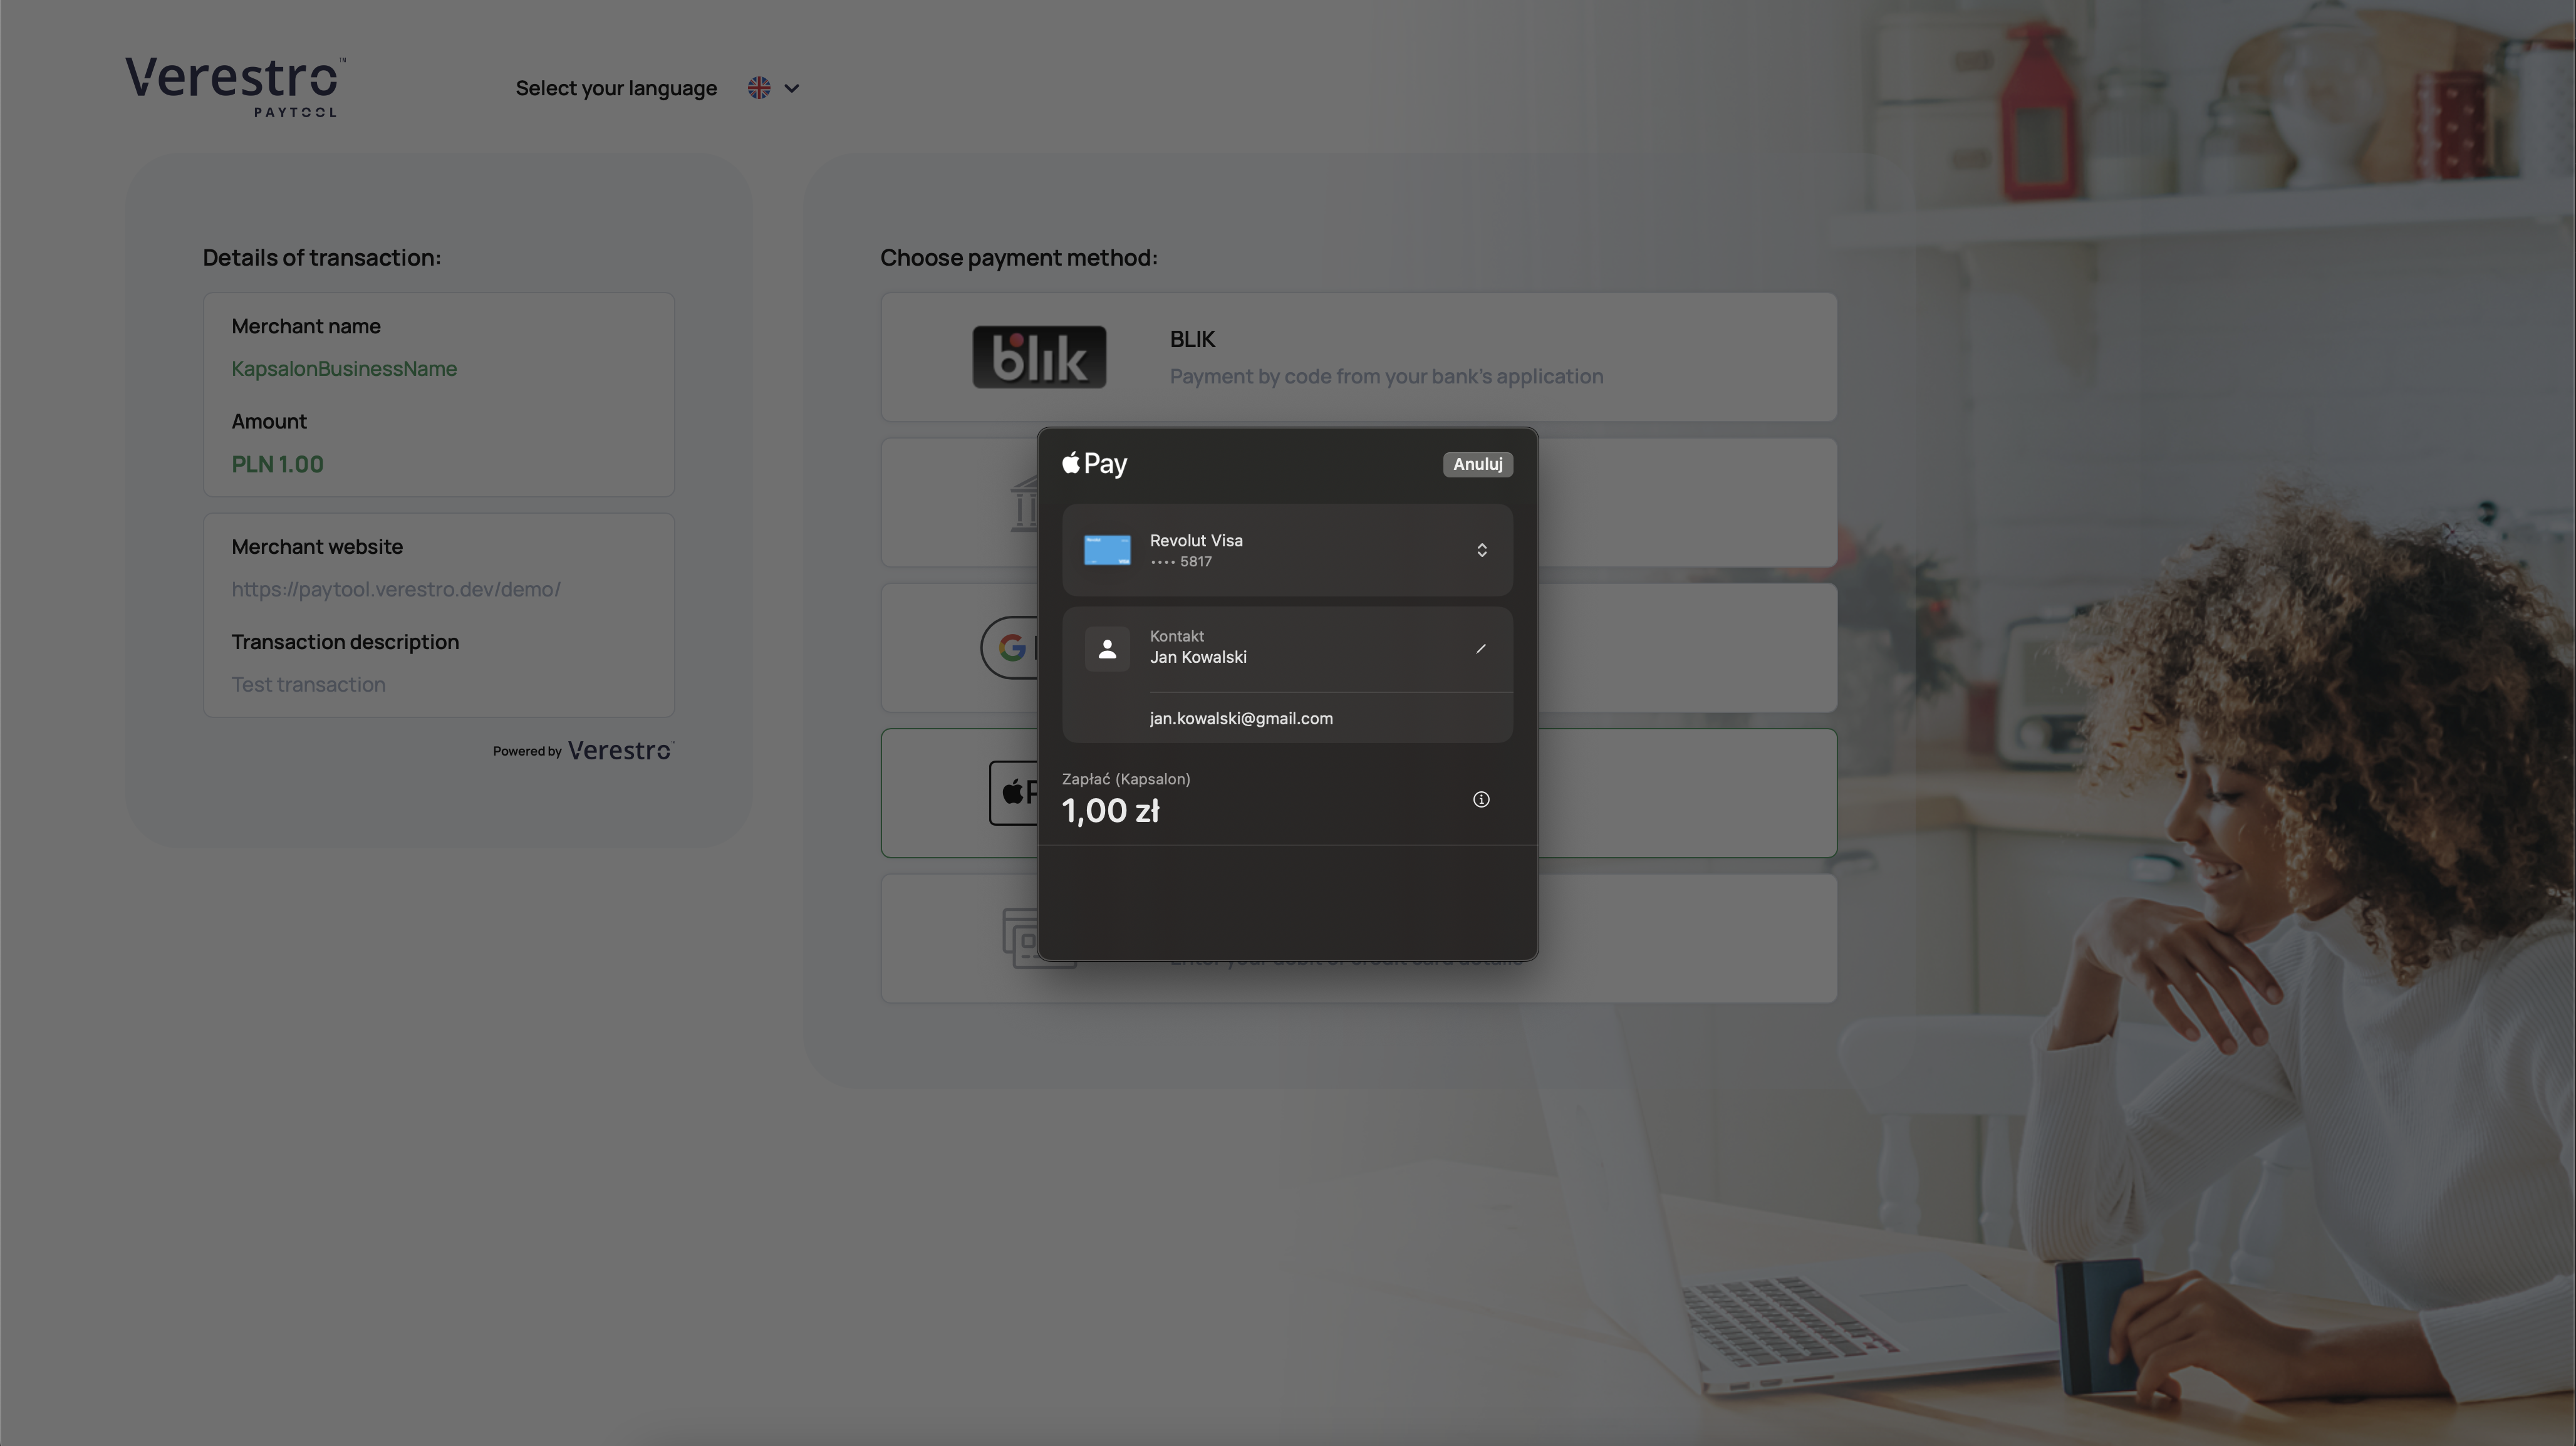
The sequence diagram below illustrates the payment process using Apple Pay™ card payment token step by step
@startuml
skinparam ParticipantPadding 30
skinparam BoxPadding 30
skinparam noteFontColor #FFFFFF
skinparam noteBackgroundColor #1C1E3F
skinparam noteBorderColor #1C1E3F
skinparam noteBorderThickness 1
skinparam sequence {
ArrowColor #1C1E3F
ArrowFontColor #1C1E3F
ActorBorderColor #1C1E3F
ActorBackgroundColor #FFFFFF
ActorFontStyle bold
ParticipantBorderColor #1C1E3F
ParticipantBackgroundColor #1C1E3F
ParticipantFontColor #FFFFFF
ParticipantFontStyle bold
LifeLineBackgroundColor #1C1E3F
LifeLineBorderColor #1C1E3F
}
actor "End User" as user
participant "Paytool Frontend" as pfront
participant "Paytool Backend" as pback
participant "Apple Pay" as gpay
participant "Customer Server" as custback
participant "Acquirer" as acq
user->pfront: End user chooses payment by Apple Pay
pfront->gpay: Open end user's Apple Pay Wallet
user<--gpay: Opens end user's Apple Pay Wallet
user-->gpay: Choose card from Apple Pay Wallet
note right of user: At this point Apple Pay may require user authorization
gpay->gpay: Encrypt chosen card token data
pfront<-gpay: Provide encrypted card token data
pfront->pback: Order transaction
pfront-->pback: Provide encrypted card token data
pback->pback: Decrypt encrypted card token data
pback->acq: Order transaction
note left of acq: At this point 3D Secure process may occur
acq->pback: Response
pback->pfront: Transaction Result
pback-->pback: Store transaction result
pfront->pfront: Redirect end user (success/failure)
pback->custback: Send transaction postback to provided URL (optional - configurable)
note right of pback: Verestro can also send the notification after transaction to the end user (optional)
custback->pback: Get transaction status (optional)
pback->custback: Return transaction status
@enduml
Note: At this moment Apple Pay biometric authorization may be required.
Note: Payment using the Apple Pay Wallet is only possible if the payer uses MacOS.
Apple Pay payment via API
Warning! Implementation of Apple Pay backend to backend oriented is work in progress...
Alternatively Verestro allows you to perform a payment with Apple Pay card token by calling directly our API method. This is a backend to backend oriented solution. In this payment model you must be registered merchant in Apple Pay™ to be able to get a card payment token from Apple Pay™.
Important: If you use Paytool with Payment process via API integration path, make sure you are a registered merchant in the Apple Pay™ system. This does not apply to Customers using the Redirect your payer route.
Note: Apple Pay provides a complete integration guide that outlines all the steps required to register as a merchant in its system. This registration enables the merchant to launch the Apple Pay wallet directly within your own application. To do so check Apple Pay Merchant Registration Guide.
Blik
Our solution supports cardless payments using the Blik code. In this payment method, the merchant should create an input field for the BLIK code within their application. The end user enters the BLIK code into this field. The merchant then sends the received code to the Paytool API by calling the appropriate method and receives the transaction status. The 6 digits Blik code is generated in the end user's bank application.

The sequence diagram below illustrates the payment process using Blik step by step
@startuml
skinparam ParticipantPadding 30
skinparam BoxPadding 30
skinparam noteFontColor #FFFFFF
skinparam noteBackgroundColor #1C1E3F
skinparam noteBorderColor #1C1E3F
skinparam noteBorderThickness 1
skinparam sequence {
ArrowColor #1C1E3F
ArrowFontColor #1C1E3F
ActorBorderColor #1C1E3F
ActorBackgroundColor #FFFFFF
ActorFontStyle bold
ParticipantBorderColor #1C1E3F
ParticipantBackgroundColor #1C1E3F
ParticipantFontColor #FFFFFF
ParticipantFontStyle bold
LifeLineBackgroundColor #1C1E3F
LifeLineBorderColor #1C1E3F
}
actor "End User" as user
participant "Customer Application" as pfront
participant "Paytool Backend" as pback
participant "Acquirer" as acq
participant "Blik" as blik
user->pfront: End user provides Blik code in the proper input\nin merchant's application and confirms payment (1)
pfront->pback: Requests for Blik payment (blik code) (2)
pback->acq: Orders Blik transaction (blik code) (3)
acq->blik: Internal request to Blik system (4)
acq<-blik: Return payment result (5)
pback->acq: Get payment result (5.1)
pback<-acq: Return payment result (5.2)
pfront<-pback: Notify about the payment result (5.3)
user<-pfront: Displays payment result (6)
ThreeDs authentication
Transactions using payment cards usually require additional authentication of the end user (card holder). In accordance with the Europenian Union directive PSD2, the Paytool solution uses the threeDs protocol version 2.0 for the authentication process. The threeDs process consists in asking the card issuer whether additional authentication of the card holder is necessary or not. It depends on the bank's response whether the threeDs process will be necessary to perform. This is determined by one of two statuses that the bank returns during the transaction process: FRICTIONLESS or CHALLENGE. The meaning of each status is described in the section ThreeDs modes. We take responsibility for performing the threeDs authentication process. The sequence diagrams below illustrates the threeDs authentication process step by step separatly for both cases: FRICTIONLESS or CHALLENGE.
Note: ThreeDs authentication is required for card payments. This authentication method does not apply to BLIK transactions.
The sequence diagram below illustrates the 3D Secure authentication process step by step
@startuml
skinparam ParticipantPadding 30
skinparam BoxPadding 30
skinparam noteFontColor #FFFFFF
skinparam noteBackgroundColor #1C1E3F
skinparam noteBorderColor #1C1E3F
skinparam noteBorderThickness 1
skinparam sequence {
ArrowColor #1C1E3F
ArrowFontColor #1C1E3F
ActorBorderColor #1C1E3F
ActorBackgroundColor #FFFFFF
ActorFontStyle bold
ParticipantBorderColor #1C1E3F
ParticipantBackgroundColor #1C1E3F
ParticipantFontColor #FFFFFF
ParticipantFontStyle bold
LifeLineBackgroundColor #1C1E3F
LifeLineBorderColor #1C1E3F
}
actor "End User" as user
participant "Customer App" as custback
participant "Paytool Frontend" as pfront
participant "Paytool Backend" as pback
participant "Acquirer" as acq
participant "Access Control Server" as ACS
user->pfront: Confirm payment order
pfront->pback: Execute transaction with 3DS
pback->acq: Order transaction with 3DS
== FRICITONLESS ==
acq->pback: Response with 3DS mode FRICTIONLESS
pback->pfront: Return status success
pfront->user: Display status success
pback-->custback: Transaction result
== 3DS mode = CHALLENGE ==
acq->pback: Response with 3DS mode CHALLENGE + ACS auth template
pback->pfront: Return status + ACS auth template
pfront->user: Redirect to ACS auth template
user->ACS: Authenticate
ACS->user: Display authentication status
ACS->user: Redirect to Paytool Frontend
ACS-->pback: Authentication result
pfront->pback: Get transaction status
pback->pfront: Return transaction status
pfront->user: Display transaction status
pback-->custback: Transaction result
@enduml
ThreeDs modes
|
ThreeDs mode |
Description |
|
|
The response containing the |
|
|
The response containing this mode denotes that the card holder must be additionally authenticated. Along with the |
Transaction result
Depending on whether the transaction was successful or not, the end user will see the appropriate status on the screen. From the status screen, he is able to return to the store's website manually - by clicking the Return to the shop button or wait for an automatic redirection. At the same time, we will send you post-transaction notification containing the status and details of the transaction. Depending on the configuration of your merchant account, an e-mail notification may be sent to the end user. Transaction status views from the end user's perspective are presented below:
 |
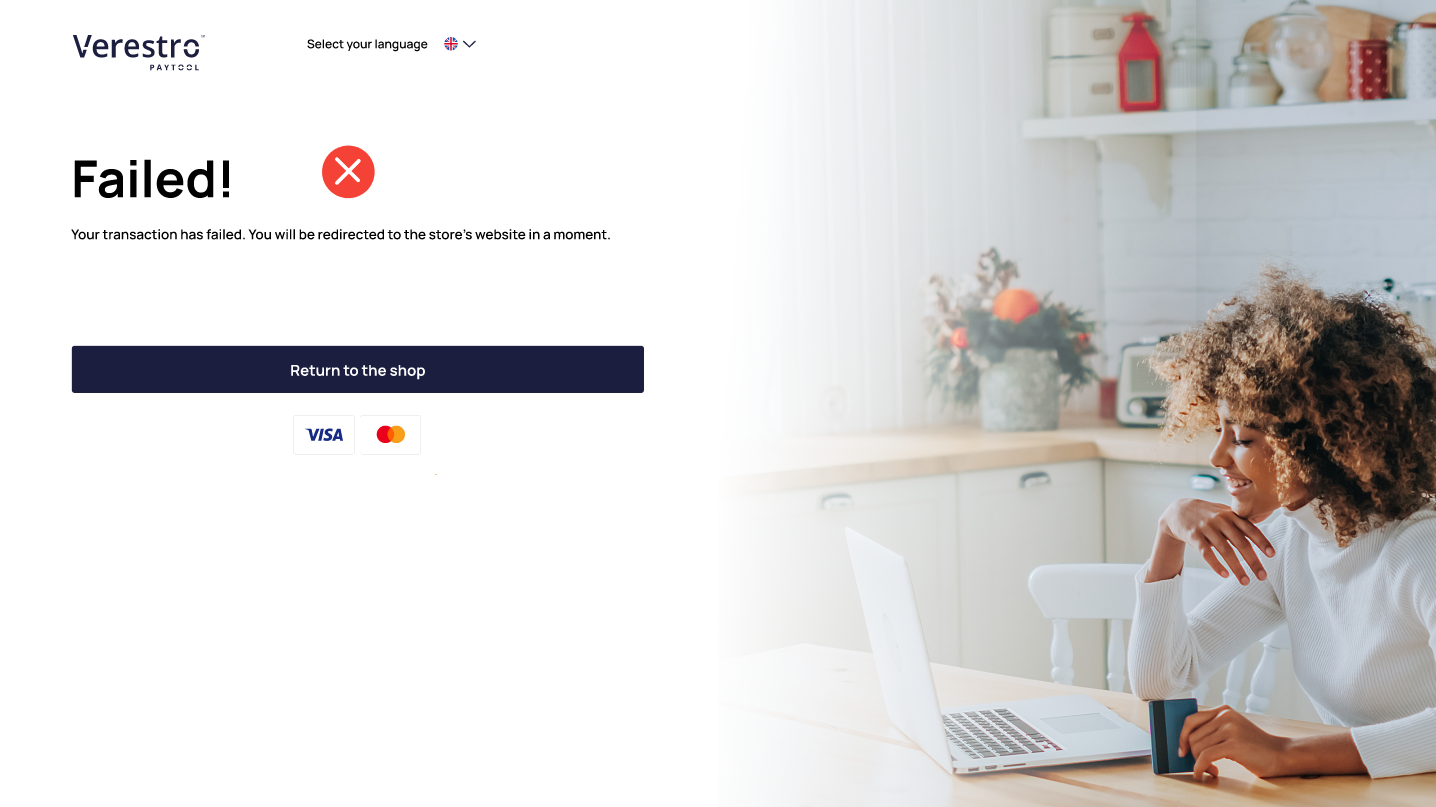 |
Notification after transaction
As mentioned in the Transaction result chapter, Paytool solution supports the sending of post-transaction notifications informing you about the status of a given transaction made in your context. This functionality is optional and it is up to you to decide whether you want to receive post-transaction notifications. This decision is made during the onboarding process and always can be edited. We recommend using this functionality, as this allow you to receive information on each of the transactions made using Verestro Paytool.
Important: In order for you to receive notification after transaction, you must define your own endpoint. You can provide us your notification URL address during the onboarding process or later. We will use this notification URL address to send you post-transaction notifications.
Post-transaction notification example sent by Verestro Paytool to the Customer
{
"transactionId": "string",
"orderNumber": "9afds032dad",
"transactionState": "FAILED",
"amount": 0,
"message": "string",
"currency": "string",
"externalTransactionId": "string",
"transactionType": "ONE_TIME_PAYMENT",
"cardDetails": {
"cardProvider": "MASTERCARD",
"cardNumber": "512485******4875"
},
"failedDetails": {
"code": "SYSTEM_ERROR",
"message": "E0200: Transaction rejected, card is blocked"
}
}End user notifications
As mentioned in the Transaction result chapter, Paytool solution supports an e-mail notification sending. Such notification contains the status and details of the transaction. This message is purely informative so that the payer knows that a transaction has been made in the context of his chosen payment instrument. This functionality is optional and it is up to you to decide whether you us to send end users notifications after the transaction. This decision is made during the onboarding process and always can be edited.
Note: The appearance of the e-mail notification is configurable.
|
Example e-mail notification after successful transaction |
Example e-mail notification after failed transaction |
|
|
|
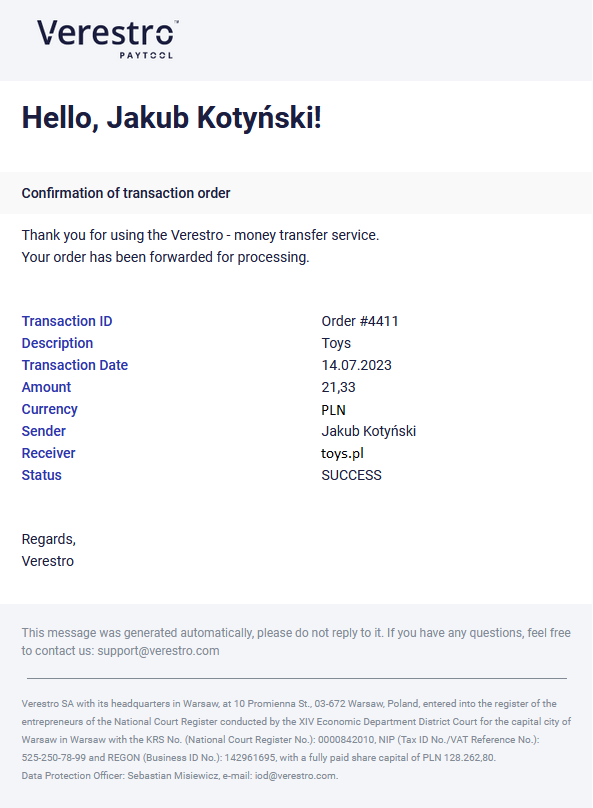
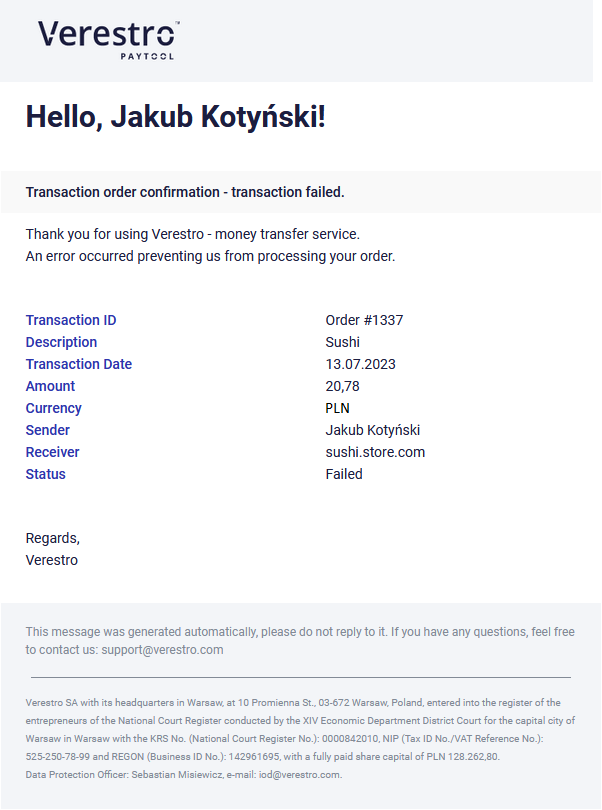
Onboarding
This chapter is intended to present you the requirements that will allow you to use the Paytool solution in your application. We have presented here what information is necessary to provide so that you can join the Paytool program and so that we can properly create the required merchant account for you in our system.
Business onboarding
Tip: Please remember to inform us on which environment you want us to configure an account for you. Verestro Paytool offers two environments: TEST and PROD. For more information about application environments please visit How to integrate chapter.
|
To start using Paytool payment widget you need to go through a few on-boarding steps: |
|
1. Please contact our sales - sales@verestro.com |
|
2. Please respond to some introduction question that will let us prepare proposal for you. |
|
3. You will receive offer for eCommerce payments. |
|
4. If you accept the offer you will be asked to provide some company documents required for the AML verification process. |
|
5. After succesful AML process you will receive contract with our partnering acquiring institution. |
|
6. You will be asked to provide account numbers for settlements and the data necessary to configure Paytool for you (see below) |
|
7. And finally you will enable Paytool widget or API on your website or mobile app to enable payments. |
Technical onboarding
Tip: The onboarding process takes place mainly on Verestro side. However, in order for all possibilities offered by Verestro Paytool to be available, the you must provide some information needed to correctly configure your merchant account in our system.
Please provide the following information:
|
Configuration parameter |
Description |
| Customer name | Basically, it's the name of the your company. The following parameter will be displayed to the end user in Verestro Paytool form. |
| Customer website URL |
Basically, it's the website URL of the your online application. The following parameter will be displayed to the end user in Verestro Paytool form. Such addresses are required to be added to our whitelist. |
| Transaction session life time |
The time given in seconds after which the initialization of the transaction will expire and processing of the payment in its context will no more be possible. |
| Redirect URL's | Those are the addresses to which end user will be redirected after a successful or unsuccessful transaction performed in Verestro Paytool. These parameters can be static (added to the your merchant account configuration) or sent in the order initiating the transaction. |
| Postback URL | Using this address we will send you information about the transaction made by a given end user. This parameter is not required if you does not want to receive notifications regarding the transaction. |
| Autodeposit property | This parameter controls whether a transactions made by merchant will be automatically deposited. This parameters can be static (added to the your merchant account configuration) or sent during the transaction initialization. |
| Supported payment methods | You should determine which of available payment methods you want to enable in Verestro Paytool. Defaultly all payment methods are enabled. This parameter can be changed anytime. Available payment methods in Paytool: Google Pay, Apple Pay, Blik, plain card number. |
| Acquirer's Merchant Id (MID) |
It is an identifier of your account in the Acquirer system. This parameter is obligatory to perform transaction. If your company supports more then 1 MID, please let us know which one should be treat as default one. Note: Default MID will be selected if you will not provide any of your MIDs in the transaction initialization request. Tip: We are suggesting to use Fiserv Polska S.A. Fiserv is our partner acquiring institution and we are fully integrated with their e-commerce API. |
|
Acquirer credentials |
Login and password that should be used to authorize your payment in the system of a given Acquirer in the context of a given terminal. |
| (Optional) Customer's logo and/or picture | These are image that could be, for example, your company logo. They will be posted as requested in the Verestro Paytool webview. This point is optional. If you do not provide such pictures, the Verestro Paytool will be shown with it's default appearance. Send this in .SVG format. |
Important! If you require transactions to be processed with the participation of a Acquirer to which Verestro is not integrated, then there must be performed a new integration. You should provide the given Acquirer API documentation that Verestro will use during the integration.
Returned data
After creating an account for the Customer, Verestro returns all necessary data which allow to use the solution. Such data includes:
|
Configuration parameter |
Description |
| Certificate X509 | |
| Gateway Id |
This is a constant and unique value that defines the PSP in the Google Pay™ system. When making a call to get a card token, the Customer transfers this value to Google Pay™ in the request. Verestro is defined by Gateway Id with Note: This only applies to Customers who make Google Pay payments by connecting directly to the Paytool API. Customers redirecting their payers to the Paytool frontend form should ignore this information. |
| Gateway Merchant Id |
This is a unique Customer identifier assigned by Verestro during the onboarding process. This identifier is in the form of a Note: This only applies to Customers who make Google Pay payments by connecting directly to the Paytool API. Customers redirecting their payers to the Paytool frontend form should ignore this information. |
Register in Google Pay™
Note: This only applies to Customers who make Google Pay payments by connecting directly to the Paytool API. If you are using Redirect your payer integration path you can ignore this section.
If you use Paytool with Payment process via API integration path, make sure you are a registered merchant in the Google Pay™ system. This does not apply to Customers using the Redirect your payer route.
To use the Token Payment Service solution, it is necessary for the Customer (you) to be registered as merchant in the Google Pay™ system. As an unregistered Customer you will not be able to get the card payment token from Google Pay in your application. To register in Google Pay™ visit Google Pay for Business quick start guide or contact Google Pay™ support. After completing registration as a merchant, the Customer will receive an access to Google Pay™ documentation enabling technical integration.
| Google Pay Web integration checklist | A checklist presenting the Google Pay integration requirements that must be met by the Customer integrating web application |
| Google Pay Web developer documentation | Technical documentation describing web integration with the Google Pay solution |
| Google Pay Web Brand Guidelines | Branding requirements that must be met by the Customer's web application to be able to use the Google Pay solution |
Register in Apple Pay™
Note: This only applies to Customers who make Apple Pay payments by connecting directly to the Paytool API. If you are using Redirect your payer integration path you can ignore this section.
If you use Paytool with Payment process via API integration path, make sure you are a registered merchant in the Apple Pay™ system. This does not apply to Customers using the Redirect your payer route.
To use the Token Payment Service solution, it is necessary for the Customer (you) to be registered as merchant in the Google Pay™ system. As an unregistered Customer you will not be able to get the card payment token from Apple Pay in your application. To register in Apple Pay™ follow Apple Pay Merchant Integration Guide.
How to integrate
This chapter provides the instruction of the integration with the solution and with it's methods. Prior to using this solution is you have to proceed onboarding process and you require created account in the Verestro Paytool system.
Note: To create an account in the Verestro Paytool system please contact with support.
Environment Test API base URL
https://paytool-api.verestro.devEnvironment Production API base URL
https://paytool-api.verestro.comTip: Below are presented sequence diagrams describing both ways of using the Paytool solution. We recommend using Redirect you payer integration path.
Integration method consisting in redirecting the payer to Paytool web view
@startuml
skinparam ParticipantPadding 30
skinparam BoxPadding 30
skinparam noteFontColor #FFFFFF
skinparam noteBackgroundColor #1C1E3F
skinparam noteBorderColor #1C1E3F
skinparam noteBorderThickness 1
skinparam sequence {
ArrowColor #1C1E3F
ArrowFontColor #1C1E3F
ActorBorderColor #1C1E3F
ActorBackgroundColor #FFFFFF
ActorFontStyle bold
ParticipantBorderColor #1C1E3F
ParticipantBackgroundColor #1C1E3F
ParticipantFontColor #FFFFFF
ParticipantFontStyle bold
LifeLineBackgroundColor #1C1E3F
LifeLineBorderColor #1C1E3F
}
actor payer
participant "Customer front" as cfront
participant "Customer backend" as cback
participant "Paytool front" as pfront
participant "Paytool backend" as pback
payer->cfront: Pay with Paytool
cfront->cback: Payer choosed Paytool
cback->pback: Customer authorization + transaction metadata
pback->pback: Store transaction metadata + open payment session
cback<-pback: OK + transaction id
cfront<-cback: OK + transaction id
cfront->pfront: Redirect + transaction id
pfront->pback: Get transaction data + merchant payment methods
pfront<-pback: OK response
payer<-pfront: Display transaction + payment methods
@enduml
Integration method consisting in continuing process via API calls
@startuml
skinparam ParticipantPadding 30
skinparam BoxPadding 30
skinparam noteFontColor #FFFFFF
skinparam noteBackgroundColor #1C1E3F
skinparam noteBorderColor #1C1E3F
skinparam noteBorderThickness 1
skinparam sequence {
ArrowColor #1C1E3F
ArrowFontColor #1C1E3F
ActorBorderColor #1C1E3F
ActorBackgroundColor #FFFFFF
ActorFontStyle bold
ParticipantBorderColor #1C1E3F
ParticipantBackgroundColor #1C1E3F
ParticipantFontColor #FFFFFF
ParticipantFontStyle bold
LifeLineBackgroundColor #1C1E3F
LifeLineBorderColor #1C1E3F
}
actor payer
participant "Customer front" as cfront
participant "Customer backend" as cback
participant "Paytool backend" as pback
payer->cfront: Pay with Paytool
cfront->cback: Payer choosed Paytool
cback->pback: Customer authorization + transaction metadata
pback->pback: Store transaction metadata + open payment session
cback<-pback: OK + transaction id
note right of cback: At this point, the Customer decides how to present the transaction to the payer
cback->pback: Request proper payment method / executing 3D Secure
cback<-pback: Transaction result
note right of cback: At this point, the Customer decides how to present the transaction result to the payer
@enduml
Methods in API
Our solution provides API method allowing you to order and process transaction by creating payment session and send transaction metadata to our system. In order to opening new payment session you receive transactionId in response which is unique identifier of the created session. Every ordered transaction has his own payment session. Using transactionId you can whether redirect your payer to our Paytool web view or continue the transaction process using other API methods provided by our solution. This section describes all API methods in Paytool solution.
Tip: Below there is a description of every single Paytool API method. To see example request bodies please visit complete API documentation is available here in SwaggerUI format. Please visit to see our methods.
Tip: Detailed information about what is included in the transaction metadata is shown in the transactionInitialization method.
This section describes the steps you need to take if you want the Paytool form to be displayed as an iframe on your website instead of redirecting your payer to Verestro Paytool website.
Tip: This section applies to customers who use the Redirect your payer implementation model. If you use a different integration model with Paytool, you can ignore this chapter.
Test Guide
TEST.Tip: Check it now. Verestro Paytool demo application is available here.
Plain card number
This method involves processing payments using credit or debit cards. In order to test it you will need to generate test cards because of possibility of getting card blocked due to anti-fraud policies on the acquirer side. Payment with plain card number use case is described here.
Test cards
| Begin | End | RC | MAC | Card Country | Currency |
|---|---|---|---|---|---|
|
5117960000000000 |
5117962249999999 |
CODE_00 |
x |
PL |
PLN |
|
5117962250000000 |
5117964499999999 |
CODE_00 |
x |
DE |
EUR |
|
5117964500000000 |
5117966749999999 |
CODE_00 |
x |
US |
USD |
|
5117966750000000 |
5117968999999999 |
CODE_00 |
x |
GB |
GBP |
|
5486000000000000 |
5486009999999999 |
CODE_05 |
x |
PL |
PLN |
|
5402060000000000 |
5402069999999999 |
CODE_30 |
x |
PL |
PLN |
|
5406603500000000 |
5406603599999999 |
CODE_05 |
03 |
PL |
PLN |
|
5167680100000000 |
5167680199999999 |
CODE_63 |
x |
PL |
PLN |
|
5296730000000000 |
5296730999999999 |
CODE_65 |
x |
PL |
PLN |
|
5238140000000000 |
5238140999999999 |
CODE_1A |
x |
PL |
PLN |
| Begin | End | RC | Card Country | Currency |
|---|---|---|---|---|
|
4400430000000000 |
4400430099999999 |
CODE_00 |
PL |
PLN |
|
4400430100000000 |
4400430199999999 |
CODE_00 |
DE |
EUR |
|
4400430200000000 |
4400430299999999 |
CODE_00 |
US |
USD |
|
4400430300000000 |
4400430349999999 |
CODE_00 |
GB |
GBP |
|
4400430350000000 |
4400430399999999 |
CODE_00 |
UA |
UAH |
|
4444184330000000 |
4444184339999999 |
CODE_05 |
PL |
PLN |
|
4444184320000000 |
4444184329999999 |
CODE_30 |
PL |
PLN |
|
4444184310000000 |
4444184319999999 |
CODE_N7 |
PL |
PLN |
|
4539120000000000 |
4539120999999999 |
CODE_65 |
PL |
PLN |
|
4567810000000000 |
4567810999999999 |
CODE_1A |
PL |
PLN |
Note: CVV may be randomized, expiration date must not be expired.
Testing various transaction paths
|
ThreeDs mode |
Amount |
|
100 - 1000 |
|
|
1001 - 3000 |
Note: Amount is a value determining amount of cash transferred in one hundredth of the currency [1,00 USD = 100].
Tip: Select an amount between 3001-8000 to test failed transaction.
Google Pay
TEST environment. Google Pay payment use case is described here.Note: To be able to test all flows of ThreeDs in Google Pay follow the description about testing various transaction paths
Apple Pay
This method involves processing payments using tokenized credit or debit cards. You need to create Apple sandbox tester account. Follow apple documentation to do so. After registration and logging in into tester account you are ready to test Apple Pay token payment. There is a list of apple-pay valid payment cards. Payment with Apple Pay use case is described here.
Blik
To perform a BLIK transaction in the TEST environment, enter the code 777777. This is a mock code provided by BLIK and should be used if you want to complete the transaction with a SUCCESS status.
Quick start sandbox in your app
Info: Remember that this is a sandbox version. This means that the transaction is a test. No fees will be charged for executing payment.
The required steps for setting up a Paytool sandbox in your application
|
1. Call Paytool API by executing transaction initialization method. You can use the cURL below to do it. |
|
2. In the response to the cURL call, we will return the transactionId and the URL to which you should redirect the payer. This URL address will open the Paytool view shown below: |
|
|
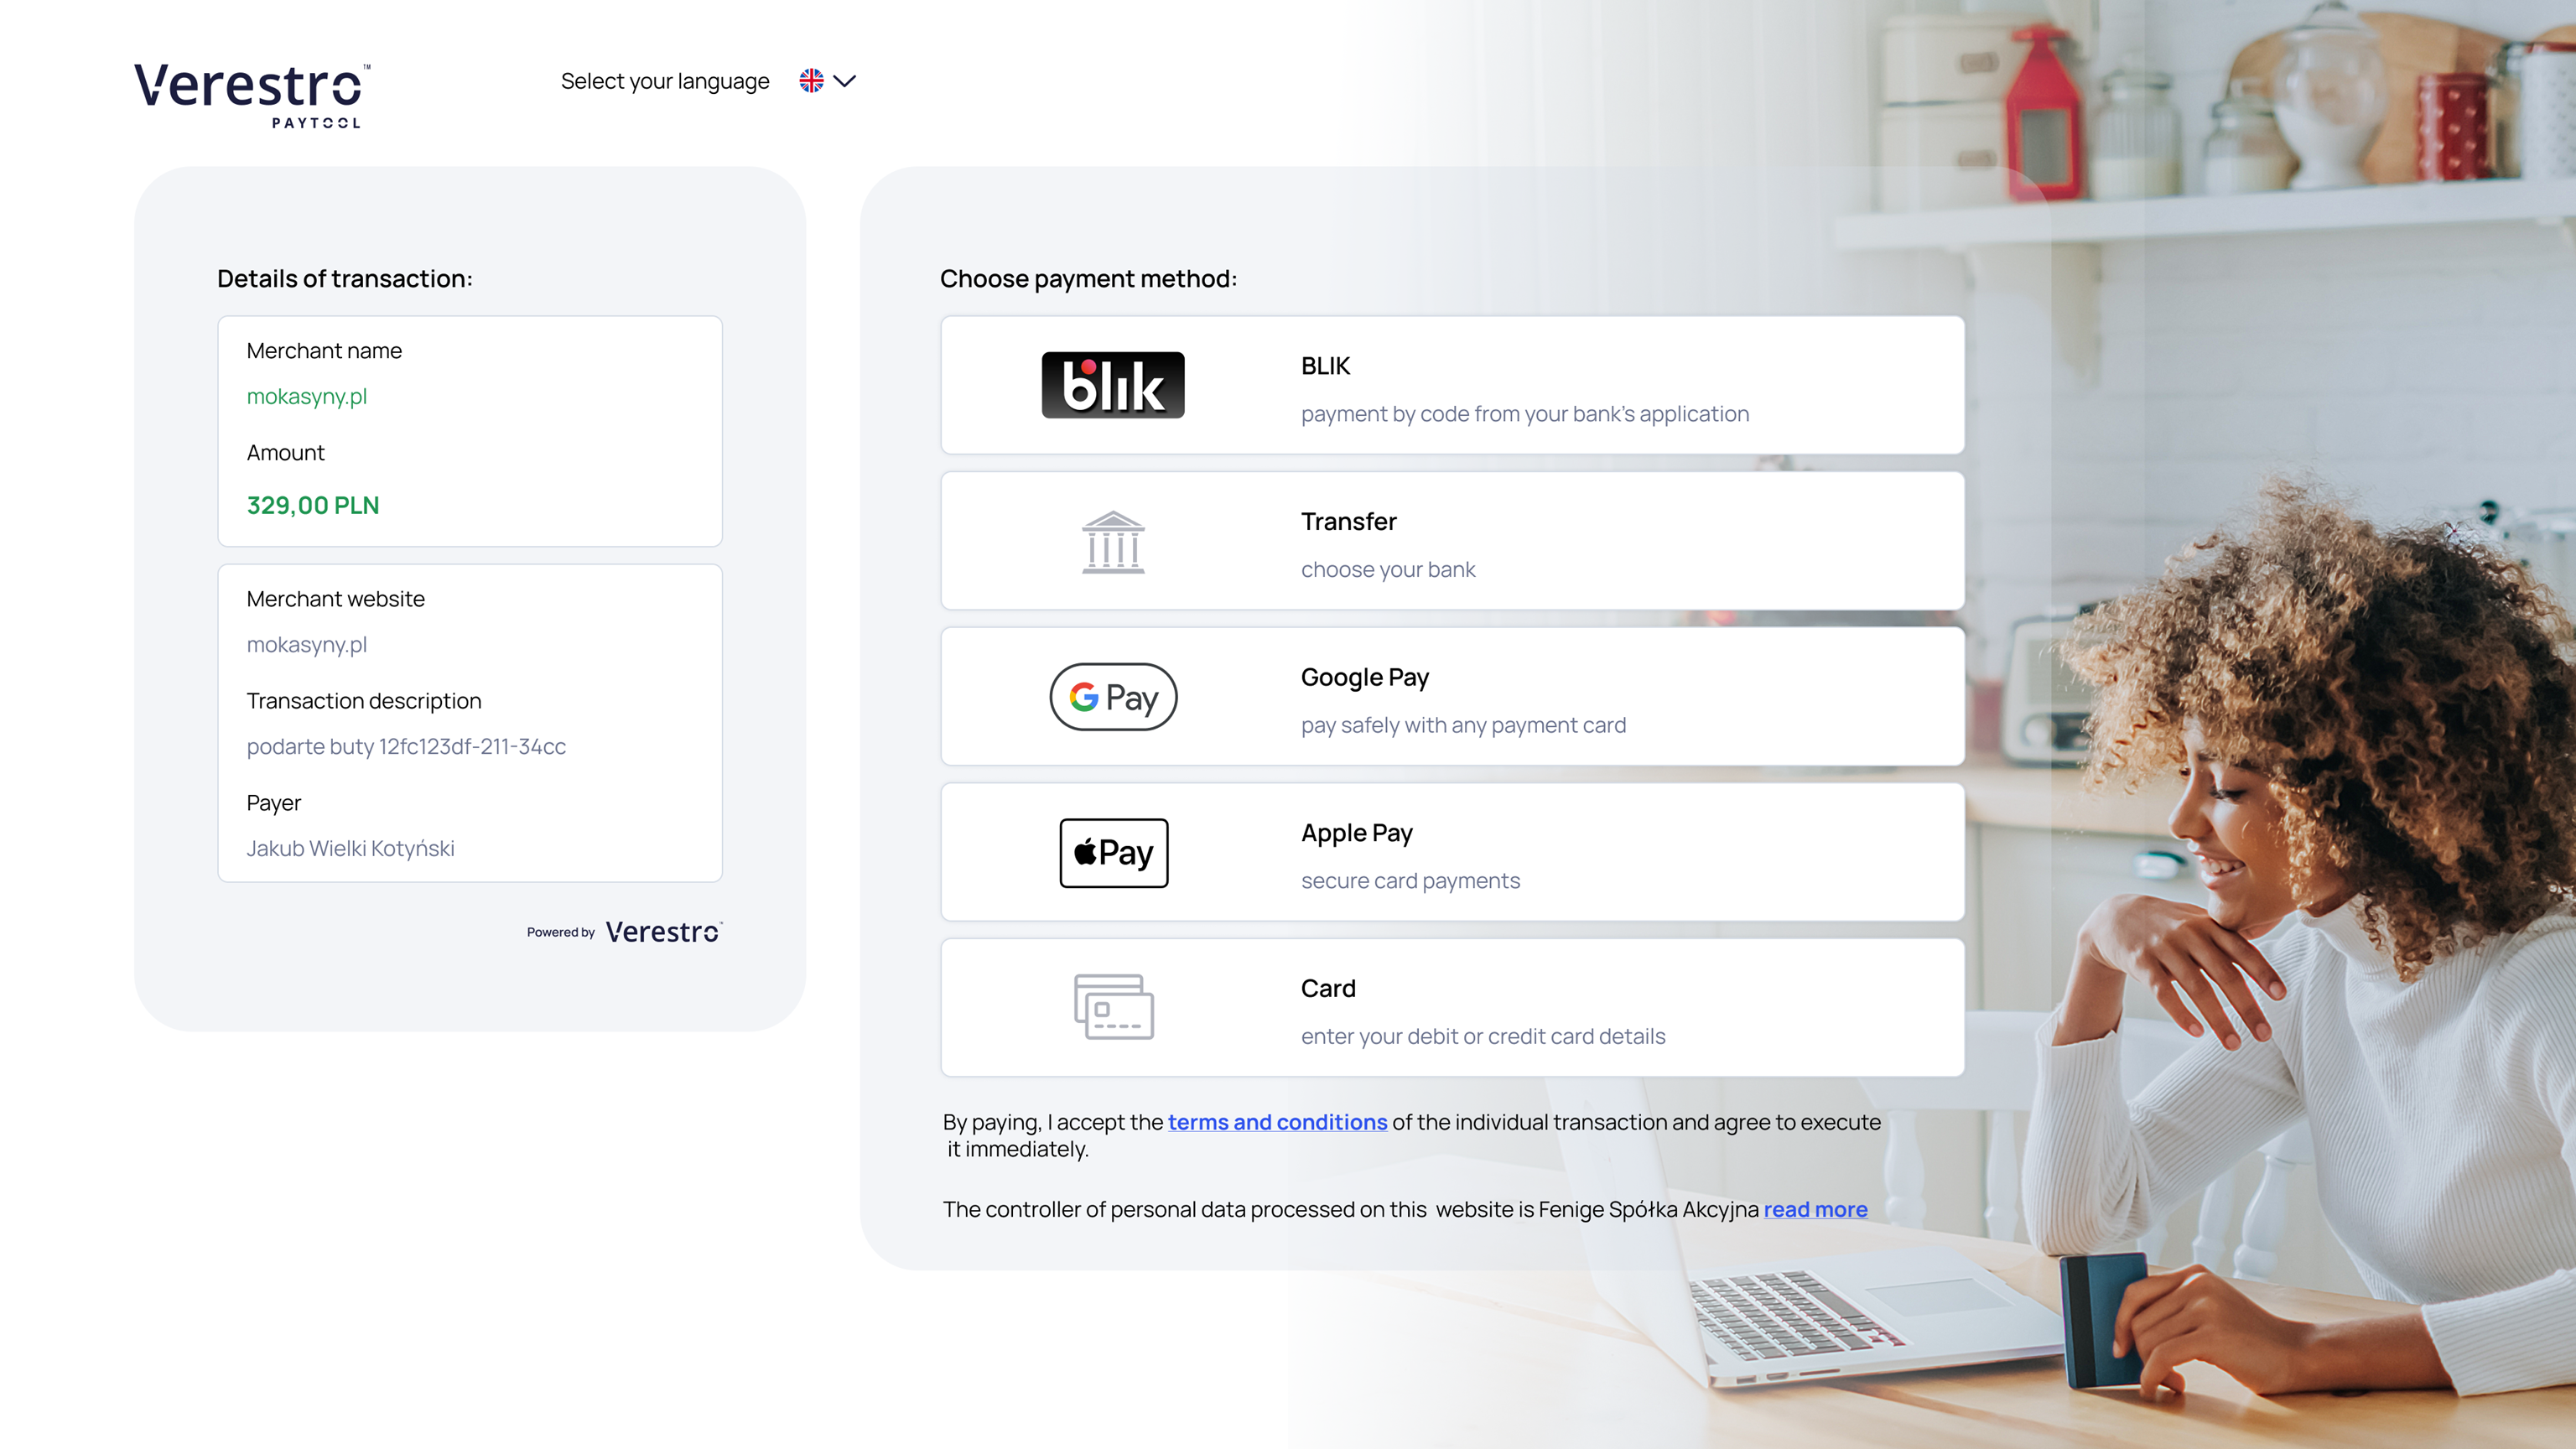
Paytool External API
External API
This chapter provides technical information about the methods created for External application.
Info: The authentication in our system is handled through the mTLS. To get a certificate please visit this link.
How to get certificate x509
Generate a key pair:
openssl genrsa -out client.key 2048Create a Certificate Signing Request (CSR):
openssl req -new -newkey rsa:4096 -keyout companyName.key -out companyName.csr -nodes -subj '/C=US/ST=Florida/L=Miami/O=SomeCompany/OU=main/CN=V-customer-App/emailAddress=example@user.com'Send the .csr file to our Chief of the security department: sebastian.misiewicz@verestro.com
@swagger="https://paytool-api.verestro.com/doc/external.yaml"
Paytool Internal API
@swagger="https://paytool-api.verestro.dev/doc/internal.yaml"
Paytool SDK
Paytool form can be displayed as an iframe on your website. To perform this integration path please visit Paytool SDK documentation available on this link: Introduction | Verestro Paytool SDK