# AML Transaction Monitoring - Administration Panel Overview

The AML Transaction Monitoring GUI enables operators to configure custom rulesets, define value sets and actions for transaction monitoring, and manage user watchlists. The system is currently being enhanced with a testing feature for dry‑run ruleset validation and an analytics dashboard for monitoring AML transaction patterns and statistics.

### Purpose &amp; scope

This documentation covers the primary processes within the AML configuration module of the partnerbank Admin Panel.

<table border="1" id="bkmrk-name-description-rul" style="width: 100%;"><tbody><tr><td bgcolor="#1C1E3F" style="width: 25%;"><span style="color: #ecf0f1;">**Name**</span></td><td bgcolor="#1C1E3F" style="width: 75%;"><span style="color: #ecf0f1;">**Description**</span></td></tr><tr><td>Ruleset management</td><td>Creating and managing rule configurations for transaction monitoring.</td></tr><tr><td>Actions management</td><td>Defining actions returned by the AML system.</td></tr><tr><td>Value set management</td><td>Managing internal variables and stored values.</td></tr><tr><td>Watchlist management</td><td>Adding and removing users from blacklists and greylists.</td></tr></tbody></table>

### Terminology

<table border="1" id="bkmrk-name-description-end" style="width: 100%;"><tbody><tr><td bgcolor="#1C1E3F" style="width: 25%;"><span style="color: #ecf0f1;">**Name**</span></td><td bgcolor="#1C1E3F" style="width: 75%;"><span style="color: #ecf0f1;">**Description**</span></td></tr><tr><td>End user</td><td>Cardholder performing transactions.</td></tr><tr><td>Operator</td><td>User working with the Administration Panel.</td></tr><tr><td>Ruleset</td><td>Predefined sets of conditions checked and processed after receiving a transaction verification request.</td></tr><tr><td>Action</td><td>Response returned by the AML system that must be processed by the external product sending the verification request.</td></tr><tr><td>Value set</td><td>Internal variable storing multiple values (for example: UHRC country codes in ISO Alpha‑2 format).</td></tr><tr><td>Watchlist</td><td>Internal storage for suspicious users, checked during transaction verification to determine appropriate decisions and actions.</td></tr></tbody></table>

## RULESETS

This section of the GUI is responsible for managing rulesets, value sets and actions.

### Rulesets

#### Defining a ruleset

To create a new ruleset, follow these steps. On the right you can insert a screenshot of the Add ruleset page to illustrate the process.

<table border="0" id="bkmrk-navigate-to-aml-%E2%86%92-ru" style="width: 100%;"><tbody><tr><td style="width: 25.623758%; vertical-align: top;">1. Navigate to **AML → Rules** and ensure the **Rule sets** tab is active.
2. Click the **Add ruleset** button.
3. Enter a descriptive **Name** for your ruleset (this field is required).
4. Provide the full rule logic in the **Ruleset definition** text area (in YAML format).
5. (Optional) Toggle **Enable test ruleset** to run the ruleset on historical transactions without affecting live processing.
6. Decide whether to save the ruleset as disabled or enabled by clicking **Save as disabled** or **Save as enabled**. Use **Cancel** to abort.

</td><td style="width: 74.376242%; vertical-align: top;">[![image.png](https://developer.verestro.com/uploads/images/gallery/2025-11/scaled-1680-/cZYimage.png)
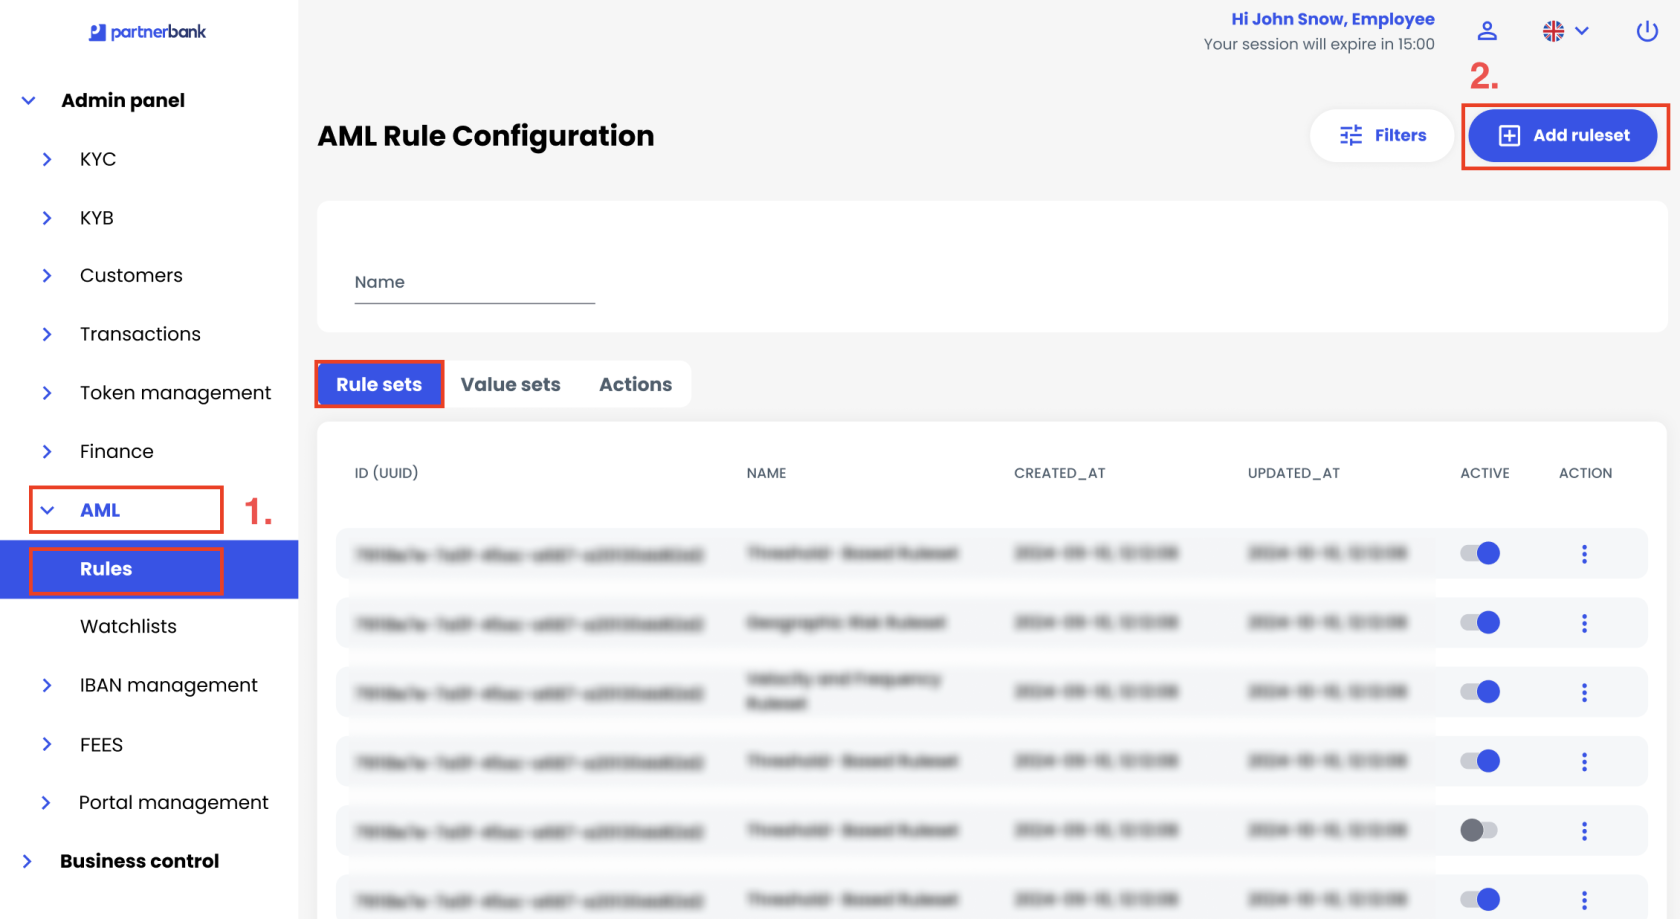
](https://developer.verestro.com/uploads/images/gallery/2025-11/cZYimage.png)

[![image.png](https://developer.verestro.com/uploads/images/gallery/2025-11/scaled-1680-/9Qsimage.png)
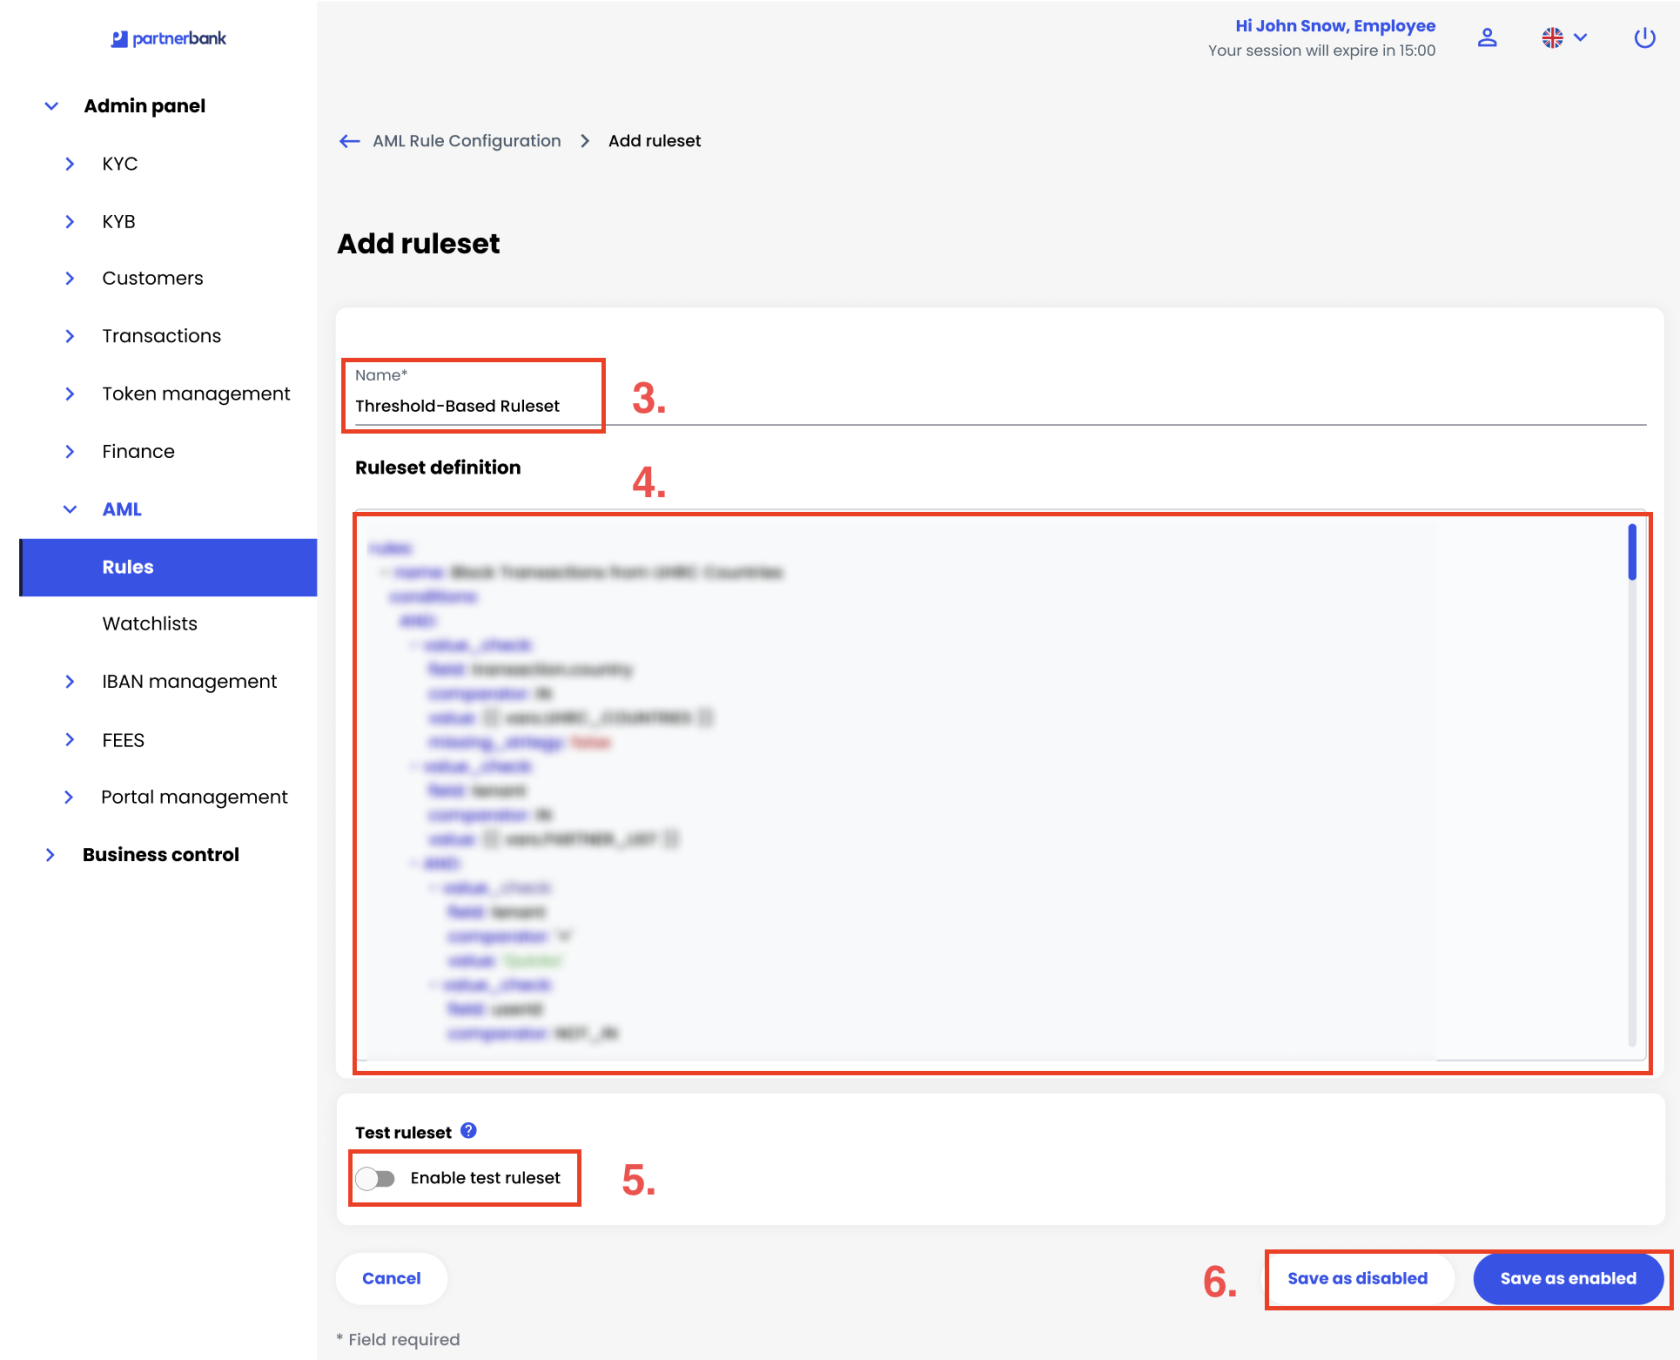
](https://developer.verestro.com/uploads/images/gallery/2025-11/9Qsimage.png)

</td></tr></tbody></table>

<p class="callout info">**Note:** A traditional YAML builder using forms and blocks is under development. In the final version, rulesets can be defined either with the text editor or with an easy-to-use form.</p>

#### Ruleset list

You can view all configured rulesets in the **Rule sets** tab. The list displays:

<table border="1" id="bkmrk-column-description-i" style="width: 100%;"><tbody><tr><td bgcolor="#1C1E3F" style="width: 25%;">**<span style="color: #ecf0f1;">Column</span>**</td><td bgcolor="#1C1E3F" style="width: 75%;">**<span style="color: #ecf0f1;">Description</span>**</td></tr><tr><td>ID (uuid)</td><td>Unique internal identifier of the ruleset.</td></tr><tr><td>NAME</td><td>Descriptive name of the ruleset.</td></tr><tr><td>CREATED\_AT</td><td>Date and time when the ruleset was created.</td></tr><tr><td>UPDATED\_AT</td><td>Date and time when the ruleset was last modified.</td></tr><tr><td>ACTIVE</td><td>Indicates whether the ruleset is enabled (blue switch) or disabled (grey switch).</td></tr><tr><td>ACTION</td><td>Menu containing actions such as view details, edit or delete.</td></tr></tbody></table>

[![image.png](https://developer.verestro.com/uploads/images/gallery/2025-11/scaled-1680-/4JRimage.png)](https://developer.verestro.com/uploads/images/gallery/2025-11/4JRimage.png)

#### Ruleset details

When you click a ruleset row, a detailed view opens showing all configuration fields. The table below summarises these elements.

<table border="1" id="bkmrk-element-description-" style="width: 100%;"><tbody><tr><td bgcolor="#1C1E3F" style="width: 25%;"><span style="color: #ecf0f1;">**Element**</span></td><td bgcolor="#1C1E3F" style="width: 75%;"><span style="color: #ecf0f1;">**Description**</span></td></tr><tr><td>Basic data</td><td>The panel that summarises the ruleset’s *ID (uuid)*, *Name*, *Created\_at* and *Updated\_at* values.</td></tr><tr><td>ID (uuid)</td><td>Unique identifier of the ruleset, displayed in the Basic data panel.</td></tr><tr><td>Name</td><td>The descriptive name of the ruleset, shown in the Basic data panel.</td></tr><tr><td>Created\_at</td><td>The date and time when the ruleset was created.</td></tr><tr><td>Updated\_at</td><td>The date and time when the ruleset was last modified.</td></tr><tr><td>Ruleset definition tab</td><td>The tab that displays the YAML definition of the ruleset, including conditions, triggers, decisions and actions.</td></tr><tr><td>Ruleset tests tab</td><td>The tab used for running and viewing test results for the ruleset.</td></tr><tr><td>Edit button</td><td>A button that opens the ruleset edit form.</td></tr><tr><td>Test ruleset button</td><td>A button that runs a dry‑run test on the ruleset using historical transaction data.</td></tr></tbody></table>

[![image.png](https://developer.verestro.com/uploads/images/gallery/2025-11/scaled-1680-/P7bimage.png)](https://developer.verestro.com/uploads/images/gallery/2025-11/P7bimage.png)

#### Ruleset activation / deactivation

When creating a ruleset, the operator chooses whether the ruleset should be active right away or saved in a disabled state by selecting **Save as enabled** or **Save as disabled**. Once the ruleset exists, its state can be toggled on or off at any time from the list view: use the status switch to enable or disable the ruleset and confirm the change. Changes take effect immediately after confirmation.

<table border="1" id="bkmrk-status-indicator-des" style="width: 100%;"><tbody><tr><td bgcolor="#1C1E3F" style="width: 19.434559%;"><span style="color: #ecf0f1;">**Status indicator**</span></td><td bgcolor="#1C1E3F" style="width: 80.565441%;"><span style="color: #ecf0f1;">**Description**</span></td></tr><tr><td style="width: 19.434559%;">Blue switch</td><td style="width: 80.565441%;">The ruleset is enabled. The toggle switch is coloured blue and positioned to the right.</td></tr><tr><td style="width: 19.434559%;">Grey switch</td><td style="width: 80.565441%;">The ruleset is disabled. The toggle switch is grey and positioned to the left.</td></tr></tbody></table>

[![image.png](https://developer.verestro.com/uploads/images/gallery/2025-11/scaled-1680-/gj9image.png)](https://developer.verestro.com/uploads/images/gallery/2025-11/gj9image.png)

#### Ruleset testing (dry‑run)

<p class="callout info">**Note:** Feature under development. The dry‑run engine will allow operators to run rulesets against historical transaction data and view the result that the ruleset would return without impacting live processing.</p>

### Value sets

#### Defining a value set

Follow these steps to create a new value set. Use the right column for a screenshot of the “Add value set” page.

<table border="0" id="bkmrk-navigate-to-aml-%E2%86%92-ru-1" style="width: 100%;"><tbody><tr><td style="width: 25.270872%; vertical-align: top;">1. Navigate to **AML → Rules** and open the **Value sets** tab.
2. Click the **Add value set** button.
3. Provide a descriptive **Name** in the *Name\** field (this is required).
4. In the *Value set* area, enter each value. Existing values are displayed as tags with an **x** to remove them. Use the **add value +** button to add additional entries.
5. Click **Save** to create the value set or **Cancel** to discard your changes.

</td><td style="width: 74.729128%; vertical-align: top;">[![image.png](https://developer.verestro.com/uploads/images/gallery/2025-11/scaled-1680-/kV8image.png)
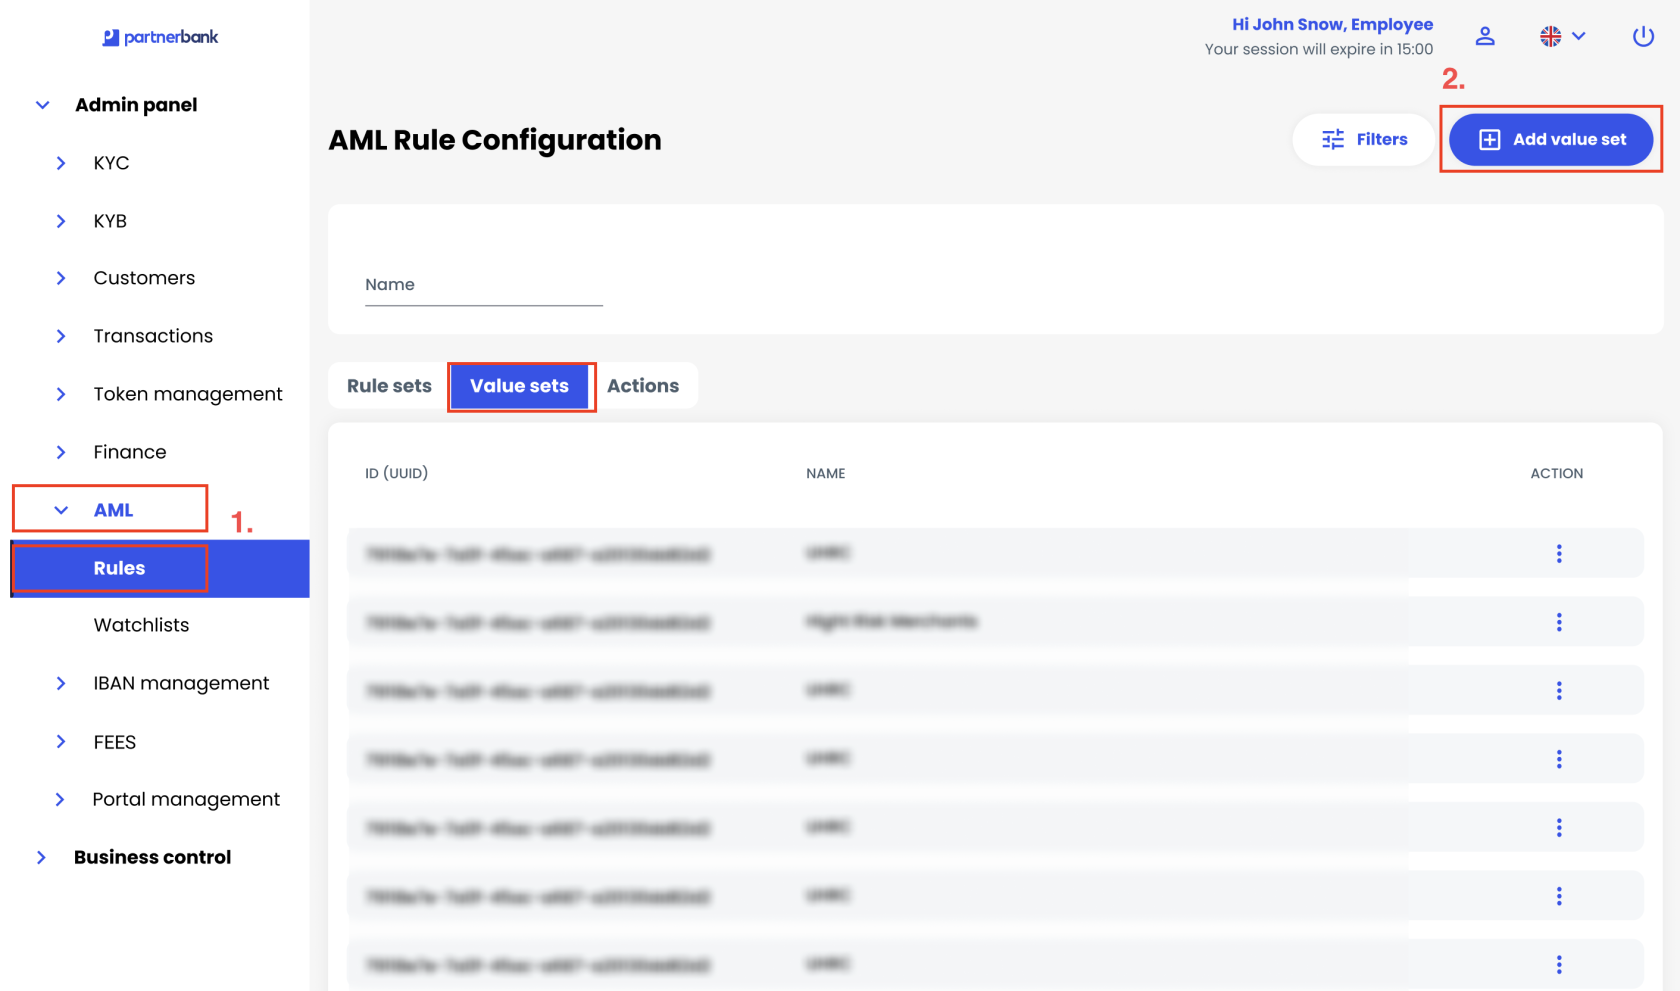
](https://developer.verestro.com/uploads/images/gallery/2025-11/kV8image.png)

[![Screenshot 2025-11-30 at 14.17.26.png](https://developer.verestro.com/uploads/images/gallery/2025-11/scaled-1680-/screenshot-2025-11-30-at-14-17-26.png)
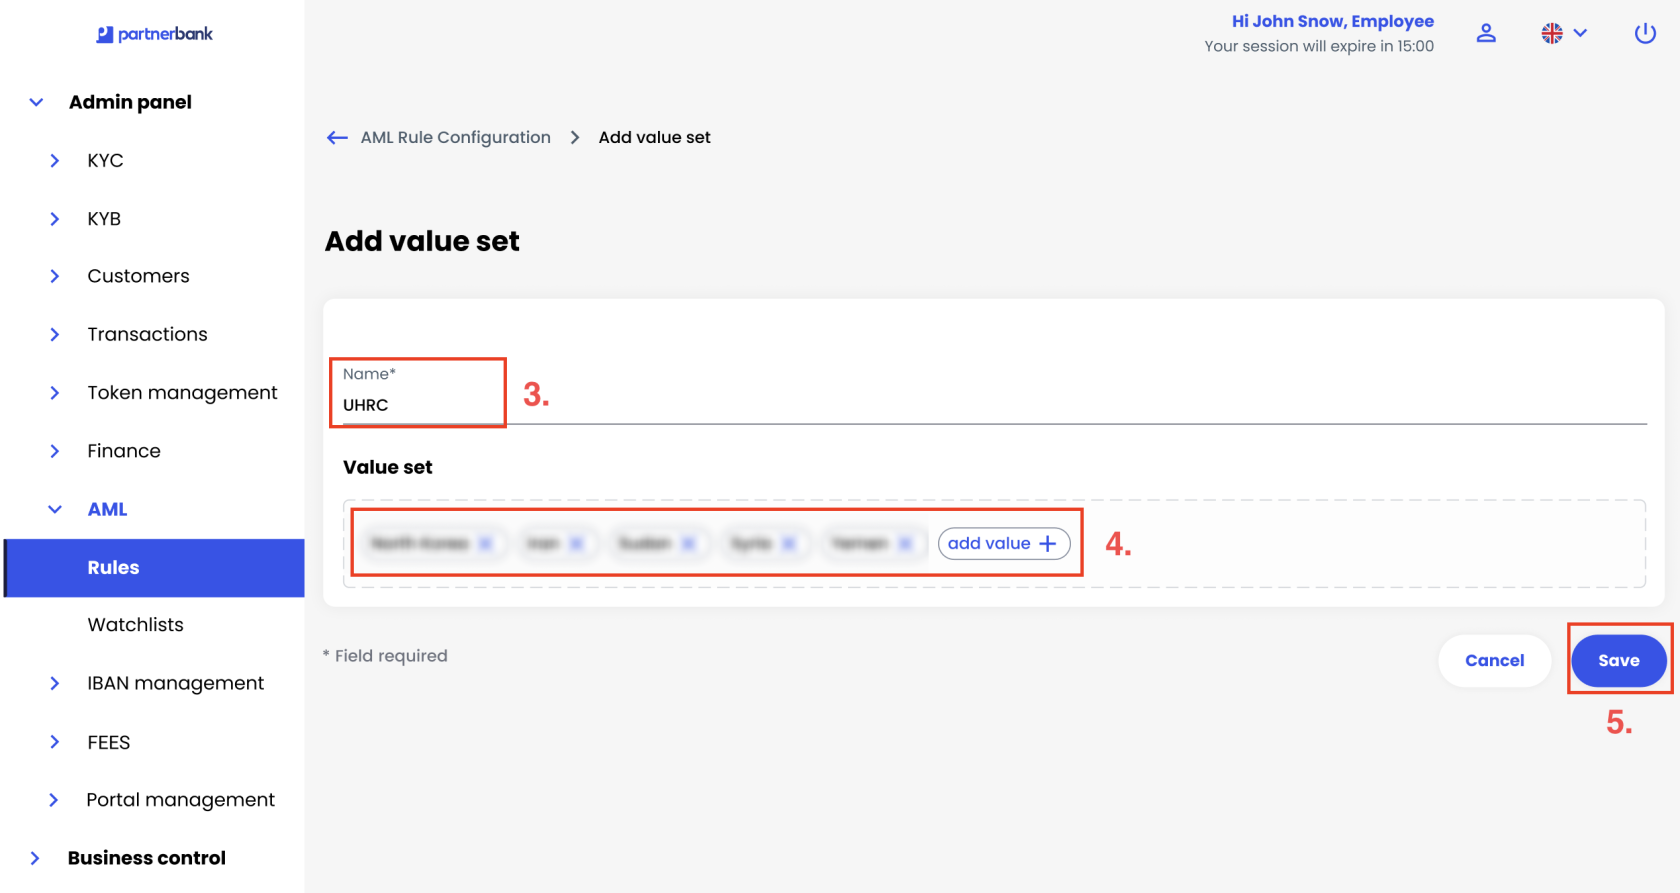
](https://developer.verestro.com/uploads/images/gallery/2025-11/screenshot-2025-11-30-at-14-17-26.png)

</td></tr></tbody></table>

#### Value sets list

The **Value sets** tab lists all defined value sets. Each row includes the following columns:

<table border="1" id="bkmrk-column-description-i-1" style="width: 100%;"><tbody><tr><td bgcolor="#1C1E3F" style="width: 25%;"><span style="color: #ecf0f1;">**Column**</span></td><td bgcolor="#1C1E3F" style="width: 75%;"><span style="color: #ecf0f1;">**Description**</span></td></tr><tr><td>ID (uuid)</td><td>Unique identifier of the value set.</td></tr><tr><td>NAME</td><td>The name of the value set.</td></tr><tr><td>ACTION</td><td>Menu containing available operations such as view details, edit or delete.</td></tr></tbody></table>

[![image.png](https://developer.verestro.com/uploads/images/gallery/2025-11/scaled-1680-/kT7image.png)](https://developer.verestro.com/uploads/images/gallery/2025-11/kT7image.png)

#### Value set details

Selecting a value set opens a detailed view where you can add or remove individual values. The elements are described below:

<table border="1" id="bkmrk-element-description--1" style="width: 100%;"><tbody><tr><td bgcolor="#1C1E3F" style="width: 25%;"><span style="color: #ecf0f1;">**Element**</span></td><td bgcolor="#1C1E3F" style="width: 75%;"><span style="color: #ecf0f1;">**Description**</span></td></tr><tr><td>Basic data</td><td>A panel summarising the value set’s *ID (uuid)* and *Name*.</td></tr><tr><td>ID (uuid)</td><td>Unique identifier of the value set.</td></tr><tr><td>Name</td><td>The name of the value set.</td></tr><tr><td>Value set</td><td>The list of values stored in the set. Each value appears as a tag with an option to remove it; new values can be added using an input or the **add value +** button.</td></tr><tr><td>Edit button</td><td>A button in the top‑right corner that opens the value set edit form.</td></tr></tbody></table>

[![image.png](https://developer.verestro.com/uploads/images/gallery/2025-11/scaled-1680-/FZcimage.png)](https://developer.verestro.com/uploads/images/gallery/2025-11/FZcimage.png)

### Actions

#### Defining an action

The table below outlines the steps for creating a new action. A screenshot of the “Add action” page can be placed in the right column.

<table border="0" id="bkmrk-navigate-to-aml-%E2%86%92-ru-2" style="width: 100%;"><tbody><tr><td style="width: 26.577133%; vertical-align: top;">1. Navigate to **AML → Rules** and open the **Actions** tab.
2. Click the **Add action** button.
3. Enter the action name in the *Name\** field (required).
4. Select a *Group\** from the dropdown list (required).
5. Define one or more properties for the action: 
    - Provide a **Property name\***.
    - Choose whether the property is required by selecting **No** or **Yes**.
    - Enter allowed values as tags in the **Value** field and use the **add value +** button to add additional values.
6. If additional properties are needed, click **Add new property** and repeat the previous step.
7. Click **Save** to create the action or **Cancel** to discard your changes.

</td><td style="width: 73.422867%; vertical-align: top;">[![image.png](https://developer.verestro.com/uploads/images/gallery/2025-11/scaled-1680-/kQuimage.png)
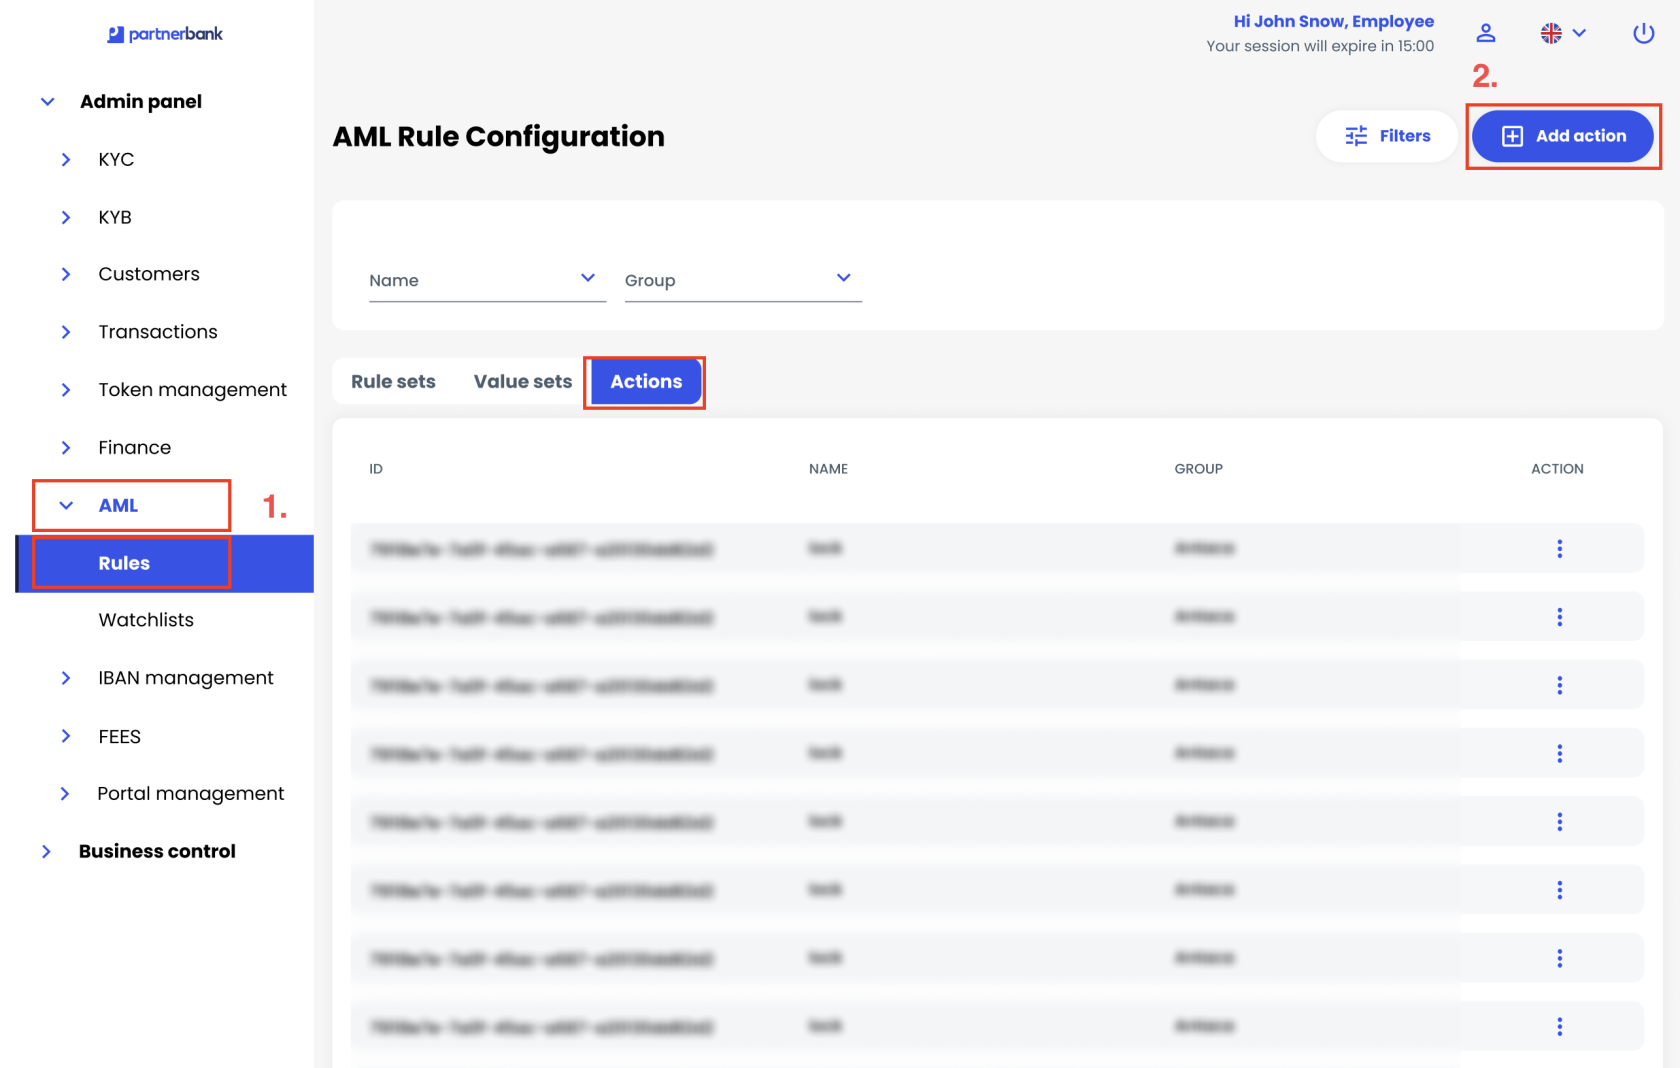
](https://developer.verestro.com/uploads/images/gallery/2025-11/kQuimage.png)

[![image.png](https://developer.verestro.com/uploads/images/gallery/2025-11/scaled-1680-/4Xdimage.png)
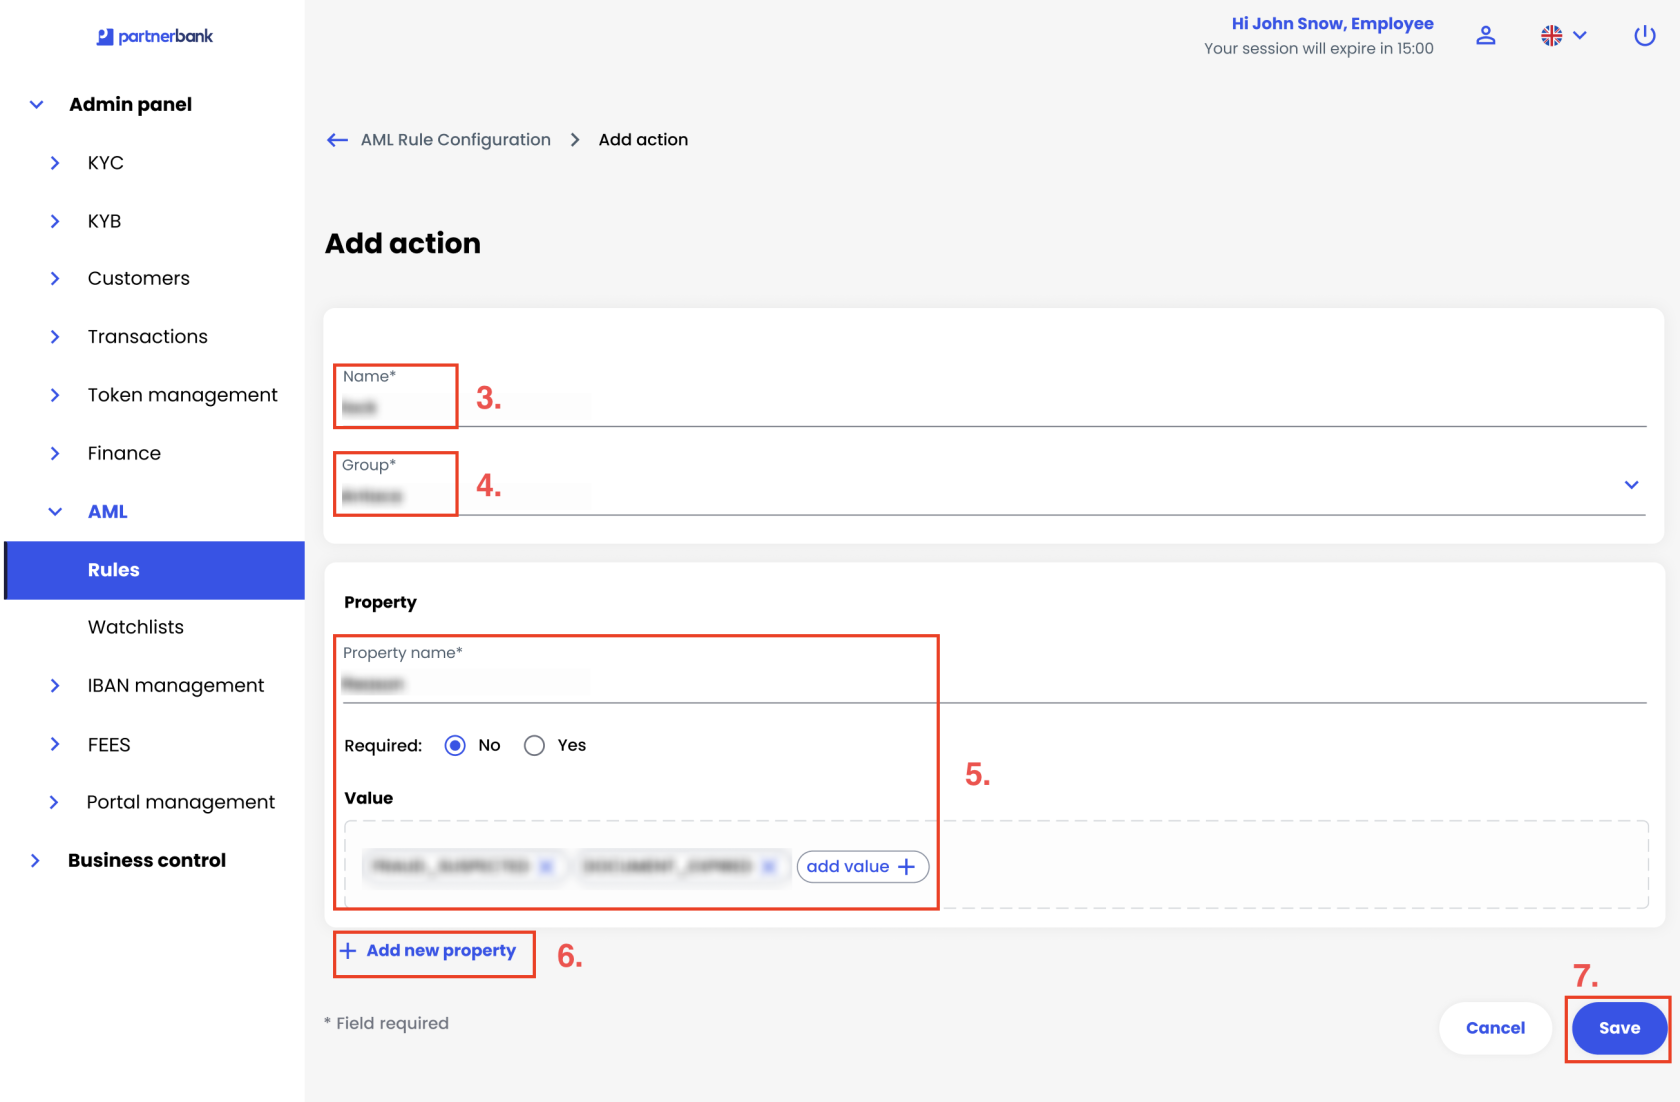
](https://developer.verestro.com/uploads/images/gallery/2025-11/4Xdimage.png)

</td></tr></tbody></table>

#### Action list

The **Actions** tab lists all configured actions. Each row shows:

<table border="1" id="bkmrk-column-description-i-2" style="width: 100%; height: 145px;"><tbody><tr style="height: 29px;"><td bgcolor="#1C1E3F" style="width: 25%; height: 29px;"><span style="color: #ecf0f1;">**Column**</span></td><td bgcolor="#1C1E3F" style="width: 75%; height: 29px;"><span style="color: #ecf0f1;">**Description**</span></td></tr><tr style="height: 29px;"><td style="height: 29px;">ID (uuid)</td><td style="height: 29px;">Unique identifier of the action.</td></tr><tr style="height: 29px;"><td style="height: 29px;">NAME</td><td style="height: 29px;">The name of the action.</td></tr><tr style="height: 29px;"><td style="height: 29px;">GROUP</td><td style="height: 29px;">The group to which the action belongs.</td></tr><tr style="height: 29px;"><td style="height: 29px;">ACTION</td><td style="height: 29px;">Menu containing available operations such as view details, edit or delete.</td></tr></tbody></table>

[![image.png](https://developer.verestro.com/uploads/images/gallery/2025-11/scaled-1680-/086image.png)](https://developer.verestro.com/uploads/images/gallery/2025-11/086image.png)

#### Action details

Clicking an action opens a details page that displays its configuration. The table below describes each element.

<table border="1" id="bkmrk-element-description--2" style="width: 100%;"><tbody><tr><td bgcolor="#1C1E3F" style="width: 25%;"><span style="color: #ecf0f1;">**Element**</span></td><td bgcolor="#1C1E3F" style="width: 75%;"><span style="color: #ecf0f1;">**Description**</span></td></tr><tr><td>Basic data</td><td>A panel summarising the action’s *ID (uuid)*, *Name* and *Group*.</td></tr><tr><td>ID (uuid)</td><td>Unique identifier of the action.</td></tr><tr><td>Name</td><td>The name of the action.</td></tr><tr><td>Group</td><td>The group to which the action belongs.</td></tr><tr><td>Property</td><td>Details for each property defined in the action. Each property contains a name, a required flag and a list of values.</td></tr><tr><td>Property name</td><td>The name of the property (e.g. *resource\_type*).</td></tr><tr><td>Required</td><td>Indicates whether the property is mandatory (true) or optional (false).</td></tr><tr><td>Values</td><td>The allowed values for the property, shown as tags (e.g. `FRAUD_SUSPECTED`, `DOCUMENT_EXPIRED`).</td></tr><tr><td>Edit button</td><td>A button that opens the action edit form.</td></tr></tbody></table>

[![image.png](https://developer.verestro.com/uploads/images/gallery/2025-11/scaled-1680-/i6dimage.png)](https://developer.verestro.com/uploads/images/gallery/2025-11/i6dimage.png)

## WATCHLISTS

The system supports two watchlist types: **Blacklist** and **Greylist**. Both lists are managed identically; you can switch between them using the tabs at the top of the watchlist management page.

### Blacklist

#### Adding a user

<table border="0" id="bkmrk-navigate-to-aml-%E2%86%92-wa" style="width: 100%;"><tbody><tr><td style="width: 29.799222%; vertical-align: top;">1. Navigate to **AML → Watchlists**.
2. Select the **Blacklist** tab.
3. Click the **Add user** button.
4. Fill in the user information fields, including **Name**, **Surname**, **Full name**, **Birth date**, **Pesel**, **Document number**, **Document type**, **Country**, **City** and **IBAN** (if applicable).
5. Click **Save** to add the user.

</td><td style="width: 70.200778%; vertical-align: top;">[![image.png](https://developer.verestro.com/uploads/images/gallery/2025-11/scaled-1680-/kQhimage.png)](https://developer.verestro.com/uploads/images/gallery/2025-11/kQhimage.png)

[![image.png](https://developer.verestro.com/uploads/images/gallery/2025-11/scaled-1680-/wPyimage.png)
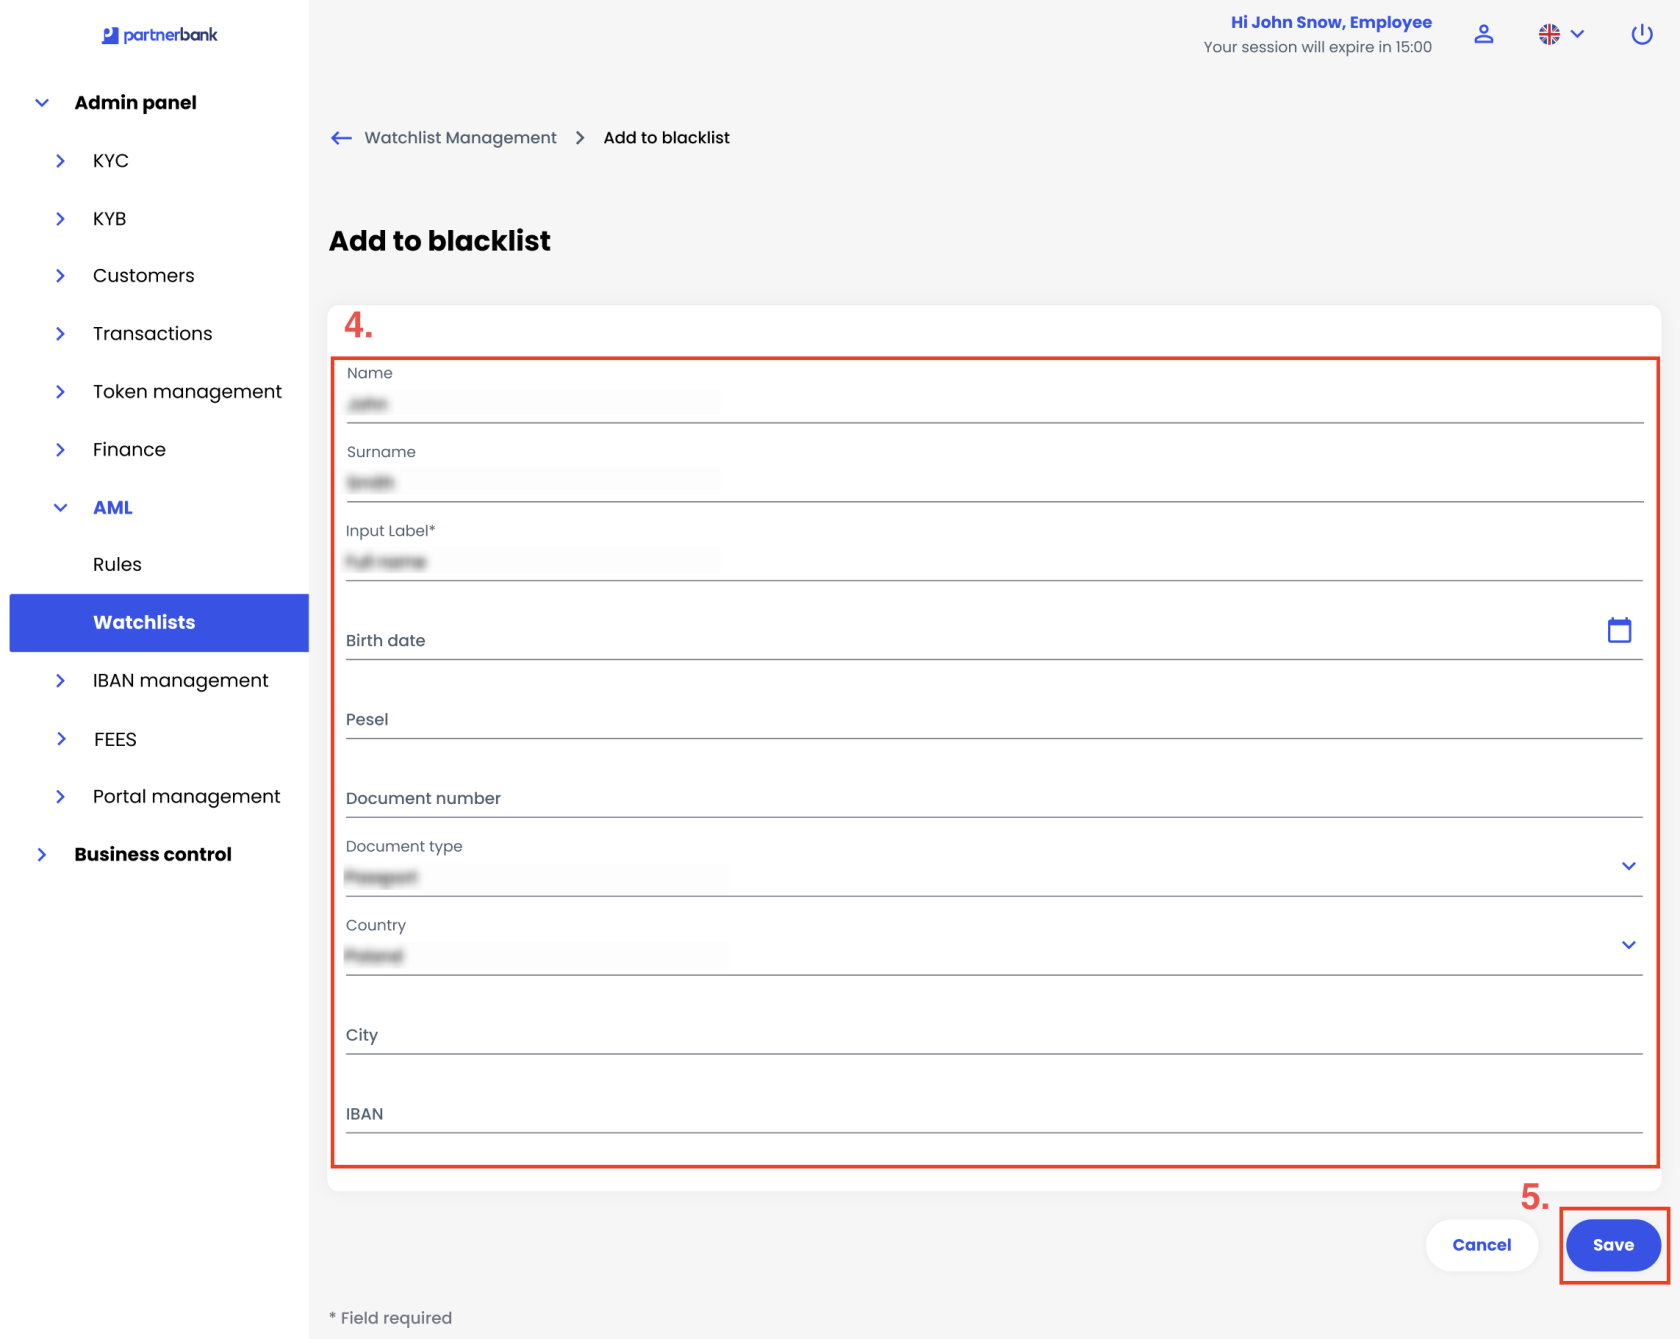
](https://developer.verestro.com/uploads/images/gallery/2025-11/wPyimage.png)

</td></tr></tbody></table>

**User information fields:**

<table border="1" id="bkmrk-field-description-na" style="width: 100%;"><tbody><tr><td bgcolor="#1C1E3F" style="width: 25%;"><span style="color: #ecf0f1;">**Field**</span></td><td bgcolor="#1C1E3F" style="width: 75%;"><span style="color: #ecf0f1;">**Description**</span></td></tr><tr><td>Name</td><td>User’s first name (required).</td></tr><tr><td>Surname</td><td>User’s surname (required).</td></tr><tr><td>Full name</td><td>The person’s full name (first and last names together).</td></tr><tr><td>Birth date</td><td>Date of birth (required).</td></tr><tr><td>Pesel</td><td>Personal identification number (PESEL) (required).</td></tr><tr><td>Document number</td><td>Identification document number (required).</td></tr><tr><td>Document type</td><td>Select from dropdown (Passport, ID card, etc.).</td></tr><tr><td>Country</td><td>Select country from dropdown.</td></tr><tr><td>City</td><td>Enter city name.</td></tr><tr><td>IBAN</td><td>Bank account number (if applicable).</td></tr></tbody></table>

**Important:** Adding a user to a watchlist does not automatically trigger any actions. A ruleset must reference the watchlist to determine whether to approve, decline or place a transaction on hold.

#### Removing a user

<table border="0" id="bkmrk-navigate-to-watchlis" style="width: 100%;"><tbody><tr><td style="width: 25.508684%; vertical-align: top;">1. Navigate to **Watchlists → Blacklist**.
2. Use the search filters to locate the user.
3. Click the actions menu (three dots) for that user.
4. Select **Delete** and confirm the removal.

</td><td style="width: 74.491316%; vertical-align: top;">[![image.png](https://developer.verestro.com/uploads/images/gallery/2025-11/scaled-1680-/pcrimage.png)](https://developer.verestro.com/uploads/images/gallery/2025-11/pcrimage.png)

</td></tr></tbody></table>

#### Searching and filtering

The watchlist management page includes filters to narrow down the list of users:

<table border="1" id="bkmrk-filter-description-n" style="width: 100%;"><tbody><tr><td bgcolor="#1C1E3F" style="width: 25%;"><span style="color: #ecf0f1;">**Filter**</span></td><td bgcolor="#1C1E3F" style="width: 75%;"><span style="color: #ecf0f1;">**Description**</span></td></tr><tr><td>Name</td><td>Filter by name (first name).</td></tr><tr><td>Surname</td><td>Filter by surname.</td></tr><tr><td>Full name</td><td>Filter by full name (first and last names together).</td></tr><tr><td>Pesel</td><td>Filter by personal identification number (PESEL).</td></tr><tr><td>Document number</td><td>Filter by identification document number.</td></tr><tr><td>Country</td><td>Filter by country (dropdown).</td></tr><tr><td>City</td><td>Filter by city.</td></tr></tbody></table>

[![image.png](https://developer.verestro.com/uploads/images/gallery/2025-11/scaled-1680-/breimage.png)](https://developer.verestro.com/uploads/images/gallery/2025-11/breimage.png)

#### Blacklist table

The blacklist displays the following columns for each entry:

<table border="1" id="bkmrk-column-description-i-3" style="width: 100%; height: 261px;"><tbody><tr style="height: 29px;"><td bgcolor="#1C1E3F" style="width: 25%; height: 29px;"><span style="color: #ecf0f1;">**Column**</span></td><td bgcolor="#1C1E3F" style="width: 75%; height: 29px;"><span style="color: #ecf0f1;">**Description**</span></td></tr><tr style="height: 29px;"><td style="height: 29px;">ID</td><td style="height: 29px;">Internal identifier for the entry (UUID shown truncated).</td></tr><tr style="height: 29px;"><td style="height: 29px;">NAME</td><td style="height: 29px;">First name of the user.</td></tr><tr style="height: 29px;"><td style="height: 29px;">SURNAME</td><td style="height: 29px;">Surname of the user.</td></tr><tr style="height: 29px;"><td style="height: 29px;">BIRTH DATE</td><td style="height: 29px;">Birth date of the user.</td></tr><tr style="height: 29px;"><td style="height: 29px;">PESEL</td><td style="height: 29px;">Personal identification number (PESEL for Polish users).</td></tr><tr style="height: 29px;"><td style="height: 29px;">DOCUMENT TYPE</td><td style="height: 29px;">Type of identification document.</td></tr><tr style="height: 29px;"><td style="height: 29px;">COUNTRY</td><td style="height: 29px;">Country.</td></tr><tr style="height: 29px;"><td style="height: 29px;">ACTIONS</td><td style="height: 29px;">Menu for managing the entry (delete).</td></tr></tbody></table>

[![image.png](https://developer.verestro.com/uploads/images/gallery/2025-11/scaled-1680-/CO1image.png)](https://developer.verestro.com/uploads/images/gallery/2025-11/CO1image.png)

#### Blacklist record details

To view detailed information about a specific entry on the blacklist, click on the row in the table. An expanded section will appear below the row showing additional details about the user:

<table border="1" id="bkmrk-field-description-fu" style="width: 100%;"><tbody><tr><td bgcolor="#1C1E3F" style="width: 25%;"><span style="color: #ecf0f1;">**Field**</span></td><td bgcolor="#1C1E3F" style="width: 75%;"><span style="color: #ecf0f1;">**Description**</span></td></tr><tr><td>Full name</td><td>The user’s full name.</td></tr><tr><td>Document number</td><td>The identification document number associated with the user.</td></tr><tr><td>City</td><td>The user’s city.</td></tr><tr><td>IBAN</td><td>The user’s bank account number, if provided.</td></tr></tbody></table>

[![image.png](https://developer.verestro.com/uploads/images/gallery/2025-11/scaled-1680-/qSVimage.png)](https://developer.verestro.com/uploads/images/gallery/2025-11/qSVimage.png)

### Greylist

The greylist is functionally identical to the blacklist.   
All operations — adding users, removing users, filtering and managing entries — are the same.

Refer to the [**Blacklist**](#bkmrk-blacklist) section above for full instructions.