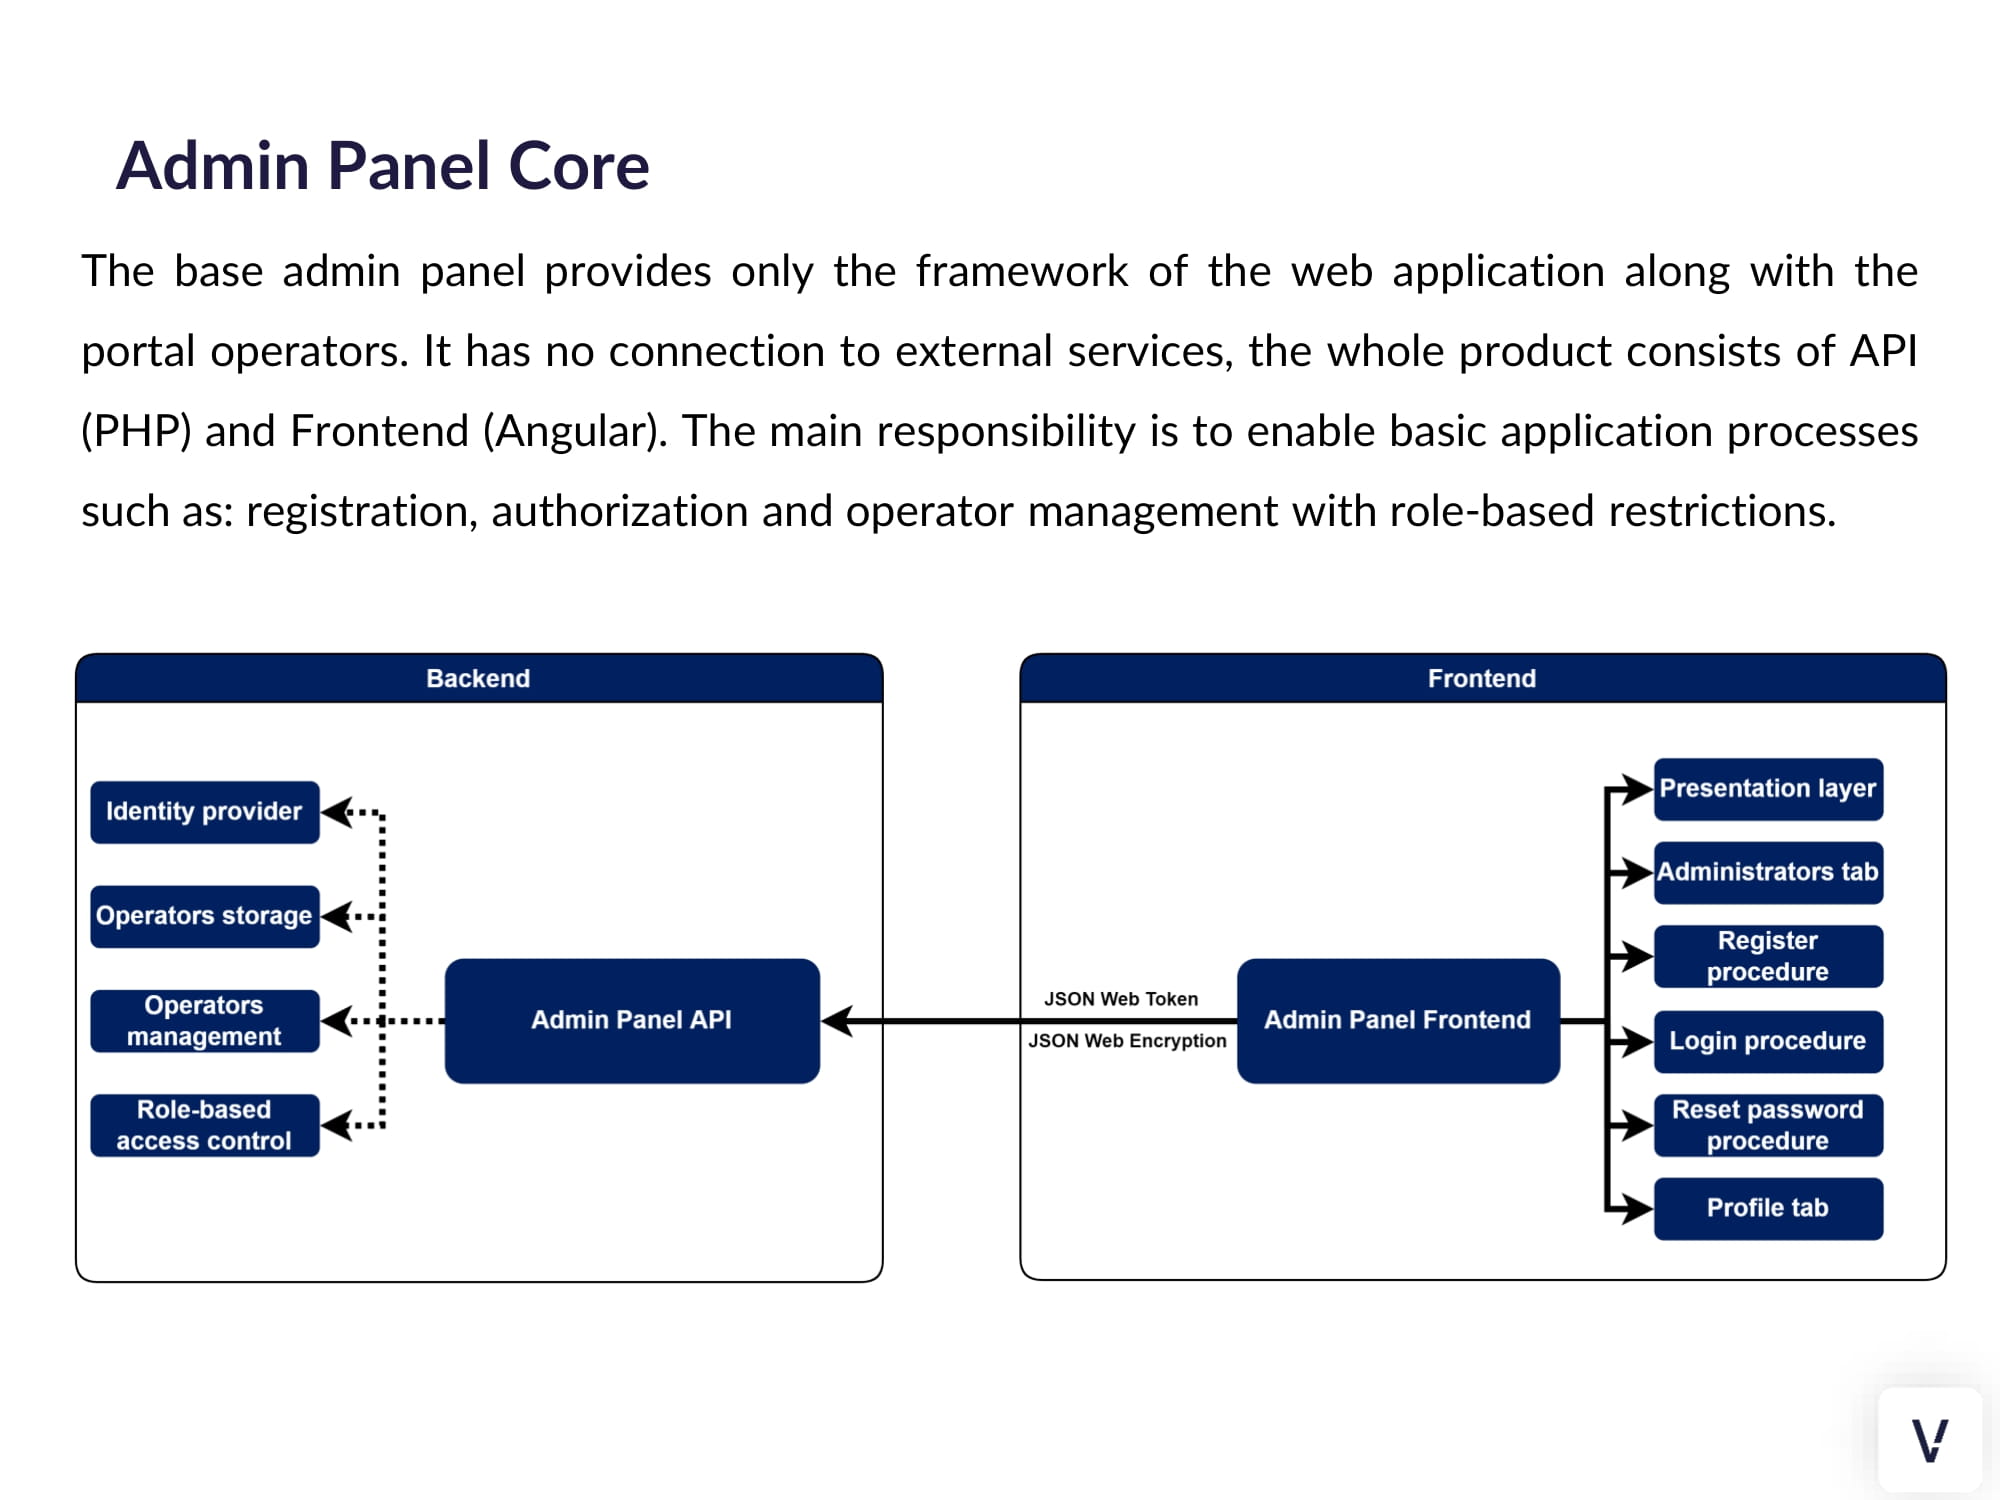
Administration Panel
Administration Panel enables various customer service and reporting actions. It is a central point to get information about user, his or her payment transactions, project performance etc.
- Article
- Intro slides
- Overview
- Token Management Administration Panel Overview
- Overview of Administration Panel main sections
- Finance Administration Panel Overview
- IBAN Management Administration Panel Overview
- KYC Panel Overview
- AML Transaction Monitoring - Administration Panel Overview
Article
You can find more knowledge about products on this site.
Customer service and user claims in card issuing
Once you start issuing cards for your users, you will experience a wide range of various problems and requests coming from your customers. In this article we will summarize the most common issues, so that you can get prepared.
These include:
- Transactions not working
- Problems with delivery or activation of plastic cards
- Transaction reversals and refund issues
- Fraudster activity
Point 1 - Transactions not working
The most common problem after starting card issuing is connected with performance of transactions. Your users will inform you about problems with transaction authorisations or merchants not accepting their card etc. There can be plenty of reasons for such problems. The most important are:
Point 2 - Problems with delivery or activation of plastic cards
Usually, when you decide to use not only virtual, but also plastic cards, you will experience various problems with personalization, delivery or activation of plastic. In different countries there may be various issues with these processes. They are usually connected with logistics or lack of easy activation methods for cards. Some of those issues can be cleaned by us during the project, but for many of them we will not have a good solution. Actually, in today's digital world, we do not recommend issuing plastic cards, but if you need to do so, get ready for such problems.
Point 3- Transaction reversals and refund issues
White paying with cards, customers will experience situations that they want to resign from a transaction after some time. Sometimes immediately - and in this case reversals will be used. Sometimes after several days - in this case refund will be used. In such situations we should receive an authorization from the merchant or acquirer that credits the transaction. We should be able to deliver this message to you, so that you can increase the user's balance on account. But sometimes this process does not work correctly. If the card issuer does not receive a message from the acquirer or payment scheme, we are unable to give you this information. User's funds may get frozen for 2-4 weeks. It is important that you understand that such things happen.
Point 4 - Fraudster activity
Any new payment activity in the world is attracting the attention of fraudsters or payment mafias. There are people in the world specialised in stealing card data or making transactions with cards while having no money on accounts. This is a very serious risk for you, as they will be testing your systems as well. This is especially visible if you have many "Do not honour" transactions or weak Know Your Customer processes. Be ready for it. Monitor your traffic. Cards will not always work for all payment transactions, some fraud rules will block suspicious activities, but your online monitoring is necessary.
Those are key points to remember about. Please do not forget about them while launching your card issuing program with us.
Thanks for reading.
Intro slides


Overview
The Administration Panel is the essential tool for our Partners to work with your Verestro services. The main purpose of Admin Portal is to provide a web-based environment with the ability to manage customer service actions. The presented solution is prepared for customisation with Partner's brand.
This document is divided into sections that describe the various components of the system. Each section contains a screen presenting the functionality and a detailed description of the states occurring in it.
The mechanisms described in this documentation are the most important ones for all web-based products that rely on Admin Portal. Some functionalities of Verestro have specific screens and processes that are not described here. Administration Panel is going through on-going development and changes to improve its performance so there may be differences in this description and real panel.
Purpose and scope
This product guide provides a high-level overview of Admin Panel Management. This document covers the following topics:
-
description of the all aggregates of operators, including detailed information and possible actions,
-
description of possible configurations,
-
granting access,
-
description of main processes as: login, reset password,
-
additional and optional functionalities.
Terminology
This section explains a number of key terms and concepts used in this document.
|
Name |
Description |
|
Operator |
User using the Portal regardless of role or level of rights. |
|
Session token |
Access to the system by a web application user is secured using a session token to uniquely associate the session with the user. It is required to perform any action. |
Access and configuration
Access solutions
The access to Admin Portal in available in 3 ways:
-
direct traffic through VPN (Virtual Private Network) - requires VPN reconfiguration on both sides,
-
block access to the domain and allow access from a particular IP address (specific IP addresses or a range
of addresses) - configuration required on Verestro side,
-
free access for everyone, who have an account in Admin Portal (no matter if VPN configuration or IP
address are set.
Admin Portal is available on two environments:
▪ test environment (dev/UAT environment),
▪ production environment.
Sample of test environment (URL): https://admin-panel-nameofclient.verestro.dev/
Sample of production environment (URL): https://admin-panel-nameofclient.verestro.com/
IMPORTANT: There is also option to use custom domains.
Configuration of Admin Portal
Admin Panel has a several default parameters related to the time of each action. Table below describes particular action and time of session token.
| Action | Description |
Accessibility time |
|
Reset password |
Validity of link to reset password. |
60 minutes |
|
Create an account |
Validity of link to first login to Admin Panel. |
60 minutes |
|
Login to the panel |
Validity of code (4 numbers) to login. |
10 minutes |
|
User session |
Session after successful login to the panel. |
15 minutes |
|
User lock |
Time of lock due to incorrect password. |
max 24h (until midnight next day) |
|
Registration link |
Validity of invitation link. |
60 minutes |
These are the default values, they can be changed at the request of the customer.
Security
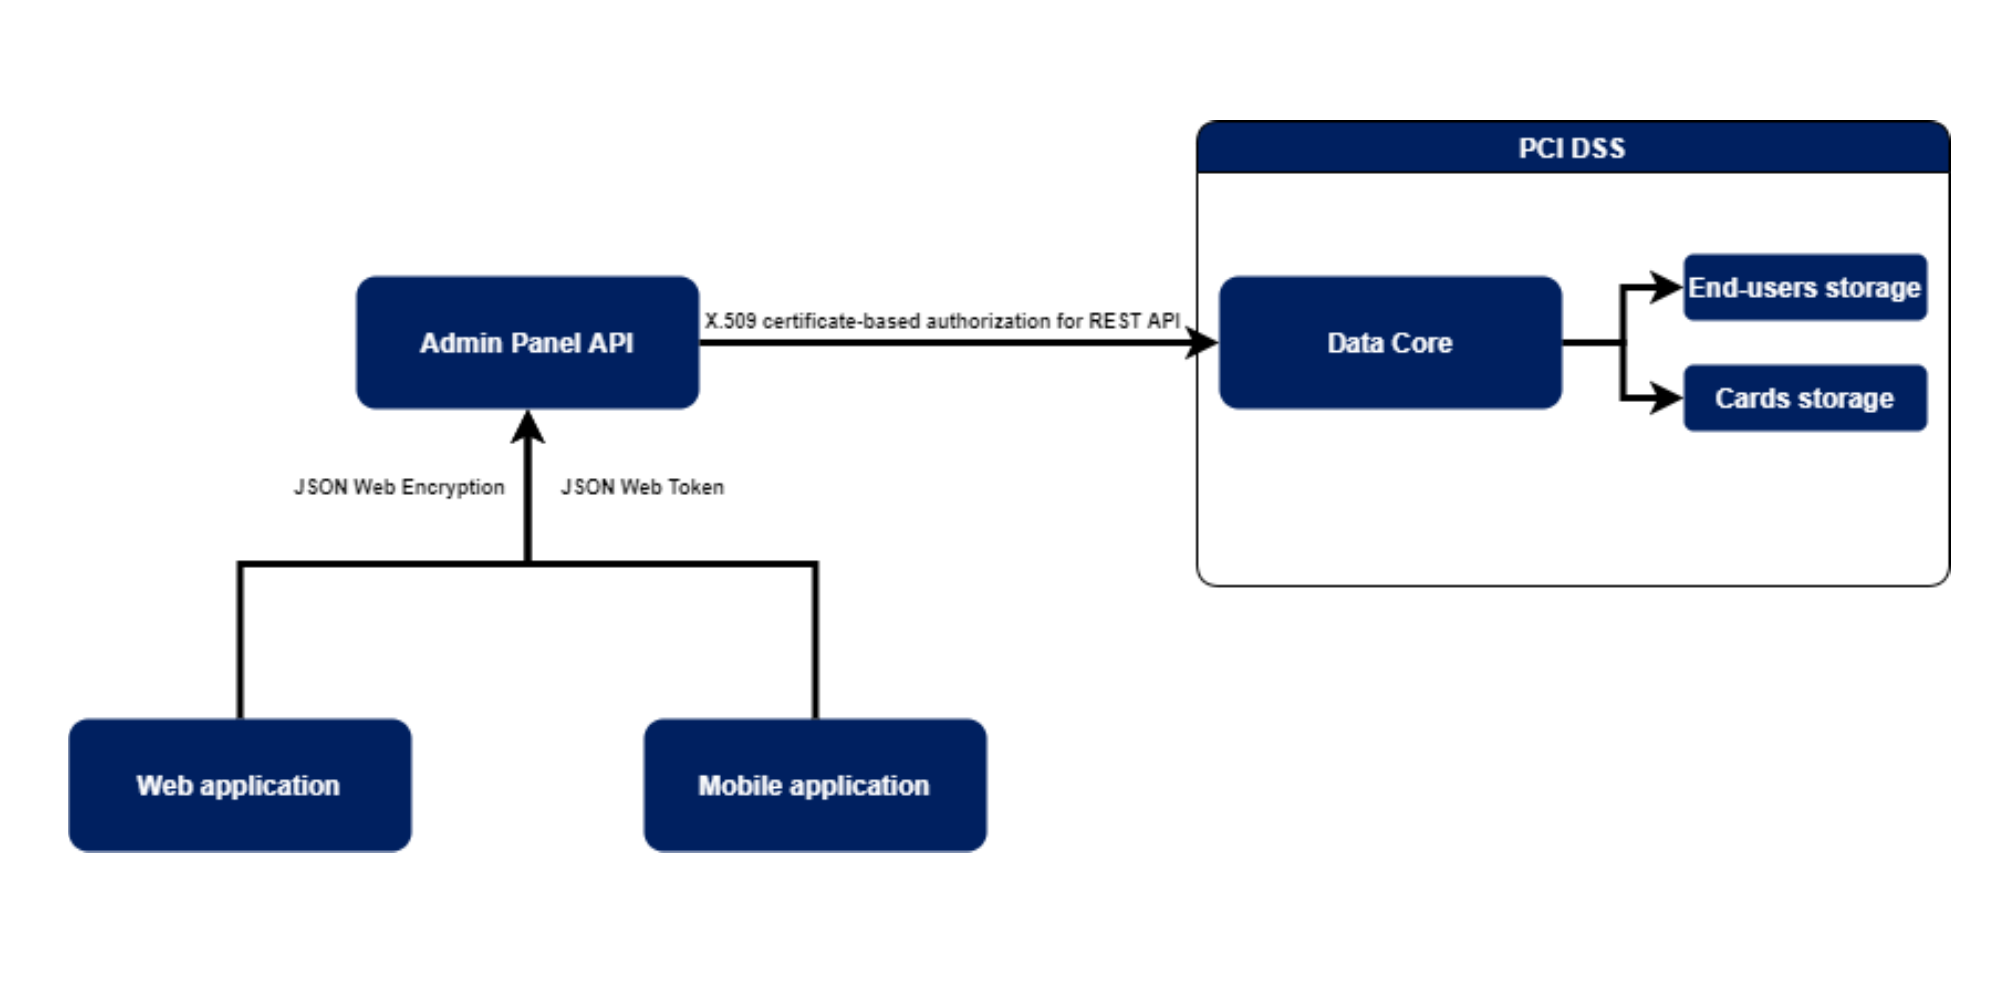
The systems offered by Verestro are fully secure, which is confirmed by current third-party certificates. As we store card and payment data we are obliged to comply with strict legal requirements. Card and user data are stored in a specially designed environment - Data Core. This environment is PCI DSS certified. The PCI-DSS standard guarantees the security of payment card data. It ensures that sensitive information is properly guarded and provides maximum security in the payment process. The portal operators' passwords are kept in a different database from the end users' data for security reasons. To encrypt them the algorithm Bcrypt with a cost of 10 is used. The cost parameter specifies a key expansion iteration count as a power of two, which is an input to the crypt algorithm.
We achieve high security standards by, among other things :
-
Building and maintaining network security - the need to build and maintain a firewall configuration that protects cardholder data, not using manufacturers' default passwords and settings.
-
Protecting cardholder data - protecting stored cardholder data, encrypting data transmissions when using public networks.
-
Maintaining a payment management program - using regularly updated anti-virus systems, developing secure systems and applications.
-
Implementing strong access control methods - limiting access to cardholder data to only those with a business need, assigning each user a unique ID, limiting physical access to cardholder data.
-
Regular network monitoring and testing - testing security systems and processes, controlling access to network resources and cardholder data.
-
Maintaining information security policies - relying on security policies for employees and vendors.
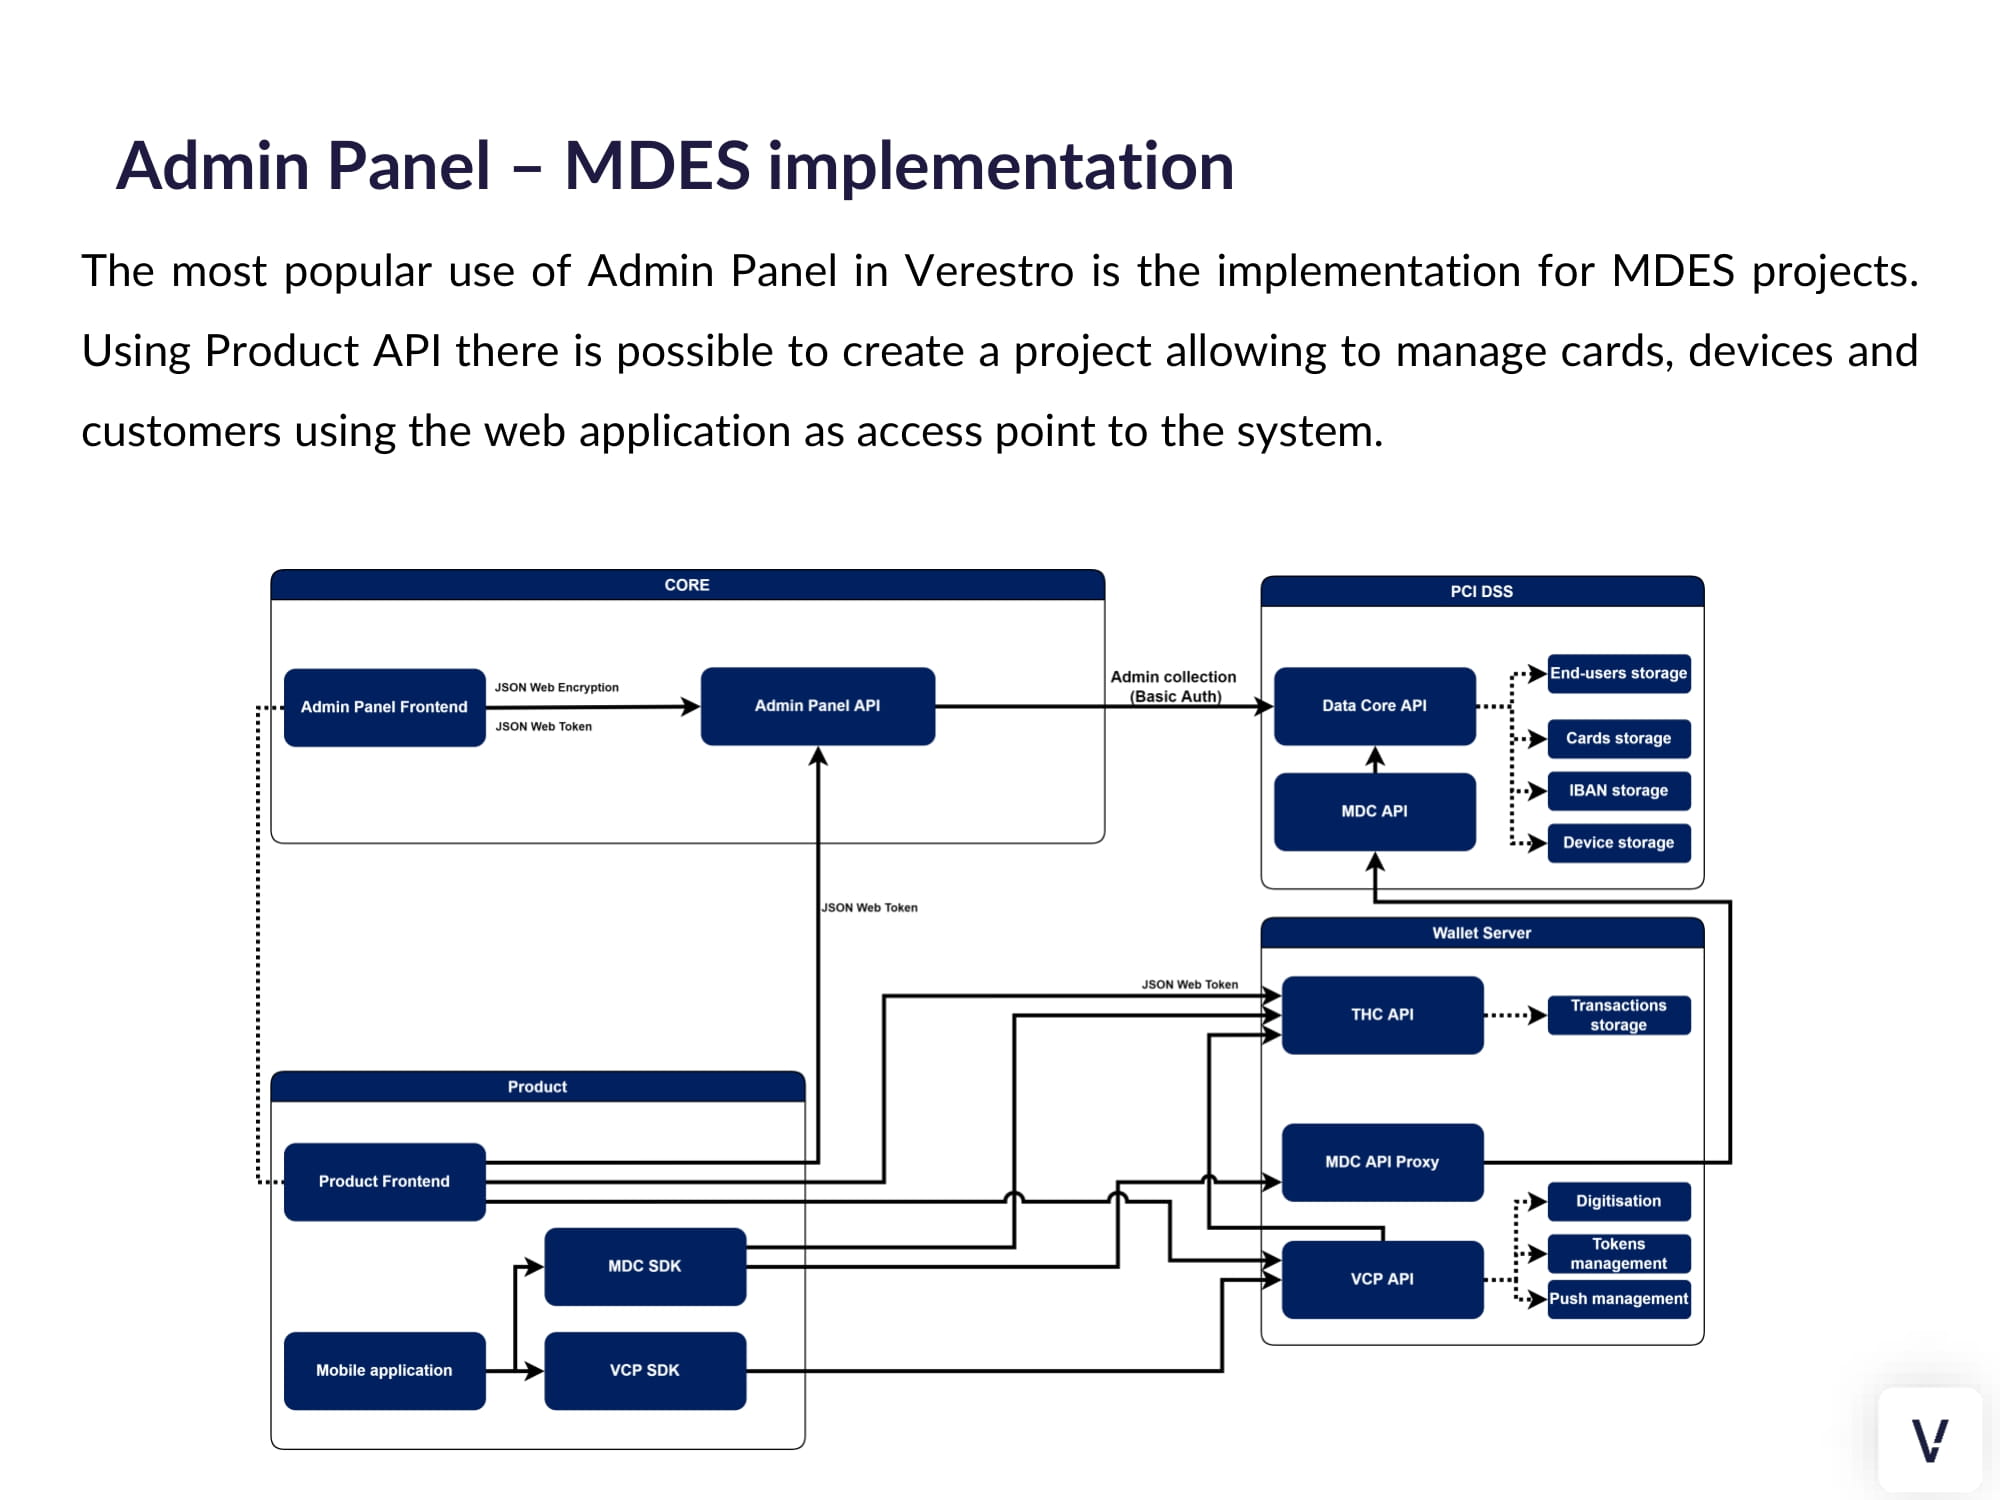
Architecture
Admin Panel uses Verestro's distributed systems to provide the highest quality of service. It is practically the best architectural solution these days. As mentioned in the previous chapter, the communication between services is completely secure, maintaining the highest security standards. This kind of system guarantees not only high efficiency, due to the division of responsibilities between the components, but also allows for easy and fast scaling of the system according to the customer's requirements.
Below is a sample architecture for the product VCP or in other words Admin Panel MDES along with MCBP Wallet.
Login procedure
First login (activation)
Users could be added only from the panel. It is not possible to register in the system without an invitation. Basic administrators accounts that can be used to create a user hierarchy are provided with the panel instance.
In order to create a new user account you have to log in to the panel using your e-mail address, which is user login. Then go to the "Administrators" tab and fill in the required data. After filling in the role, personal data and e-mail address there will be sent a welcome message with an activation link for new account.

Once the email send process is complete, the invited user will receive a message. It contains a welcome and an activation link - used to set a password to access the system.
Clicking on the link redirects to the login page, where the employee will have to set a password during the first logging in. The required password standard is a minimum of 8 characters, at least one digit, one capital letter and one letter.
Login procedure
Operator must provide correct pair – e-mail and password. If the provided login is incorrect, a message informing the employee of an error “Incorrect e-mail or password” and the possibility of another attempt will be displayed.
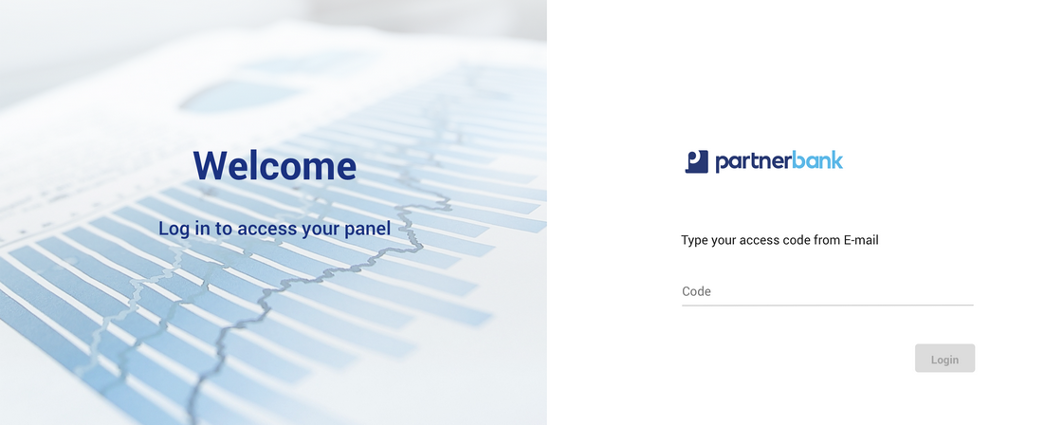
If the data provided is correct, an authentication code is sent. This is required to complete the next step of the two-step login.
As last step application asks for code. Sent code has set validity time. If code will not be provided in this time, login procedure must be started from first step.
Reset password procedure
In order to reset password, admin has to open the login page and click option “reset password” (located under e-mail and password inputs). In next step, admin must provide correct e-mail address.
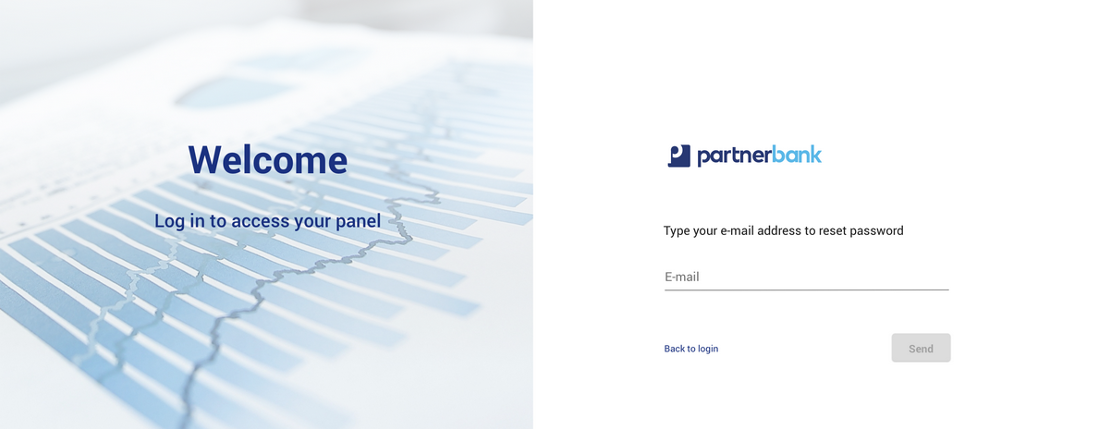
If the provided e-mail is correct, reset password link will be send to the employee's company e-mail address.
Clicking on the link redirects to the reset password page, where the employee will have to provide his e-mail address and set a new password. The required password standard is a minimum of 8 characters, at least one digit, one capital letter and one small letter.

Main view
Once the authentication process is properly completed, the bank employee has access to the panel. He is shown the main screen of the system. Depending on the assigned rights group its appearance may vary. Different roles in the system have different tabs available.
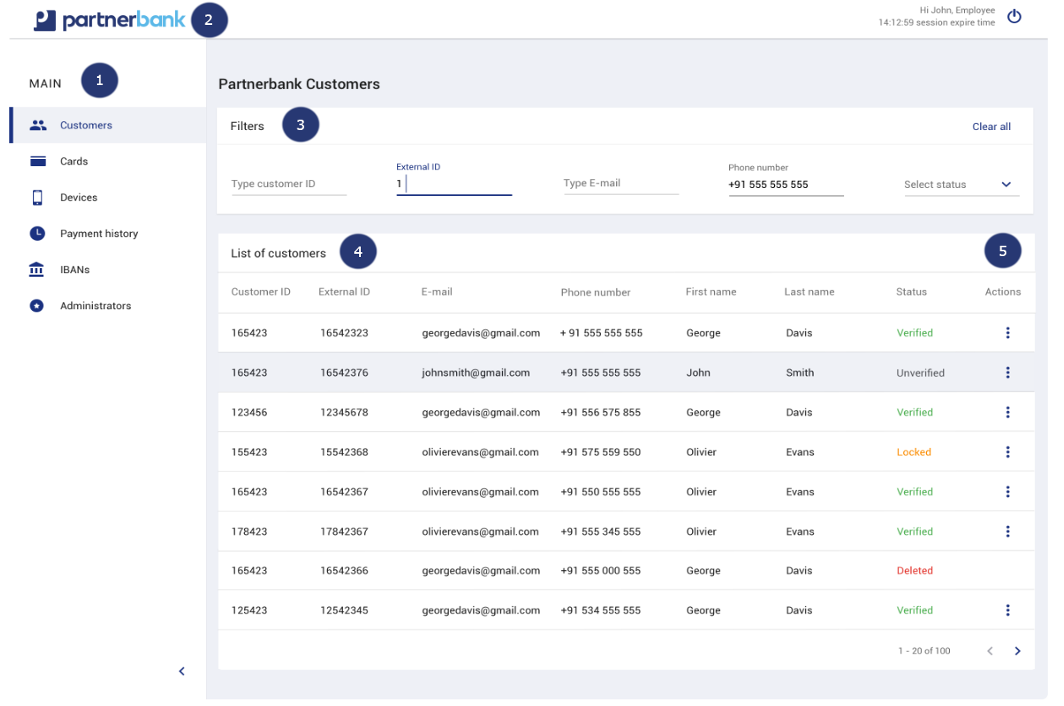
The components that make up the Admin Portal are:
1) Main menu contains aggregates as: customers, cards, devices, payment history, IBANs, project administration (administrators, visuals, logs).
2) Admin Panel adjusted to the client’s colours and logotype.
3) Filters allows to select multiple filter options and display results that contain information all the selected criteria.
4) List of the most important information referring to each aggregate (example: customers).
5) Actions allows admin to change the status of aggregate or edit data.
Operator administration
Roles and permissions
From the perspective of the bank’s operations team or call center staff, access to authorization levels is now managed using access labels rather than 3 predefined roles as it was in the past.
Three standard access labels have been introduced to reflect the typical organizational hierarchy:
-
employee -
manager -
admin
These labels correspond to different access levels and responsibilities related to operational functionalities within the portal. The core duties available under each label include customer verification, data visibility, and in some cases, data editing.
On request, we can create additional privilege levels such as readonly or privileges for level 1 support and level 2 support.
Operators may hold one or more labels simultaneously, allowing for flexible and precise permission management tailored to the needs of the institution.
|
Aggregate area |
Action |
Admin |
Manager |
Employee |
| Portal management - Operators | View | x | x | - |
| Create | x | x | - | |
| Edit | x | x | - | |
| Delete | x | x | - | |
| Lock | x | x | - | |
| Unlock | x | x | - |
-
An operator with the
adminlabel:-
Can view, create, edit, and delete other operators, regardless of their assigned labels.
-
Has full visibility of all users, including other
admin,manager, andemployeeoperators. -
May assign any access label to other operators.
- Has access to access label management (assign to operator).
-
-
An operator with the
managerlabel:-
Can manage operators labeled as
employeeonly. -
Has access to operator management functions (view, create, edit, delete) within this scope.
-
Cannot view or modify users with
manageroradminlabels.
-
-
An operator with the
employeelabel:-
Does not have access to operator management functionalities.
-
Can only perform tasks allowed within their assigned label scope, as defined per product configuration.
-
Operators list
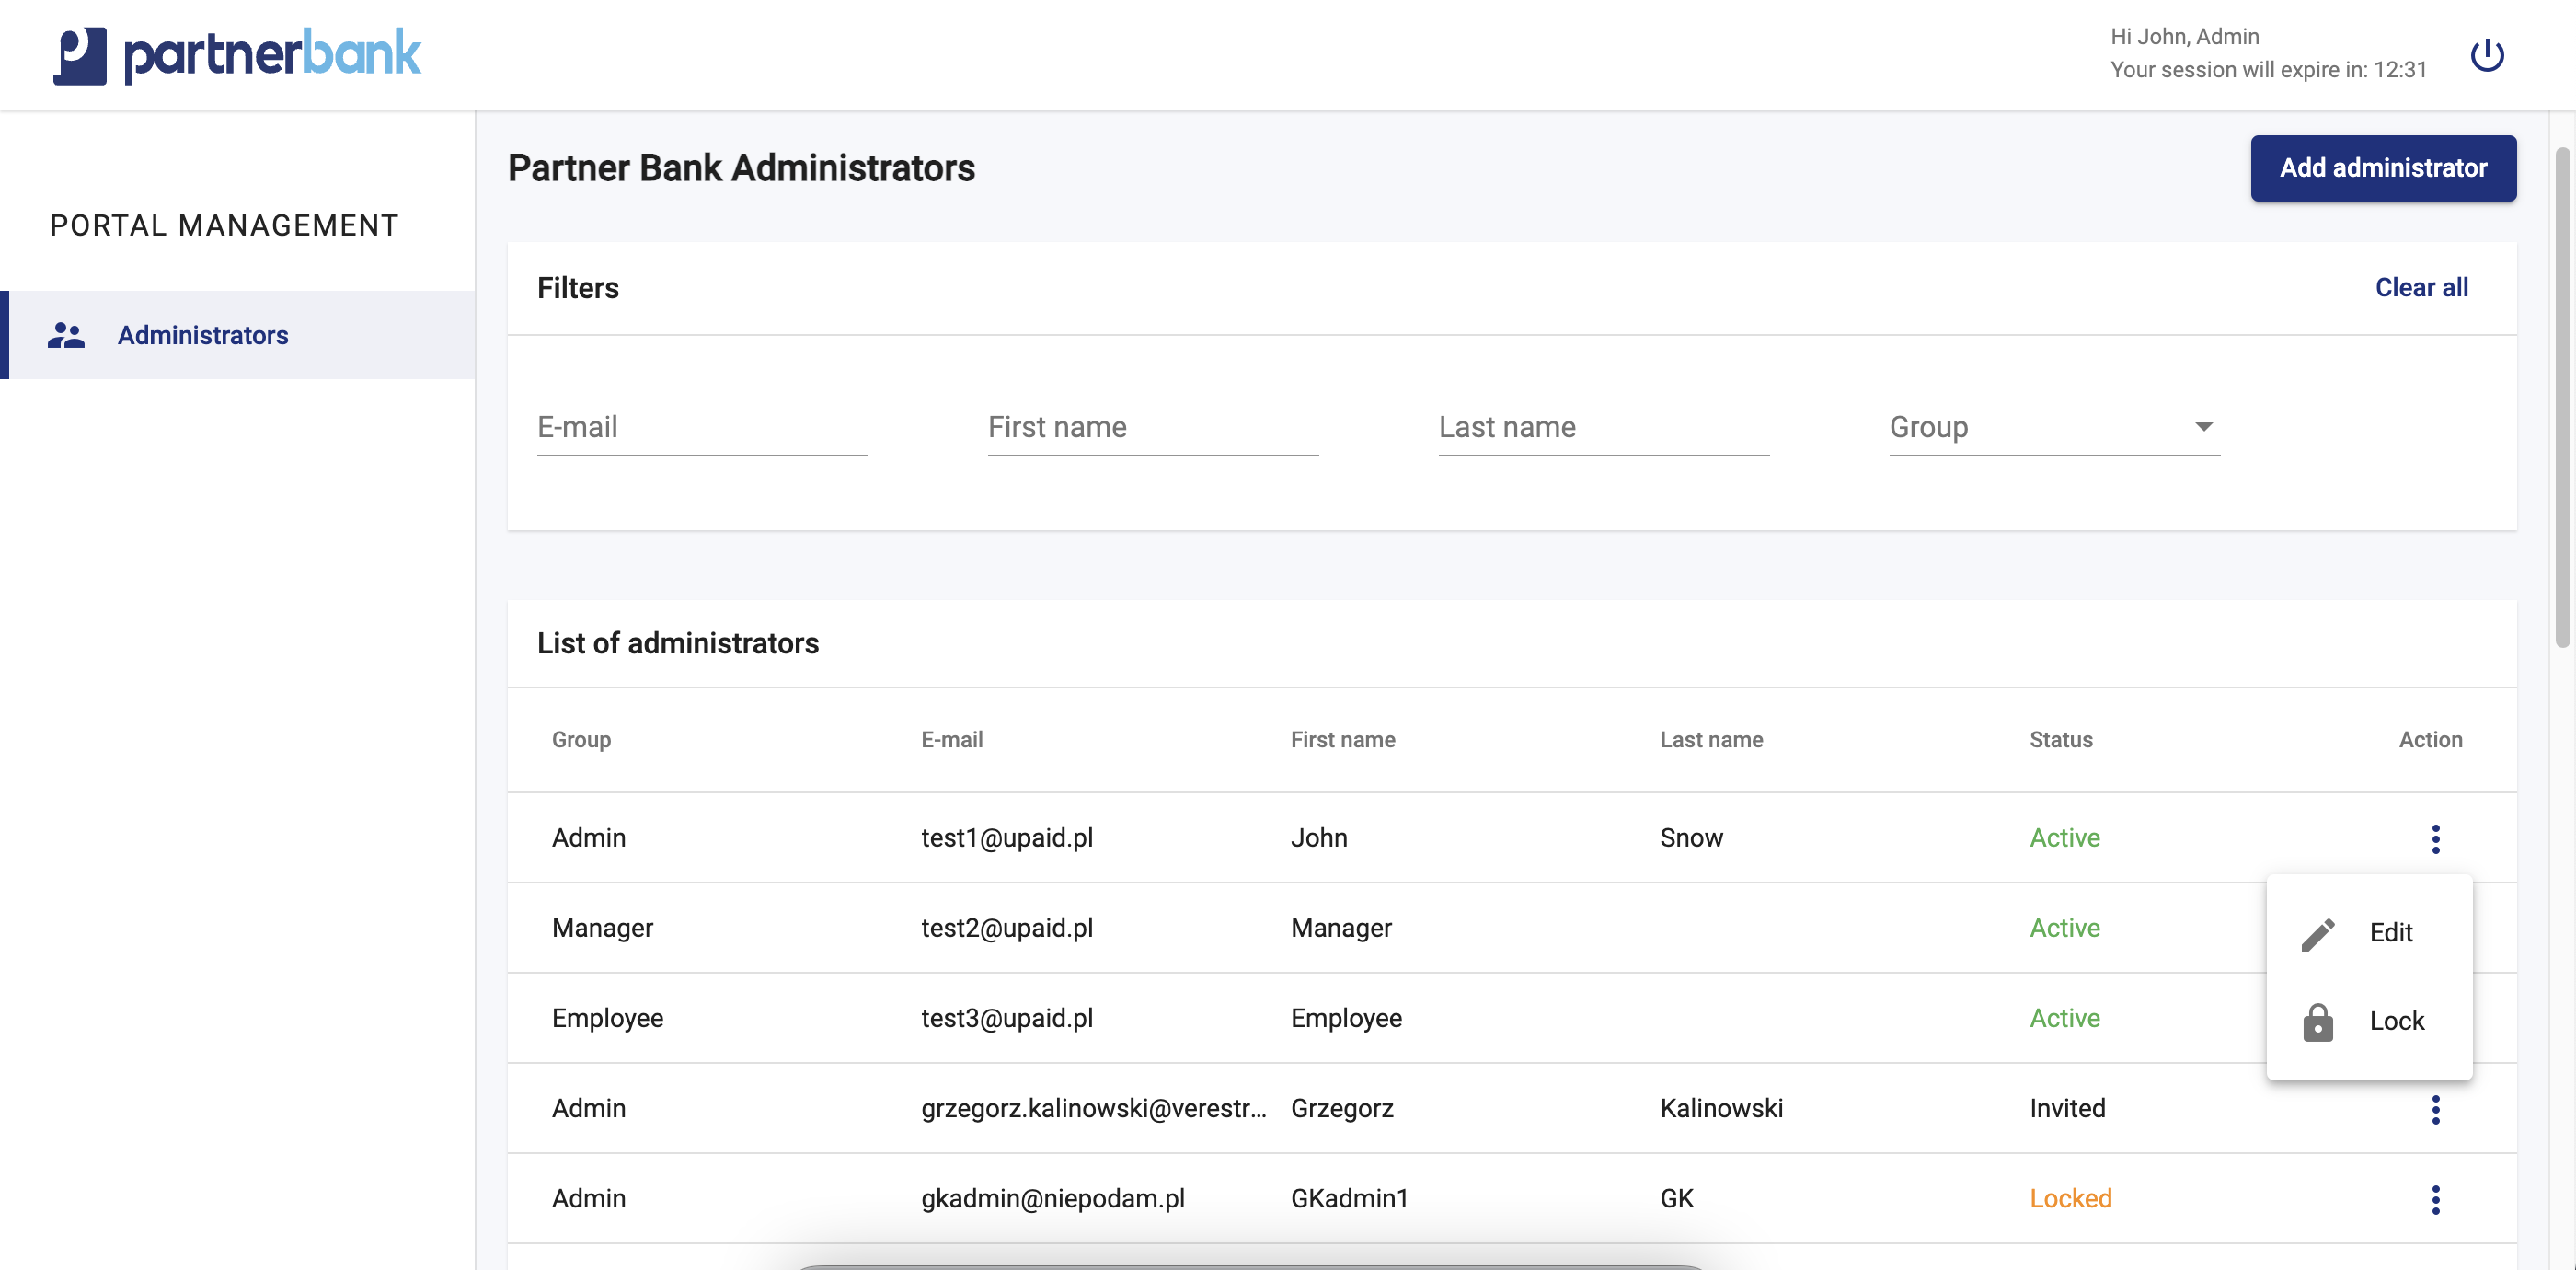
Administration Panel Accounts list contains filters and columns with dates. In this section detailed lists don’t occur. The filters are used for dynamic searching, such data as: e-mail, first name, last name, group (available: admin, manager, employee).
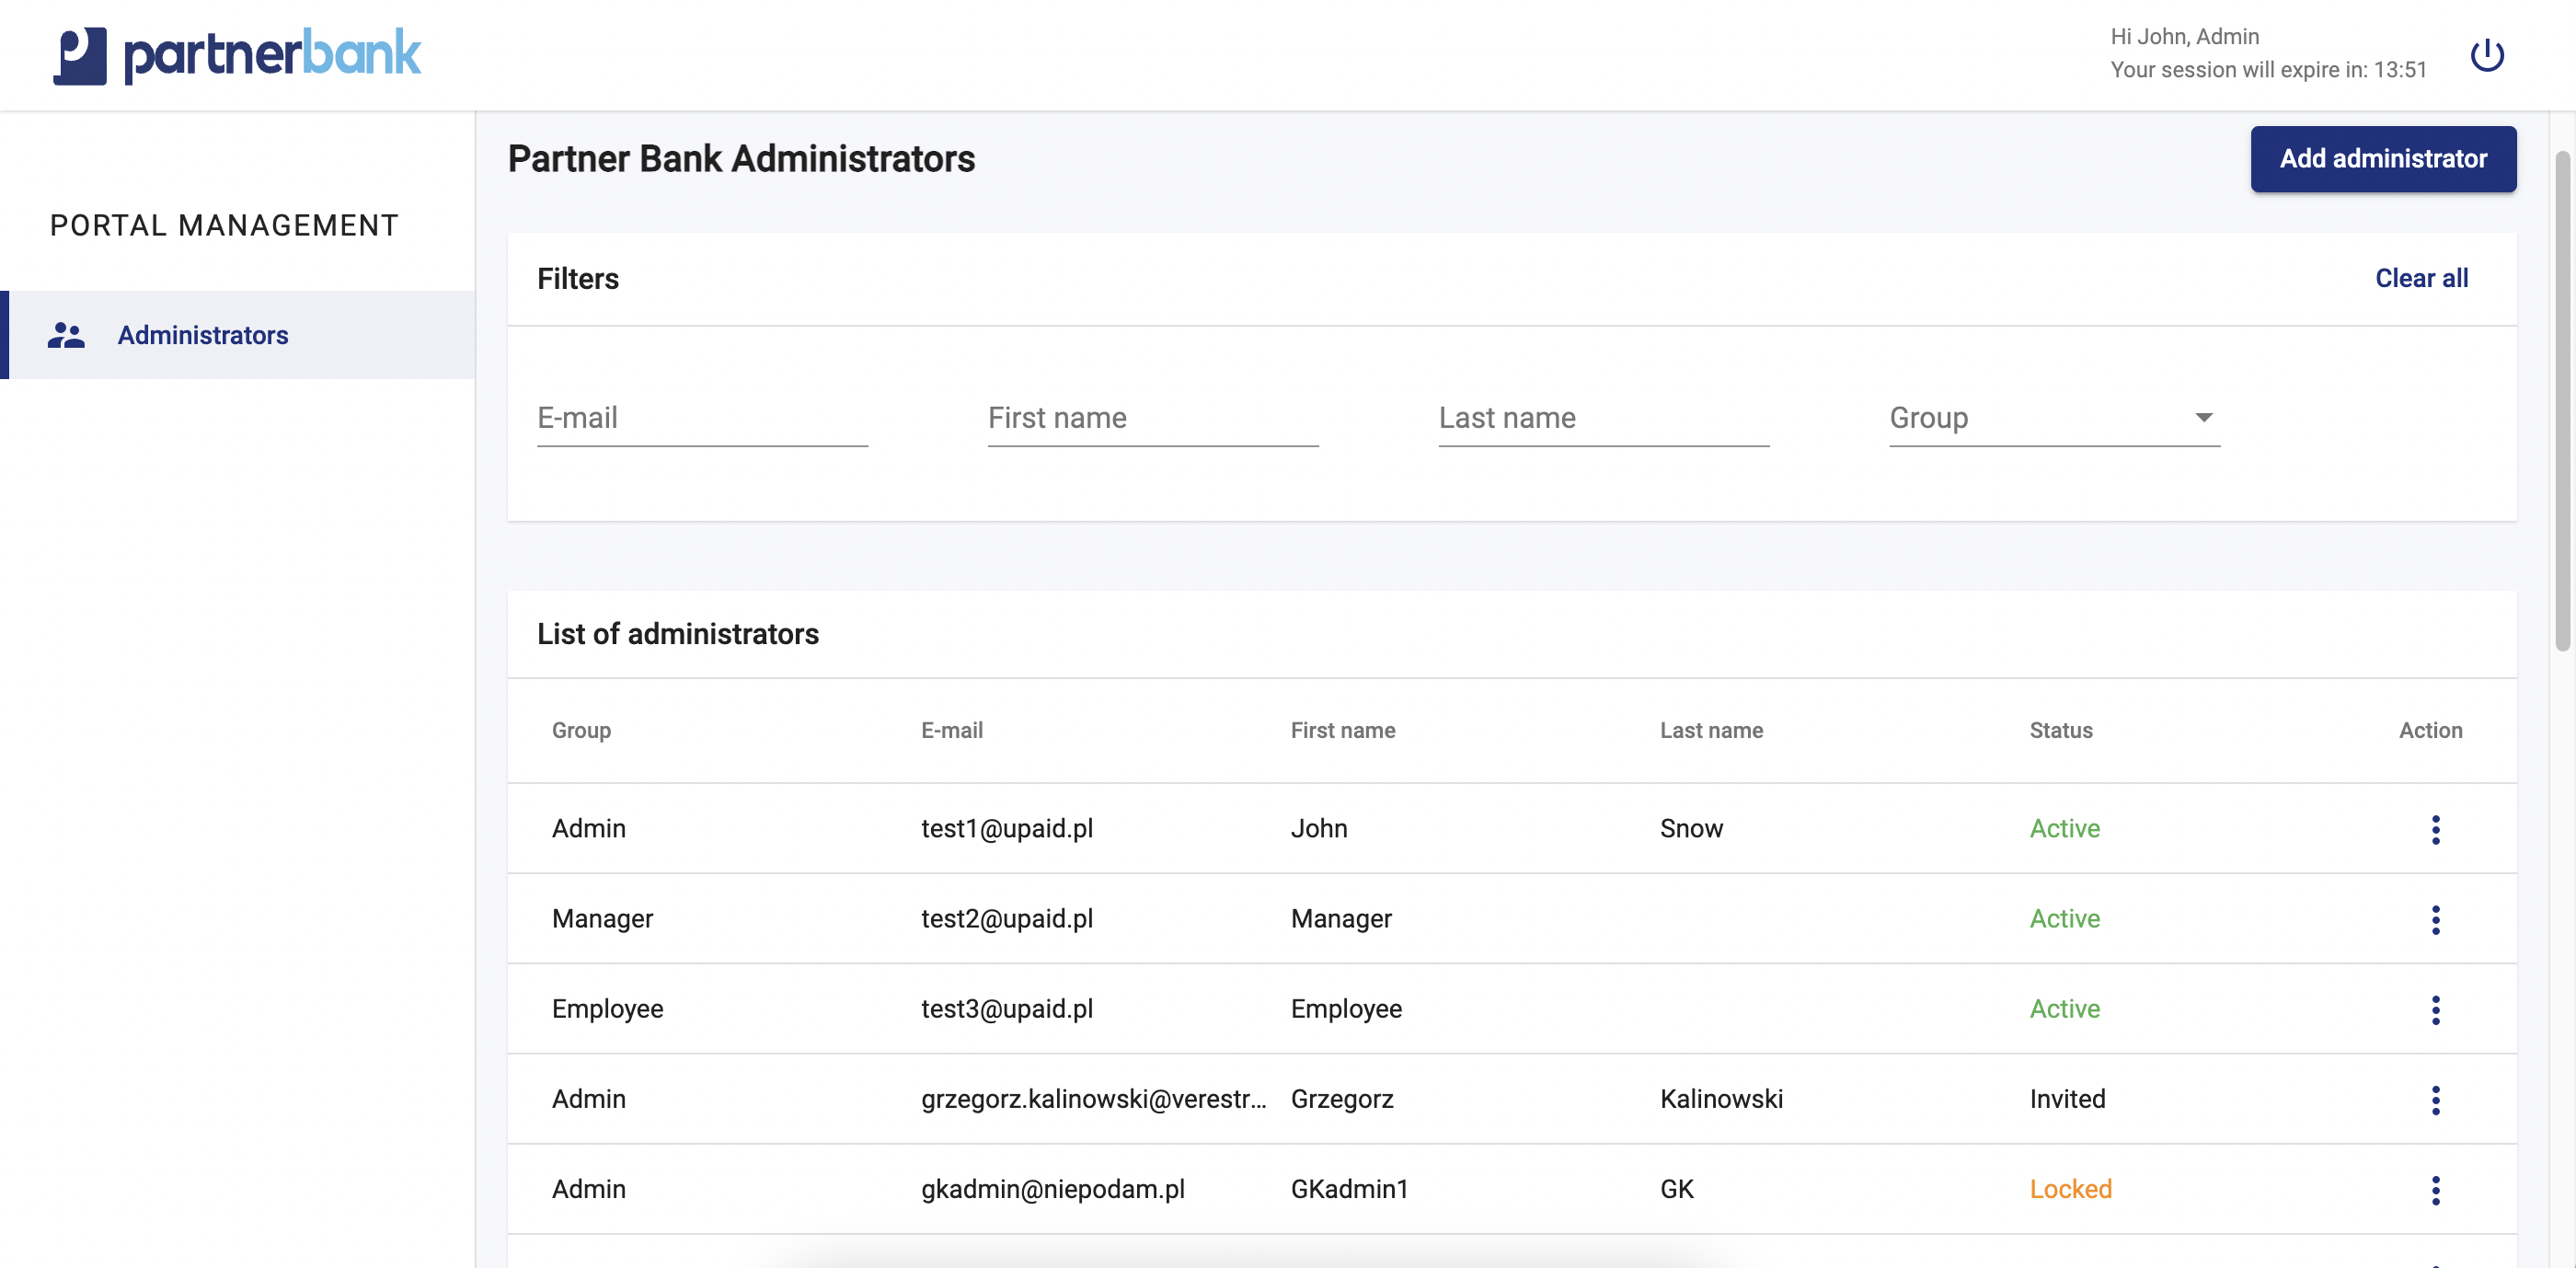
Basic list includes following information:
|
Parameter |
Description |
|
Group |
Group determines the access level. |
|
|
Admin e-mail address. |
|
First name |
Admin first name. |
|
Last name |
Admin last name. |
|
Status |
Admin status (described in admin statuses part). |
|
Actions |
Action which can be performed on particular admin (described in admin actions part). |
Account statuses
|
Name of status |
Description |
| Inactive | The inactive status means that the operator account was created with the is_active=false flag. No invitation has been sent to the system. This is an optional status. |
| Invited | The invited status means that the invitation to the system (password setting link) has been sent to the operator. This is possible in two cases: 1. the account was created with the flag is_active=true. 2. the account was created with the flag is_active=false and then activated. |
| Active |
The active status means that the operator has properly completed the registration and activation process, i.e. has created a password to the portal (using the link with the invitation or the resetPassword procedure if the link has expired). In this status the access to the portal is possible - it is the only status that allows a proper login. |
| Locked |
The locked status clearly indicates that the operator has been locked by another operator. This status can be applied to all statuses except deleted. From locked status operator can return to his previous status. Moreover, if an operator with status invited has been moved to locked status and in the meantime has completed registration, then after removing the lock it will have active status - not invited as it was before the lock. |
| Deleted | The deleted status means that the portal operator has been irreversibly removed from the system. It is not possible to restore an operator account from this status. |
Referring to the above tables, the possible transition of operator states is presented in the diagram below.
Standard flow - operator is created in status invited (Admin Panel MDES/VCP scenario).
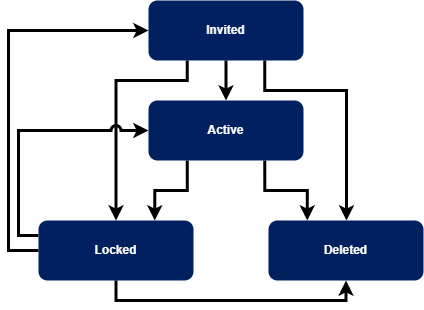
Alternative flow - operator is created in status inactive.
Accounts actions
Administration Panel user can perform the following actions for the particular user (admin, manager, employee):
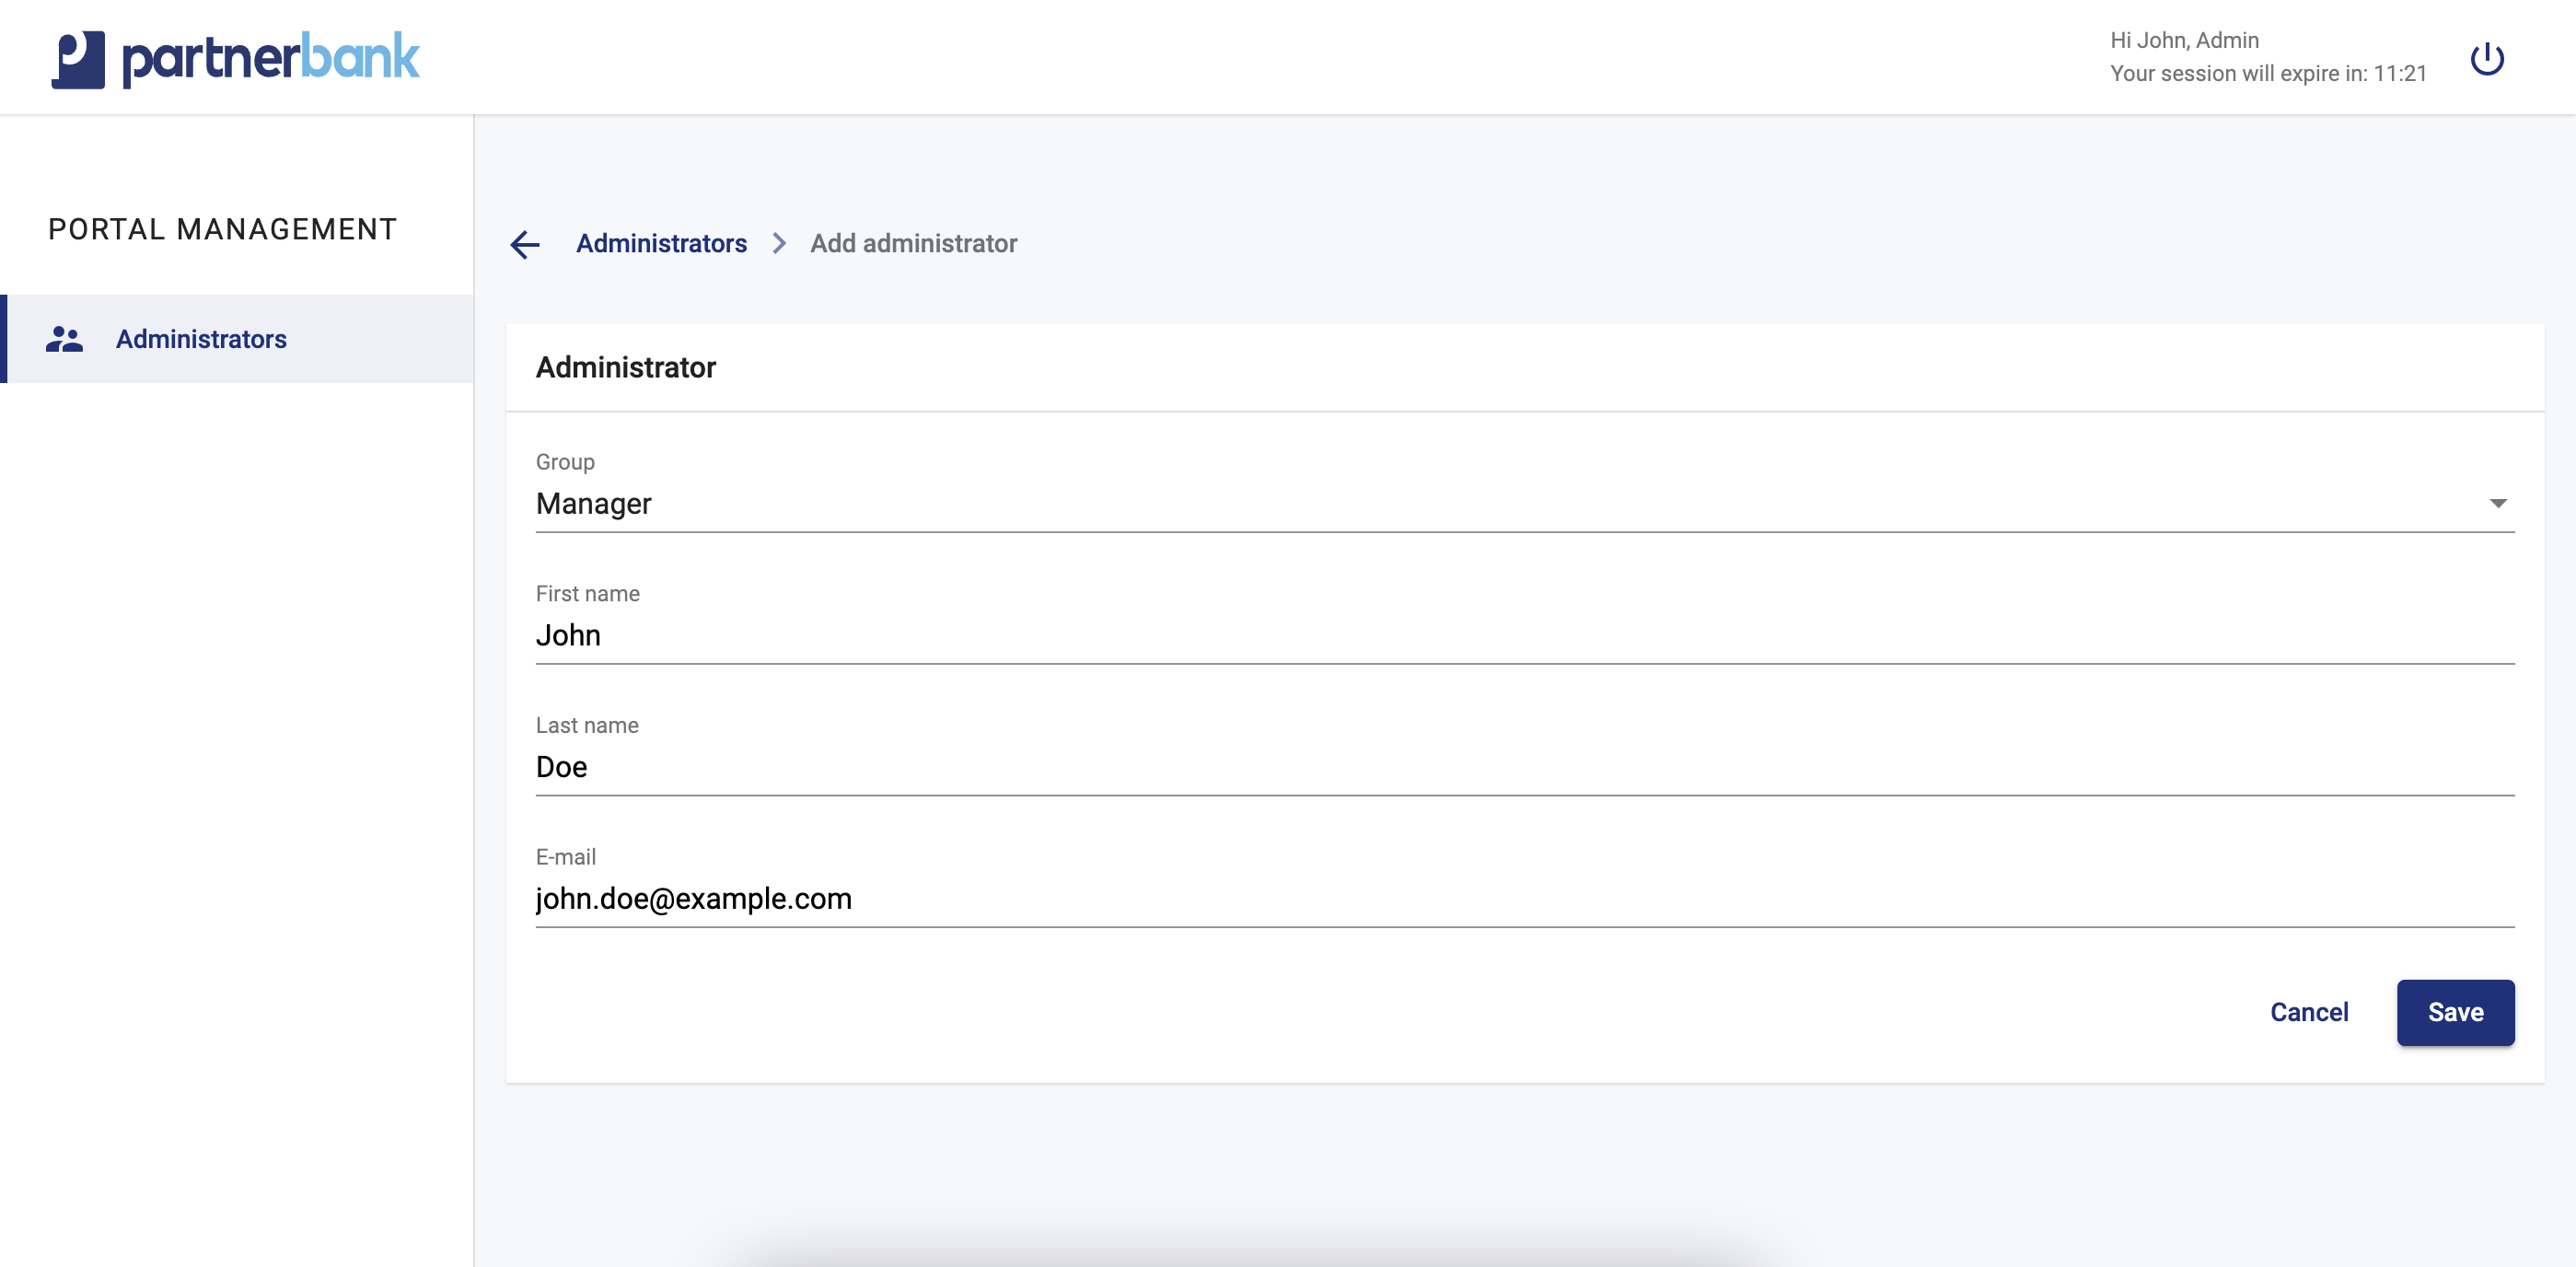
a) add admin/manager/employee – necessary to input following data: group (select: admin, manager, employee), first name, last name, e-mail. In order to confirm “Save” button should be clicked. Added user should receive e-mail with link to activate account and set the password.
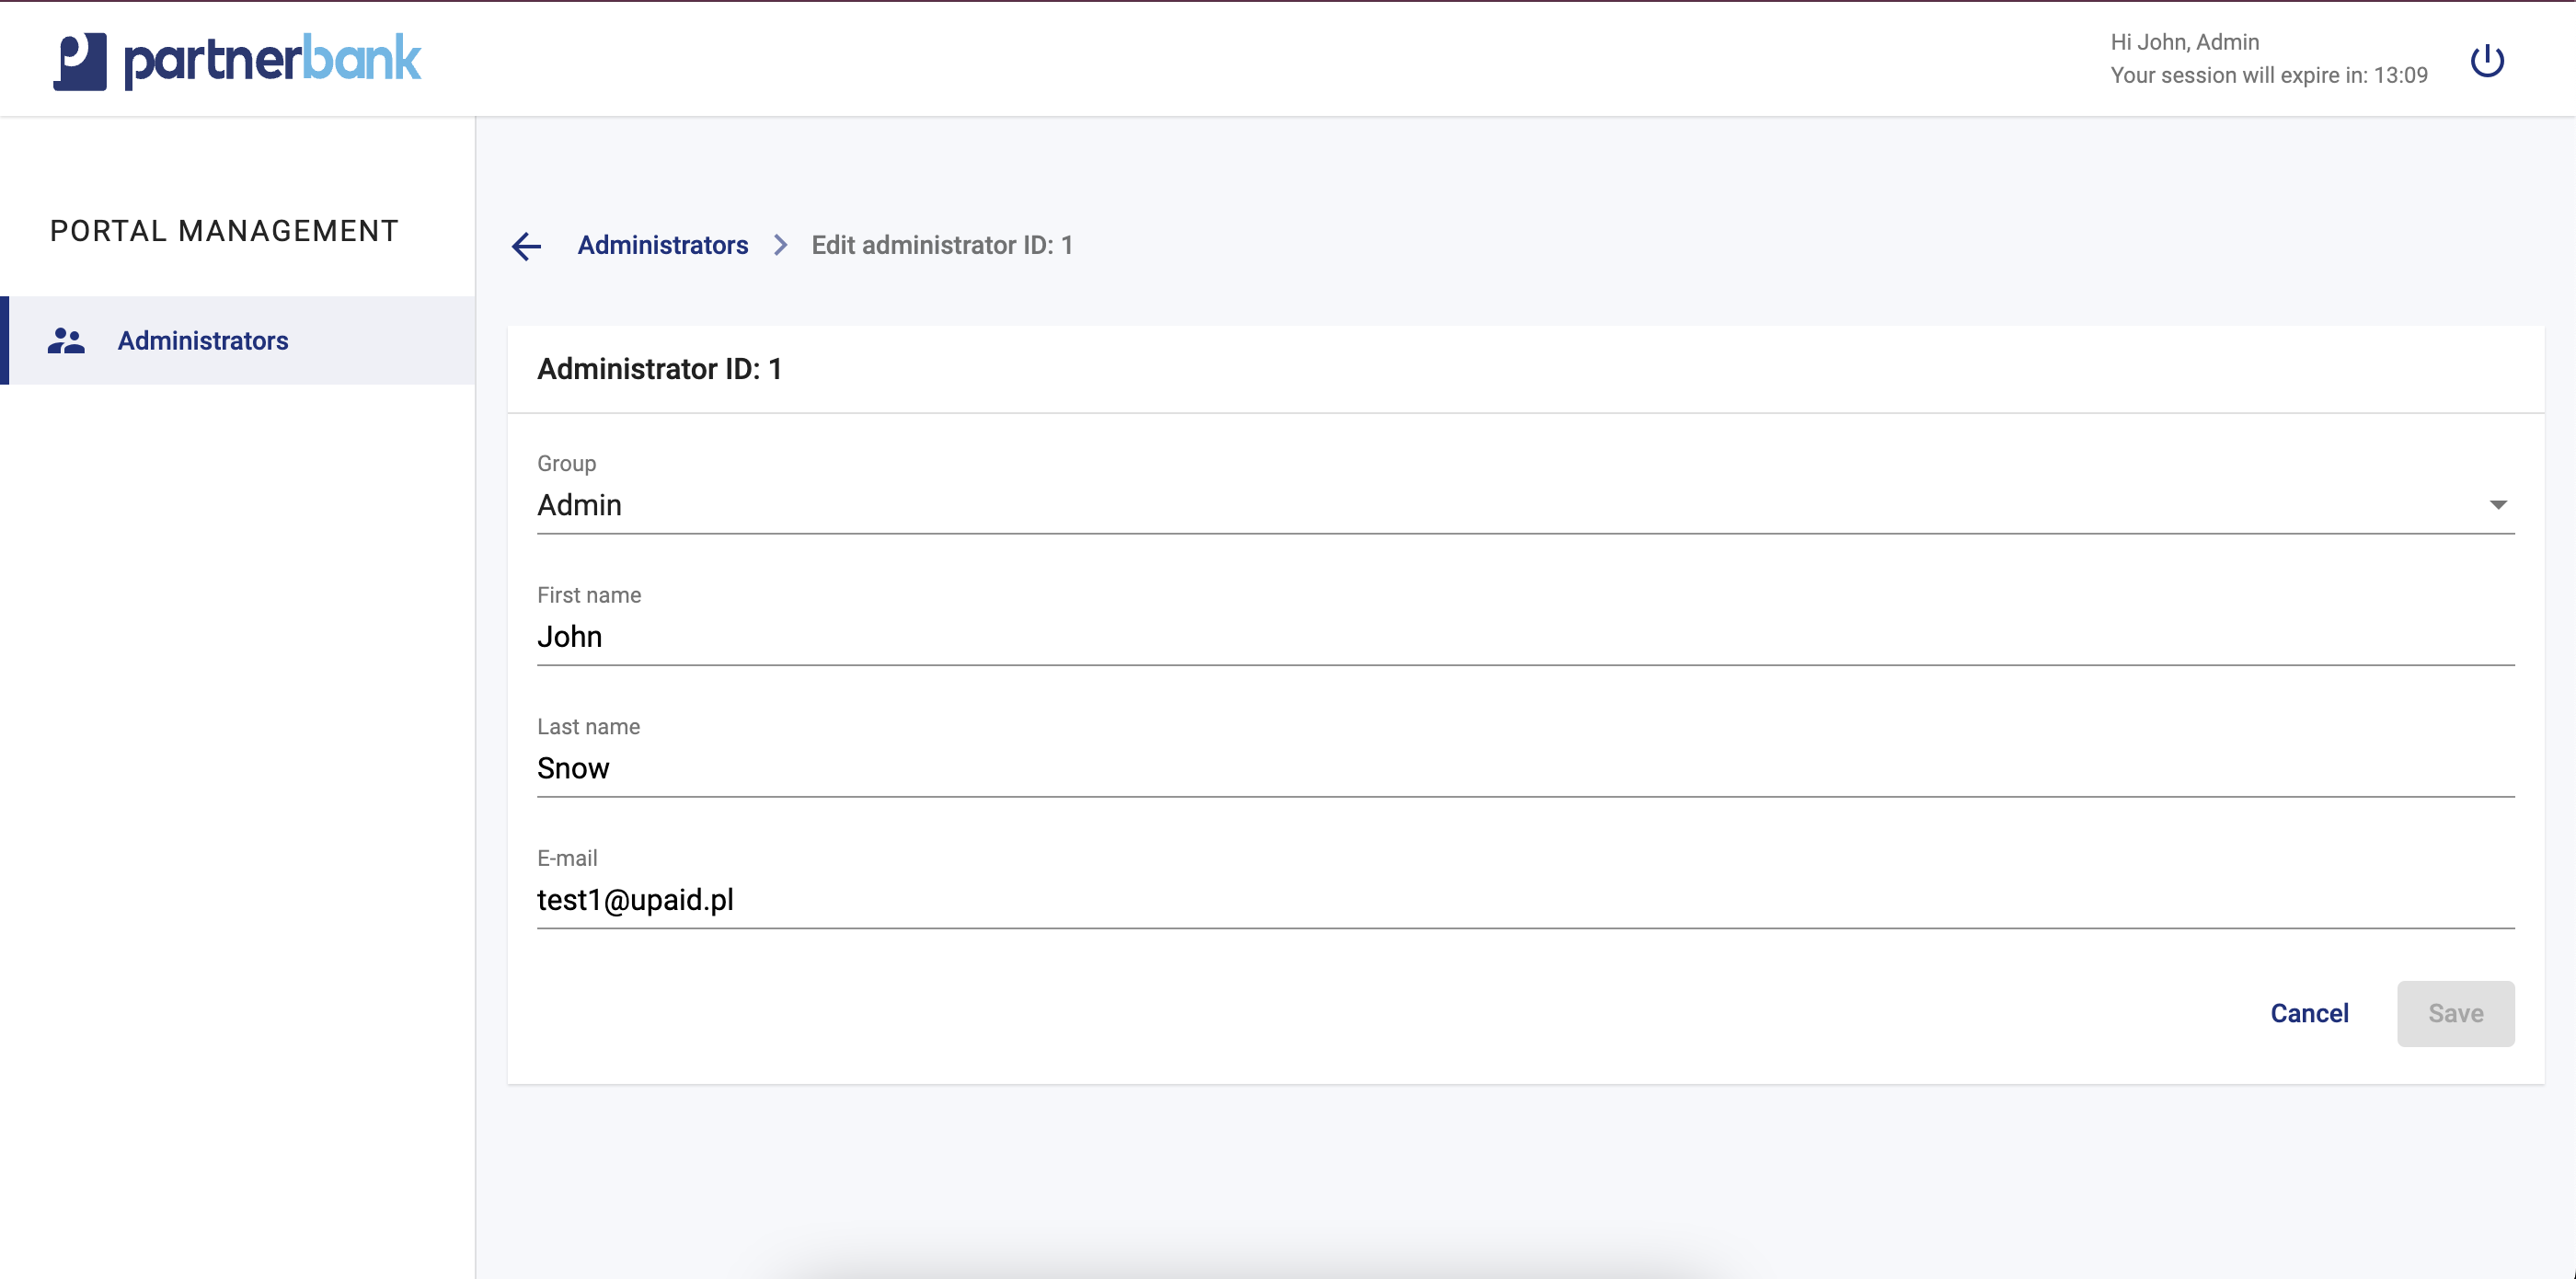
b) edit admin/manager/employee – possible to change following data: group (select: admin, manager, employee), first name, last name, e-mail. There's no option to edit operator with status "invited", in this particular case it's necessary to delete invitation and add a new operator.
c) lock admin/manager/employee – temporary lock of user.
Notifications in the system
This section contains all email messages that are sent in the system to the portal operator.
Emails from Admin Panel to operator.
|
Process |
Topic |
Details |
Comment |
|
Invitation to the system |
Set password to administration panel. |
Hello! You are receiving this e-mail because an account was created for you, and you need to set a new password. <button to set password> Regards, < NameOfClient > |
Standard email sent when portal operator added new operator. |
|
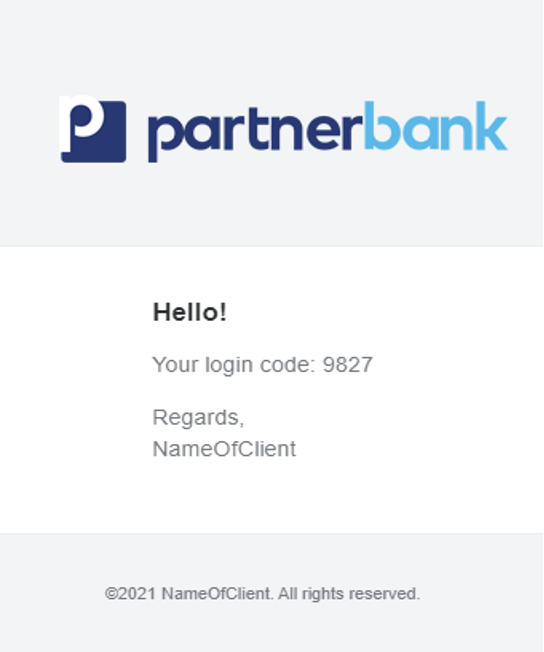
Login process |
Login code. |
Hello! Your login code: <code> Regards, < NameOfClient > |
Standard AP email sent when portal operator entered correct email and password. |
|
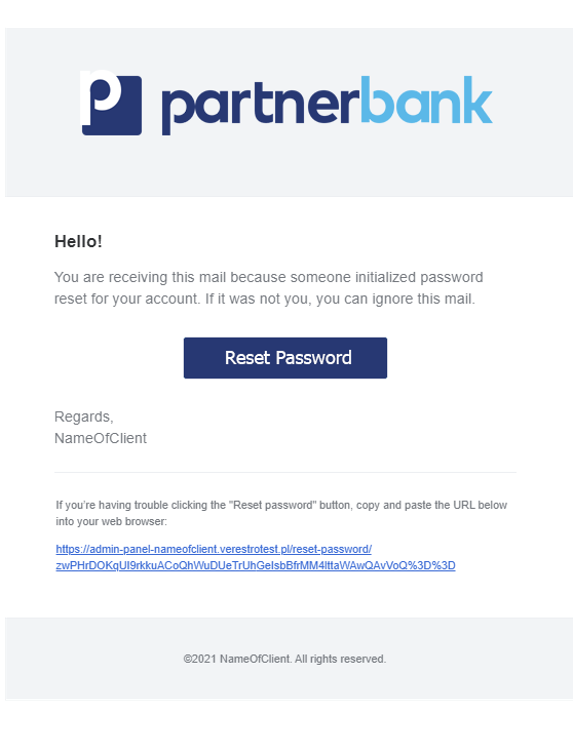
Reset password |
Reset password to administration panel. |
Hello! You are receiving this mail because someone initialized password reset for your account. If it was not you, you can ignore this mail. <button to reset password> Regards, <NameOfClient> |
Standard Admin Panel email sent when portal operator uses "reset password" button on login page. |
|
Additional password policy |
Password expiration reminder. |
Hello! Your password will expire in <NumerOfDays> days. Please change your password to avoid losing access to the portal. Regards, <NameOfClient> |
Related to additional policy to force password changes. |
|
Inactive account policy |
Inactive account reminder. |
Hello! Due to inactivity your account will be blocked in <NumerOfDays> days. Please log into the portal to avoid losing access to the portal. Regards, <NameOfClient> |
Related to the additional policy of automatically deactivating unused accounts. |
Additional features
This section focuses on additional functionality in the system. By default they are disabled, they can be enabled upon request during panel creation or panel version upgrade.
Token blacklisting
For better security, a mechanism for blacklisting session tokens has been prepared. This makes it possible to prevent unauthorized access to the portal and data using the session token of a logged out user (if the token life has not expired yet).
It should be noted that during the logout process the session token in the user's browser is destroyed, regardless of whether the blacklisting mechanism is enabled. Also, closing the browser deletes the token.
However, a theoretical scenario is that the user's token is intercepted and used for unauthorized access to the system. Access possible for the lifetime of the token.
When this mechanism is enabled, the token is blacklisted (and therefore prevented from further use despite the active life time) and each query to the backend (API Admin Panel) checks whether the token used by the user is not blacklisted.
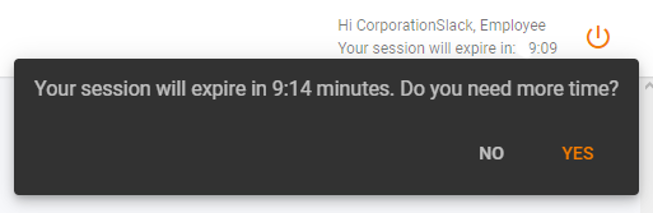
Session extension popup
Sometimes the session time may not be sufficient to perform the portal user's operations. For this reason a mechanism has been created to ask the user if there is a need to extend the current session.
It should be noted that by default when half of the session time elapses and the user performs some action (moves to another tab, clicks a button) the session time is renewed. By session time renewal it is meant that a new session token is assigned to the user and the session time counter is restored to its default, maximum value.
When the mechanism is active at a certain time before the end of the session the user is asked if he needs more time (screen below). If user chooses affirmative answer, there is assigned a new session token and the session time is restored to the default, maximum. Selecting no closes the dialog. Not selecting an option will close the dialog when the session time expires and the user is logged out.
Tooltip for table row values
Depending on the resolution and screen size, the appearance of each screen may vary cosmetically. Admin Panel is responsive but values in tables can be of different length (up to 255 characters). It is not always possible to display the entire value in a single table cell. For this reason, a mechanism was created to display a tooltip for table cell values.
The default mechanism is to show the user as many characters as fit into the table cell - depending on the screen size of the device. It is possible in this case to copy the whole, valid value of the cell. Unfortunately it is not possible to preview it by user in simple way - it is necessary to copy cell value e.g. to text document to know its characters that do not fit in the cell.
By enabling described mechanism the tooltip is displayed when the user hovers the mouse over a particular value in the table and waits for 1 second without moving the mouse. The user can easily see the entire value of such a variable.
Password policies
As it is extremely important for us to ensure the security of the portal operators' data and the data to which the operators have direct access, we are providing an additional policies for passwords.
User lock
For added security, a popular mechanism has been implemented to lock the user's account for the period set in the configuration options. By default, the operator's account is blocked until the end of the day after 3 incorrect login attempts, i.e. if the user enters the wrong password 3 times, he will not log in. Such a user can be unblocked, for example, by correctly performing a password reset.
Force password change
The first of the additional policies that can be used on the admin instance of the panel is to force the operators to change the password every specified number of days. In the case of inactivity on the part of the operator the account is locked - its unlocking is possible through a password reset mechanism. Before the account is blocked, an email notification is sent about the need to change the password - the time when the email is to be sent is configurable.
Force unique password
A second, additional safeguard in password security policies is to prevent a user from setting a password that they have already used in the past. With this mechanism, it is possible to configure how many previous passwords should be excluded from reuse. Of course, for data security reasons, previously used passwords are not stored but only their unique hash, which is used for uniqueness comparison.
Deactivate inactive accounts
In order to ensure the safety of the data contained on the portal, an automatic deactivation mechanism for unused accounts has been created. It allows to define the time without logging in after which the operator will be blocked. Unblocking the account is possible by using the password reset mechanism, which is tantamount to confirming your identity and access to your e-mail address.
Handling an unavailable service
As Admin Panel consists of multiple services (as a reminder, individual services are responsible for the corresponding sections in the side menu), it is important to ensure the availability of the application when any of the individual components is not working (for example, due to a scheduled maintenance outage). For this reason, a mechanism for graying out unavailable services in the side menu has been implemented and enabled by default. If any product/service is temporarily unavailable, the portal operator can still use the functionality provided by the other services. In the case that the unavailable service becomes operational, the section becomes available again after refreshing the page.
Token Management Administration Panel Overview
The TMP Administration Panel (or the admin portal/portal for short) is the essential tool for you to work with your online application. Here you can manage payment tokens and track history of payments. The presented solution is prepared for rebranding for the client's brand. The document is divided into sections that describe the various components of the system. Each section contains a screen presenting the functionality and a detailed description of the states occurring in it.
Purpose and scope
This product guide provides a high-level overview of Admin Panel Management. This document covers the following topics:
-
description of the all aggregates of tokens, including detailed information and possible actions,
-
description of possible configurations,
-
granting access,
-
additional and optional functionalities.
Abbreviations & Acronyms
This section explains a number of key terms and concepts used in this document.
|
Name |
Description |
| MDES |
Mastercard Digital Enablement Services |
| VTS |
Visa Token Service |
| TMP |
Token Management Platform |
| OTP |
One Time Password |
Terminology
This section explains a number of key terms and concepts used in this document.
|
Name |
Description |
| Customer |
Cardholder. |
|
Operator |
User using the Admin Panel. |
|
Token |
Payment Token. |
|
Session token |
Access to the system by a web application user is secured using a session token to uniquely associate the session with the user. It is required to perform any action. |
MAIN VIEW
Once the authentication process is properly completed, the bank employee has access to the panel. It is shown the main screen of the system. Depending on the assigned rights group its appearance may vary. Different roles in the system have different tabs available.
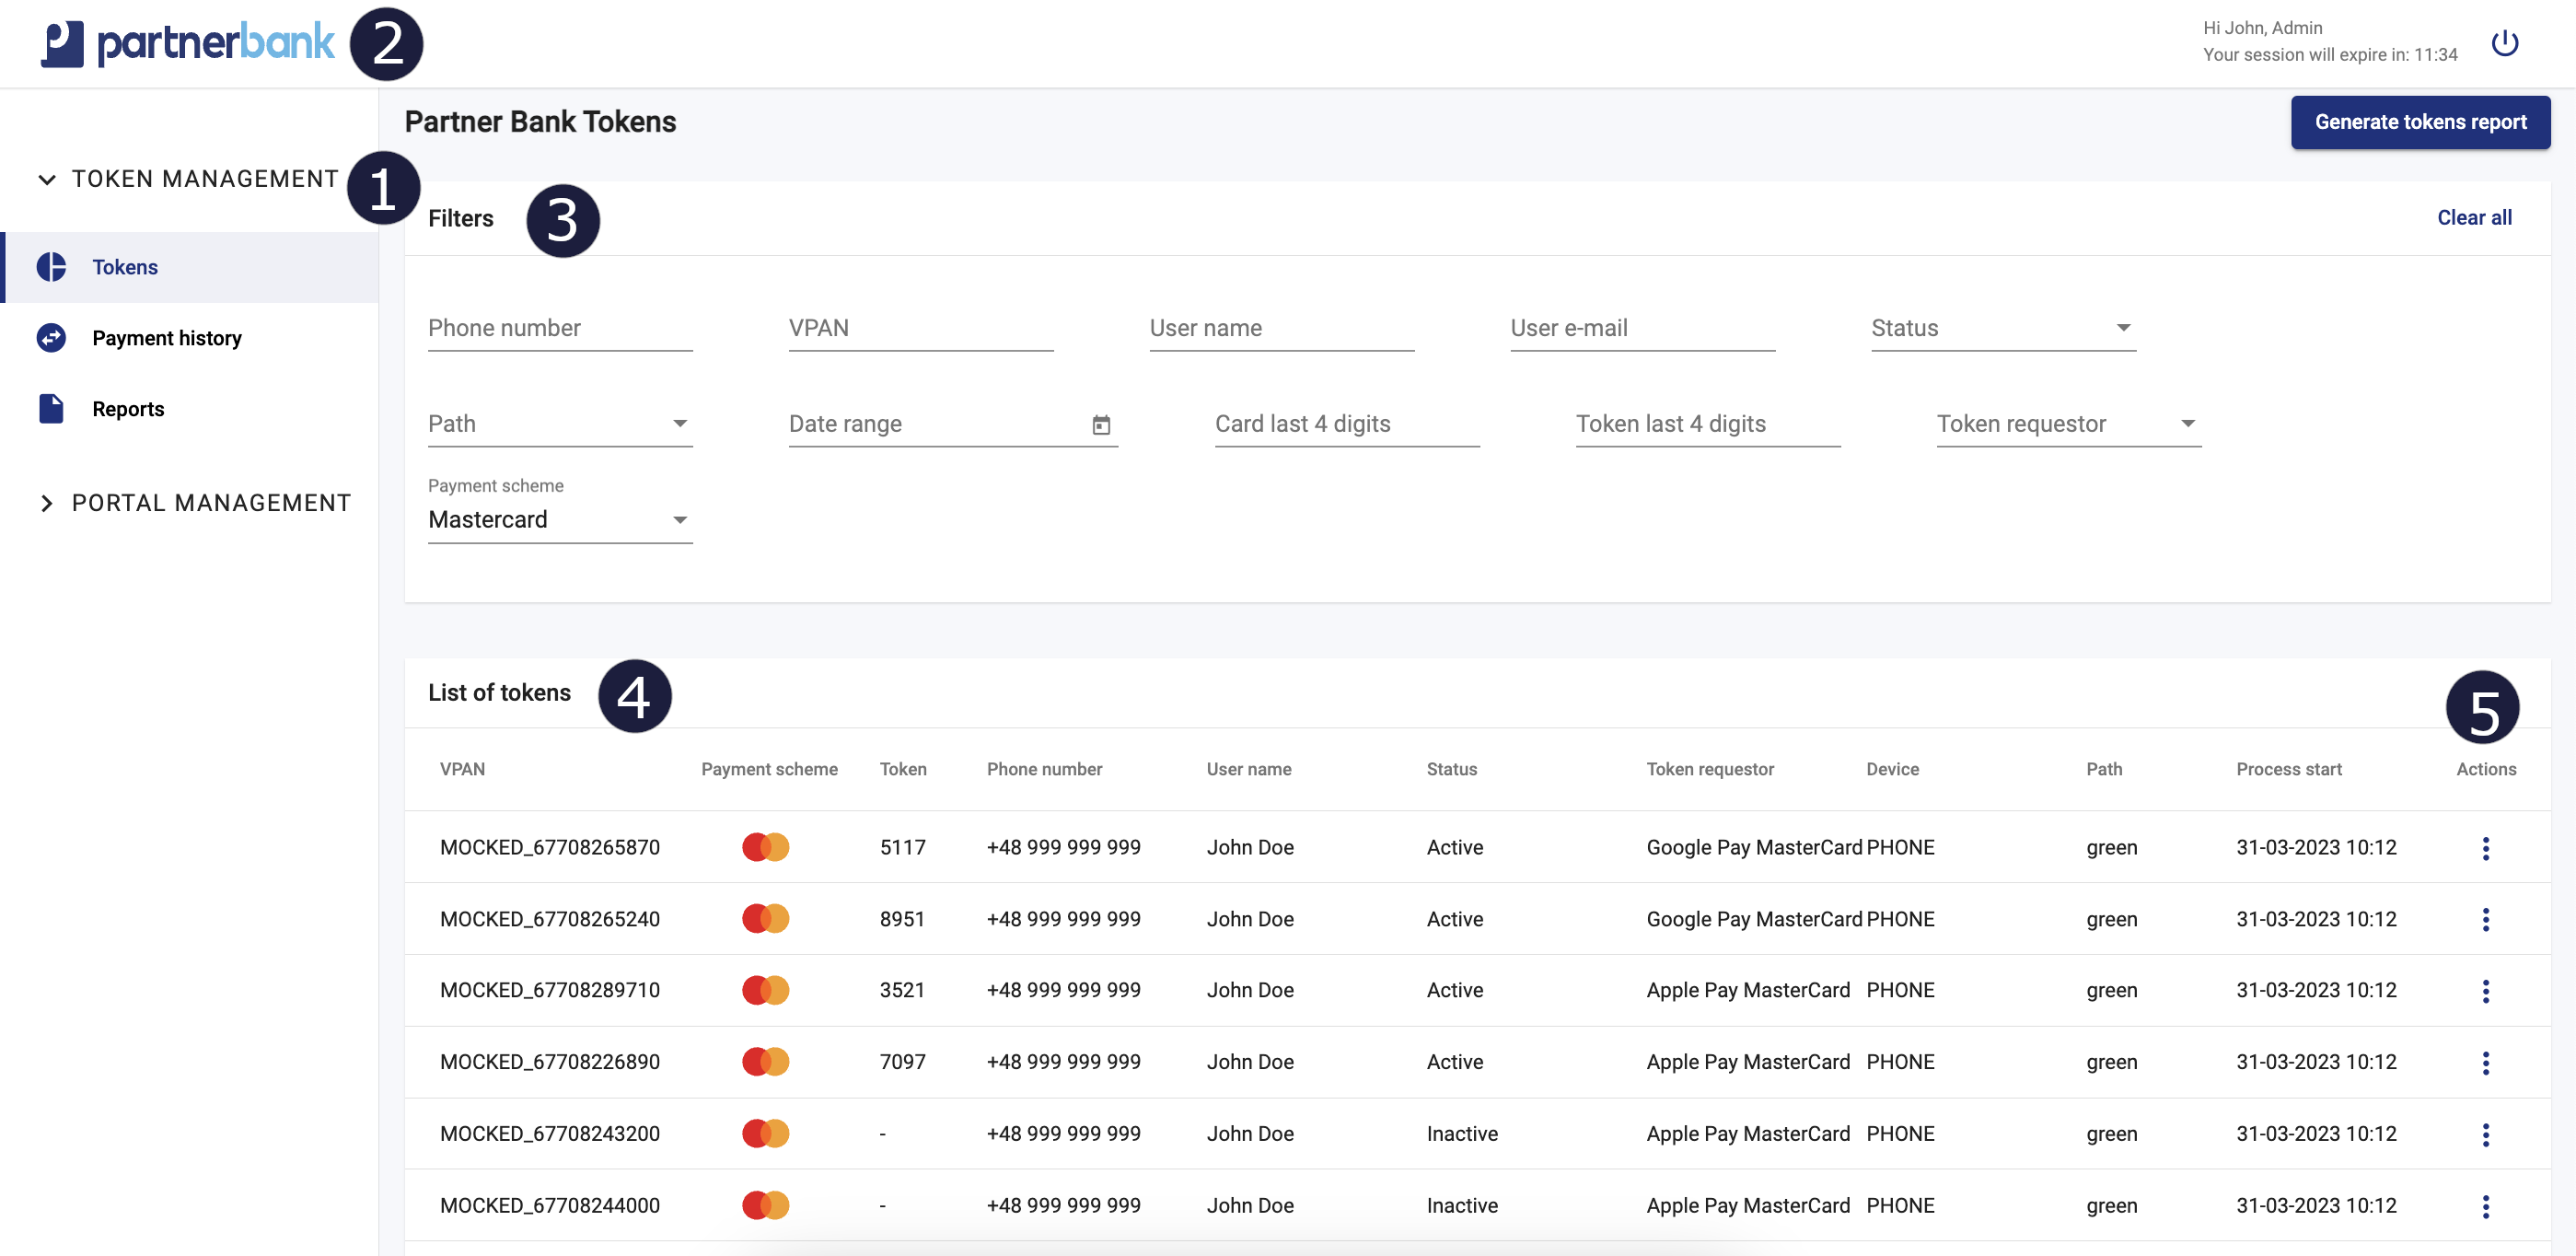
The components that make up the Admin Portal are:
1) Main menu contains aggregates as: tokens, history of payments, reports in Token Management Tab and Portal Management Tab.
2) Admin Panel adjusted to the client’s colours and logotype.
3) Filters allows to select multiple filter options and display results that contain information limited all the selected criteria.
4) List of the most important information referring to each aggregate (example: tokens).
5) Actions allows admin to change the status of a single entity or edit data.
TOKEN MANAGEMENT
Tokens
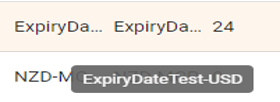
Tokens section contains a list of tokens and the filters. The filters are used for dynamic searching, such data as: phone number, VPAN (external card id), path, status last four digits of card or token, payment scheme and others.
Basic list includes following information:
|
Parameter |
Description |
|
VPAN |
External Card ID provided by the Issuer. |
|
Payment scheme |
Payment scheme - Mastercard of Visa. |
|
Token |
Token last 4 digits. |
|
Phone Number |
Cardholder's Phone number. |
|
User name |
Cardholder's User name. |
|
Status |
Token status. |
|
Token requestor |
Token Requestor/Wallet. |
|
Device |
Device form factor. |
|
Path |
Inital authorization path - green/yellow/orange/red. |
|
Action |
action which can be performed on particular customer (described in customer actions part). |
Available actions
| Action | Description |
| Activate | This action activates the token. Available if the token can be activated and is currently INACTIVE. |
| Suspend | This action suspends the token. Available only for ACTIVE tokens. |
| Unsuspend | This action unsuspends the token. Available only for SUSPENDED tokens. |
| Deactivate | This action deactivates the token. Available for all INACTIVE, ACTIVE and SUSPENDED tokens. |
Generate tokens report
Token Details
Selecting a specific token allows to see more detailed data. In addition to basic information.
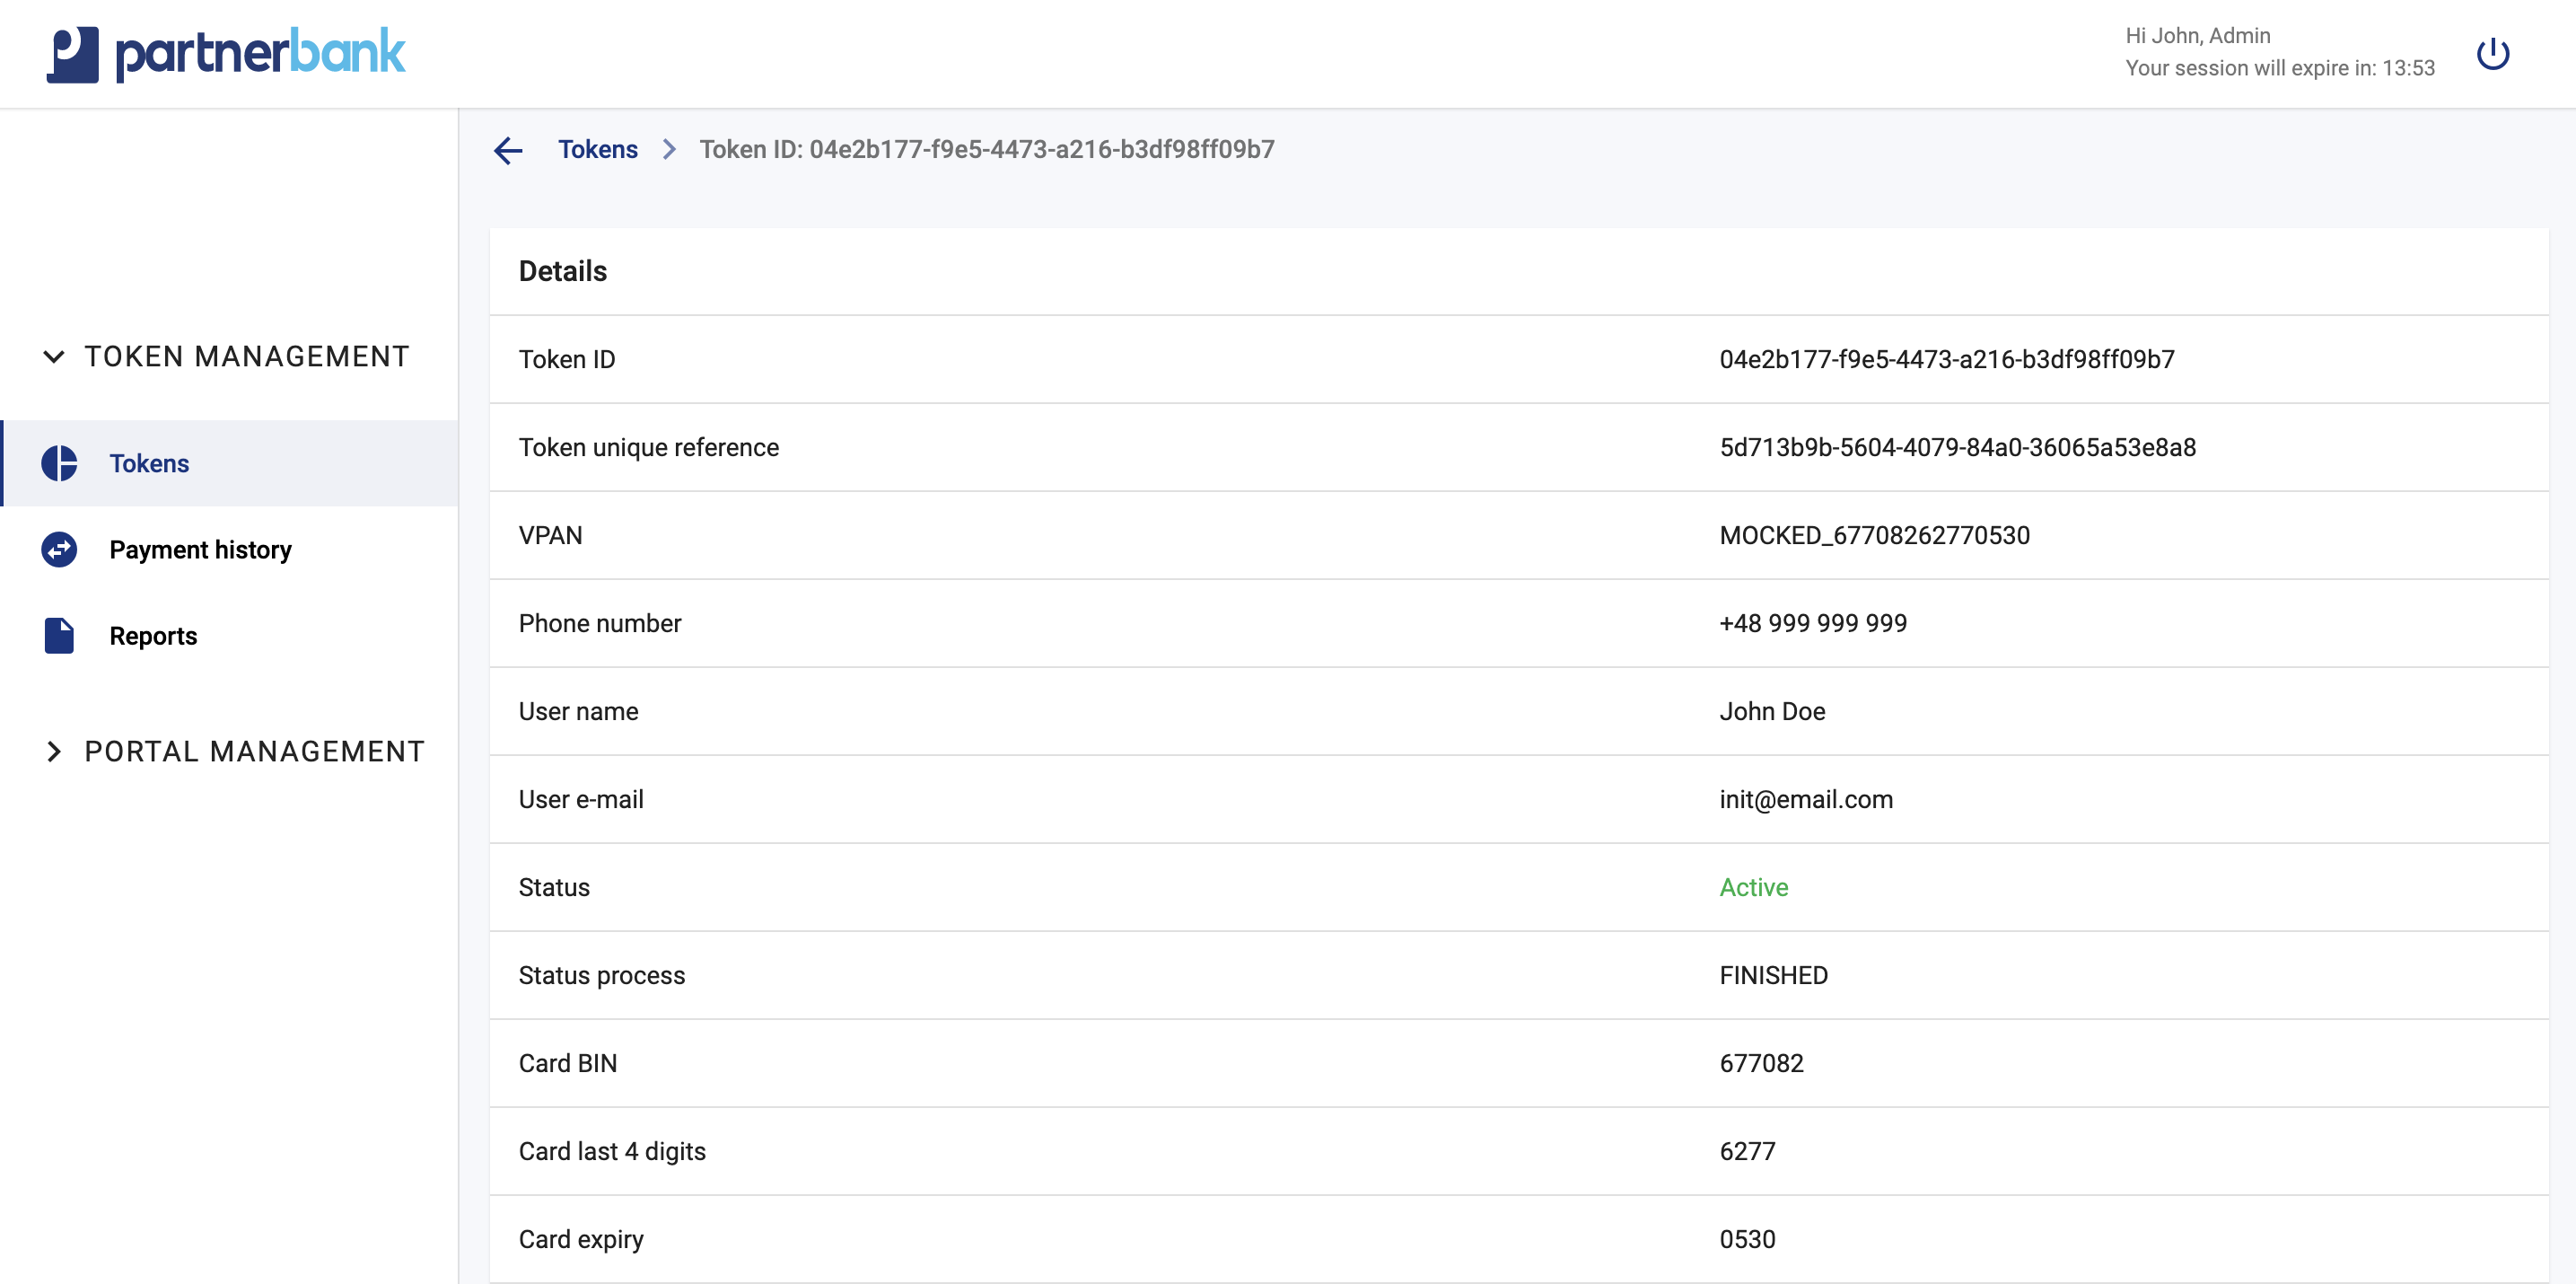
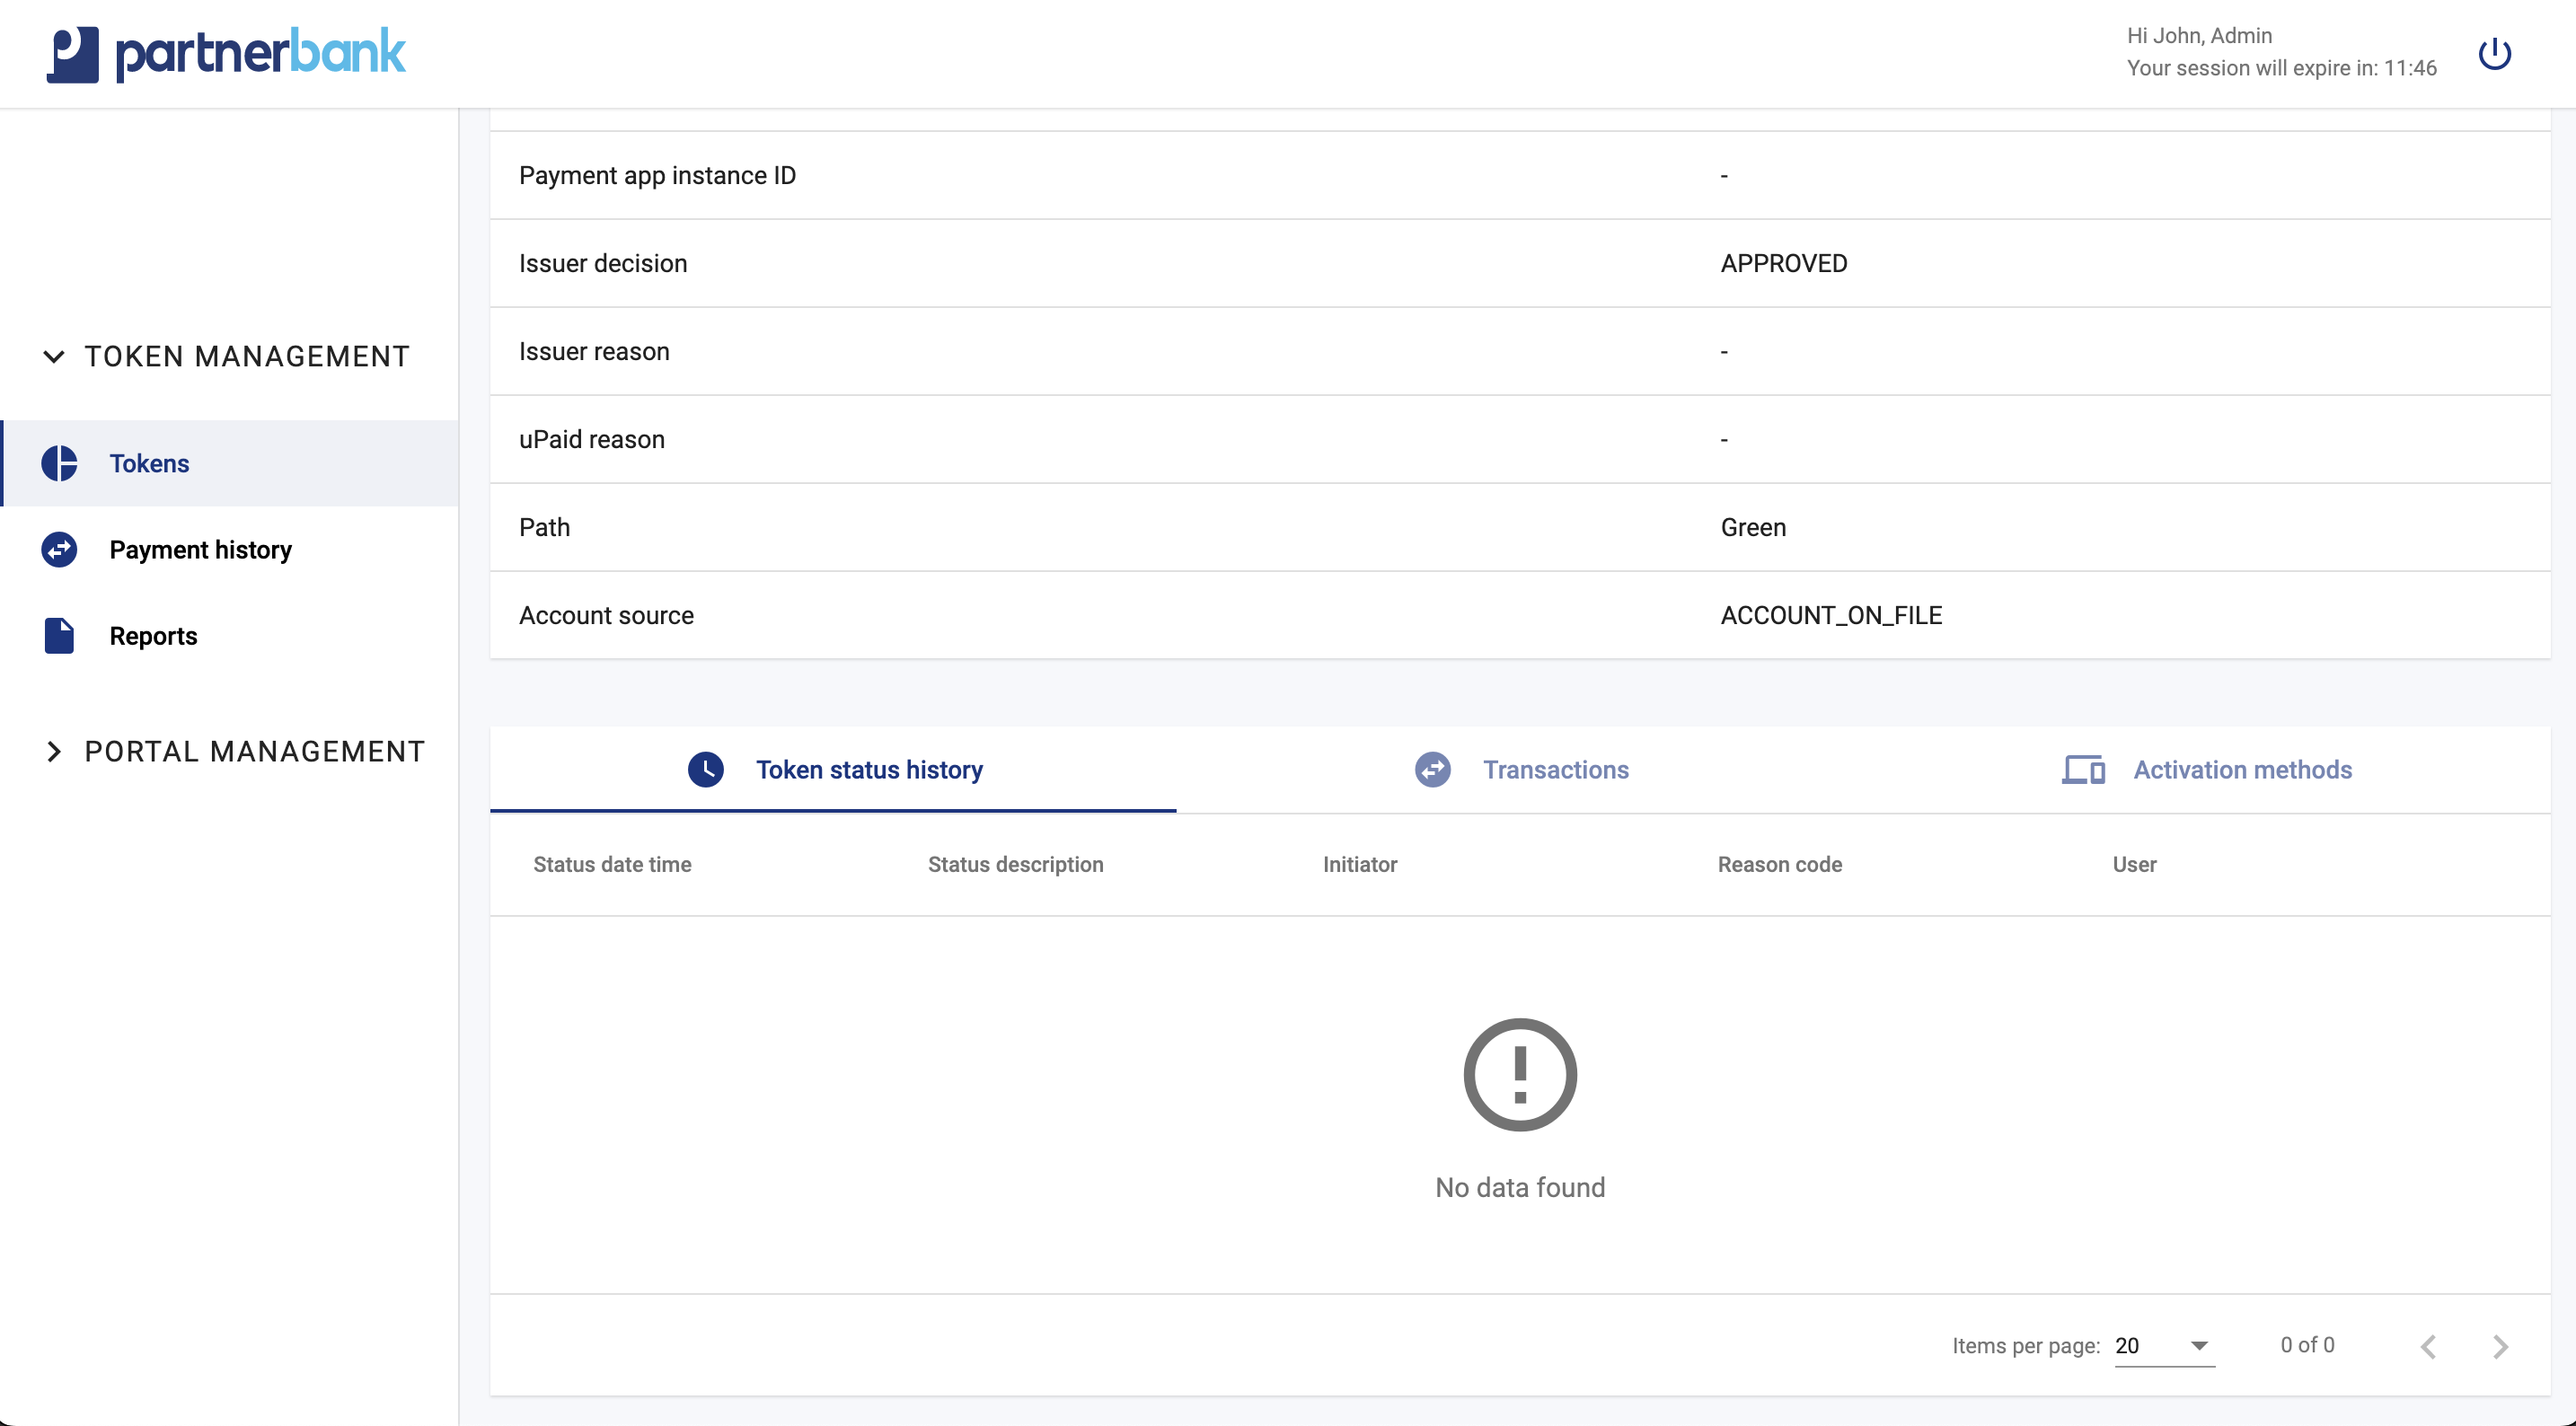
Detailed list includes following information:
|
Parameter |
Description |
|
Token ID |
Internal Verestro Id of the token. |
|
Token unique reference
|
MDES/VTS token unique reference. |
|
VPAN
|
External Card Id - Issuer Card Id. |
|
Status
|
Token Status. |
|
Status process
|
Status of the tokenization process - IN_PROGRESS, FINISHED. |
|
Sms count
|
Number of sms messages with OTP code sent. |
|
Token type
|
The type of the token: CLOUD/EMBEDDED_SE. |
|
Wallet ID
|
Wallet ID of the token requestor. |
|
Correlation ID
|
Value linking pre-digitization messages generated during provisioning. |
|
Reason code
|
Reason of the last token update. |
|
Payment app instance ID
|
Identifier of the Payment App instance within a device. NOTE - This may contain the identifier of the Secure Element or a mobile device for some wallets. |
|
Issuer decision
|
Final tokenization decision returned to MDES/VTS. |
|
Issuer reason
|
Reason of the DECLINE, if the tokenization is declined because of invalid card data, exp date or cvc. |
|
uPaid reason
|
Reason of the DECLINE, if the tokenization is declined because of Verestro velocity controls triggered. |
|
Account source
|
Account source - Manual entry, card on file, from mobile application. |
Payment history
Payment history list
Payment history list contains filters and columns with dates. In this section actions don’t occur. The filters are used for dynamic searching, such data as: phone number, VAPN, date range, status and token requestor . The date is displayed in local time.
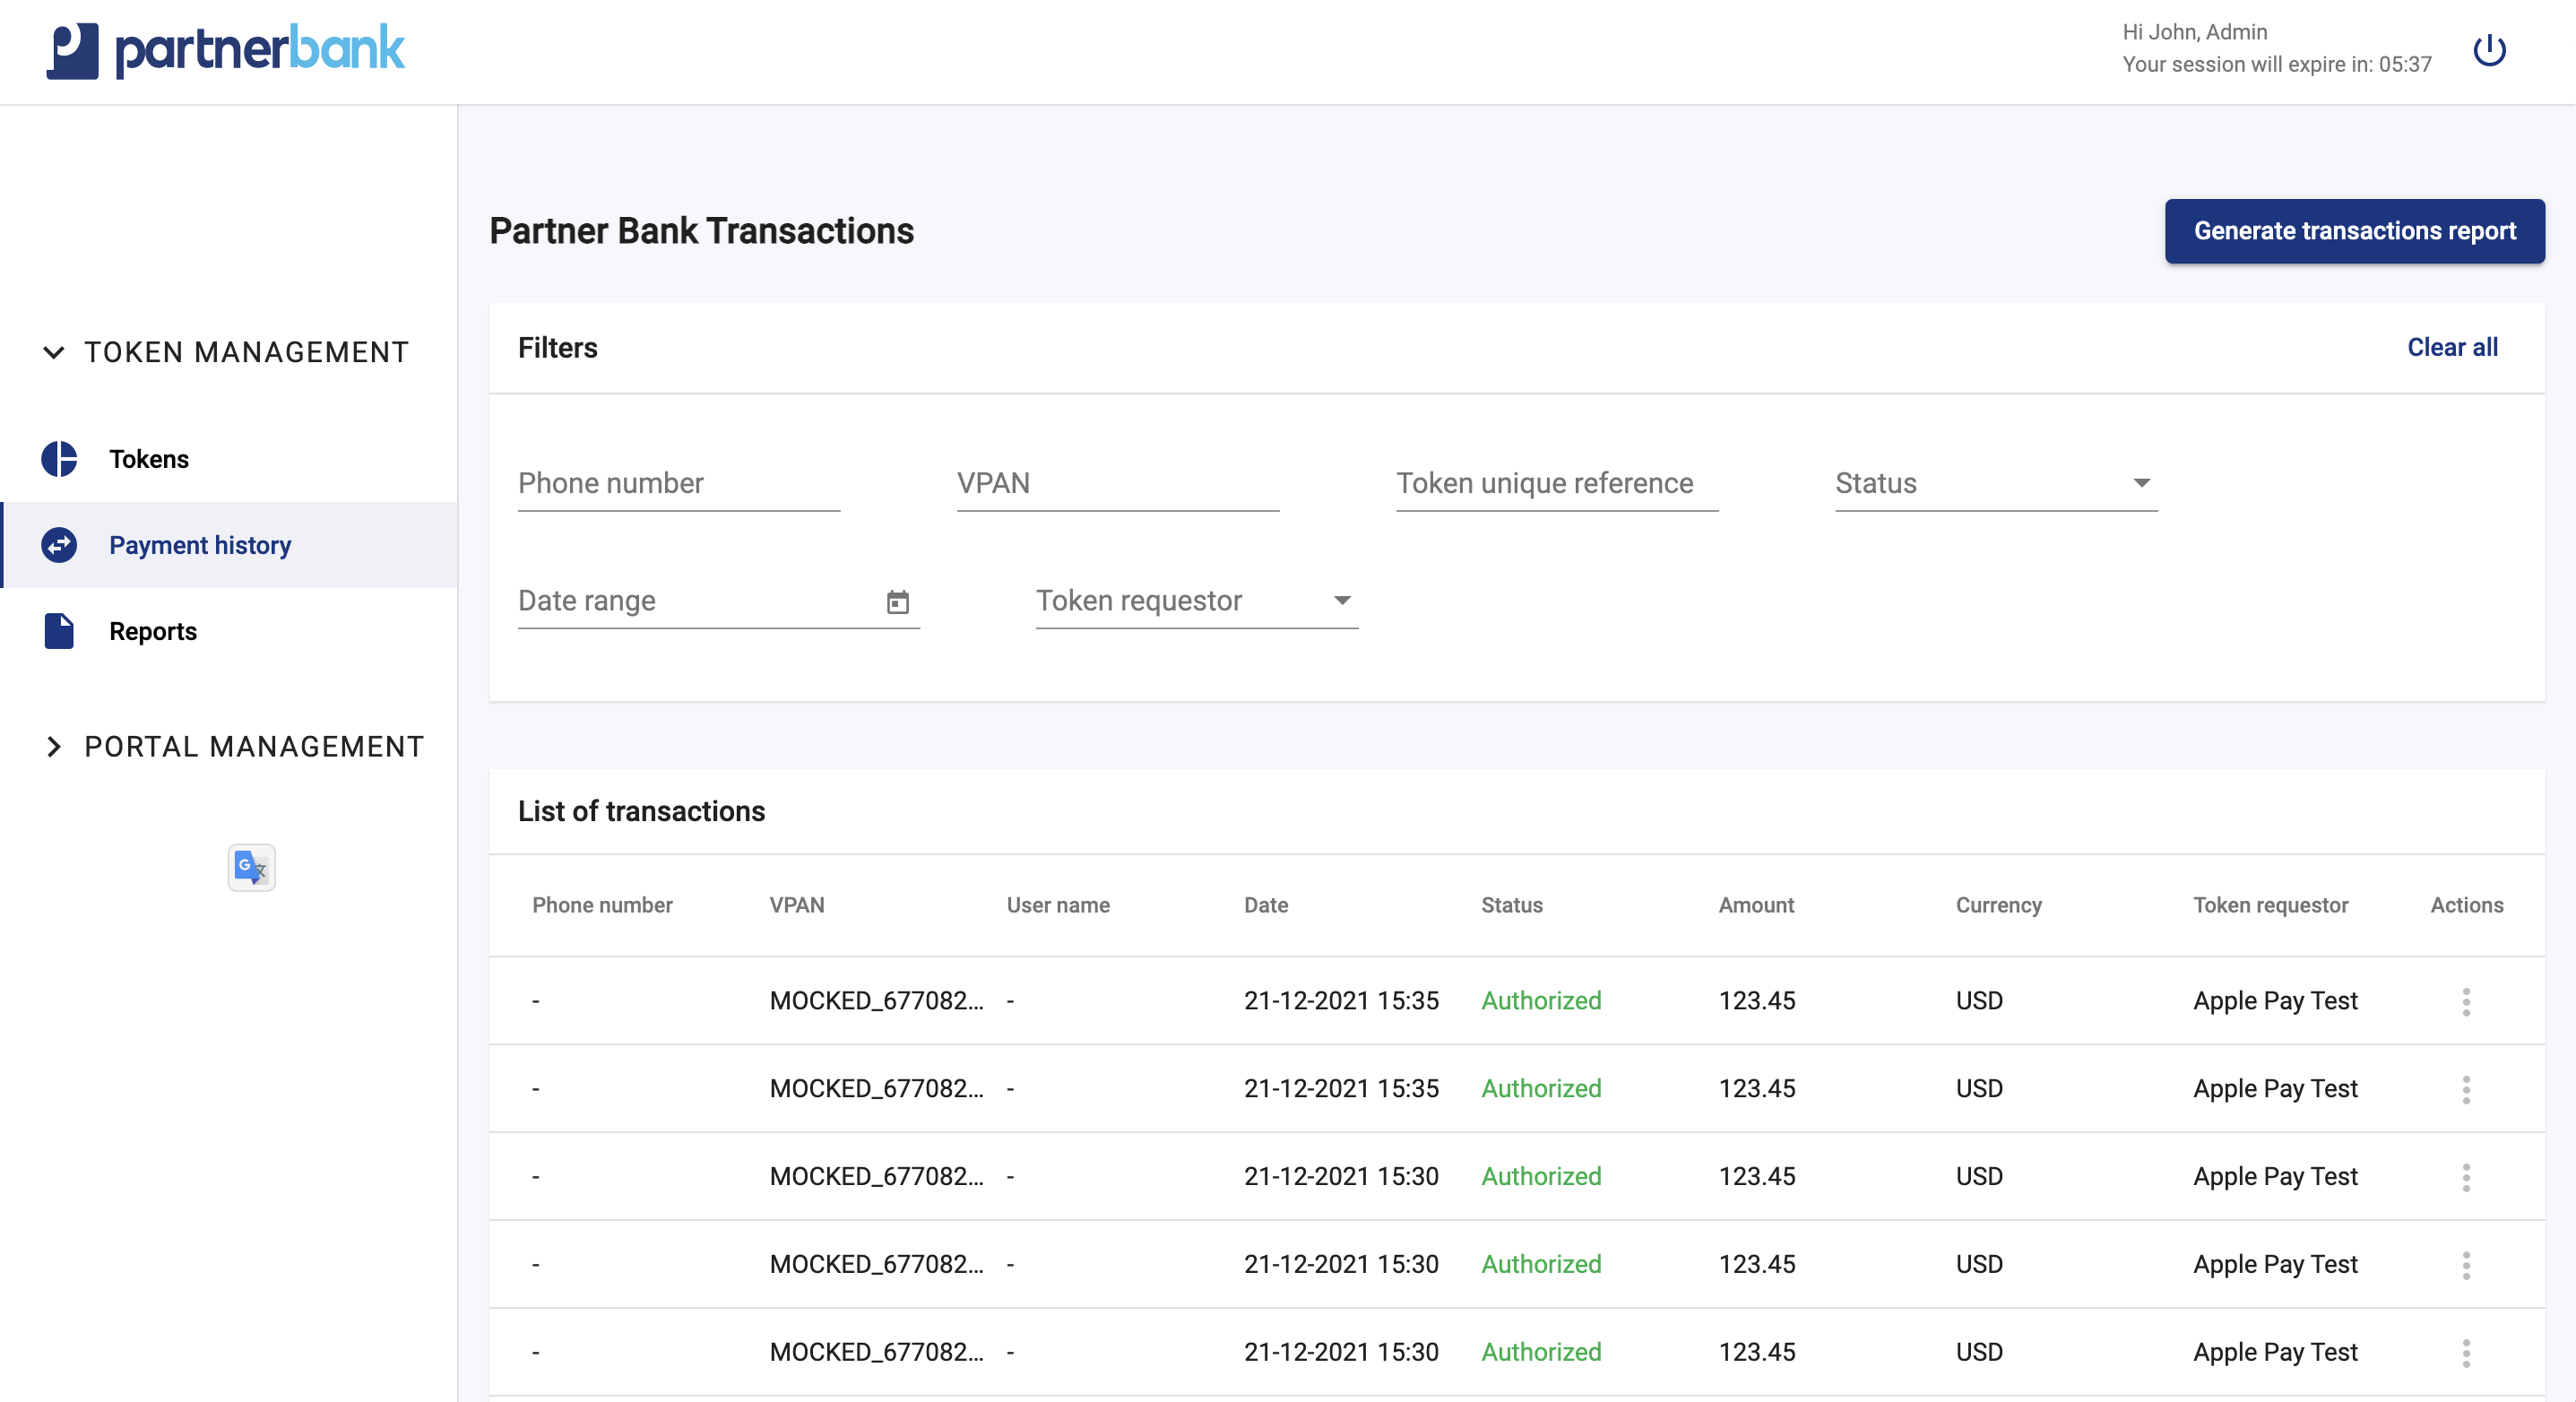
Basic list includes following information:
|
Parameter |
Description |
|
Phone number |
Cardholder's phone number (if provided by the Token Requestor). |
|
VPAN |
External Card ID. |
|
User name |
Cardholder's username (if provided by the Token Requestor). |
|
Date |
Transaction date. |
|
Status |
Status of the transaction. |
|
Amount |
Amount. |
|
Currency |
3-character ISO 4217 currency code of the transaction. |
| Token requestor | Token requestor . |
Generate transactions report
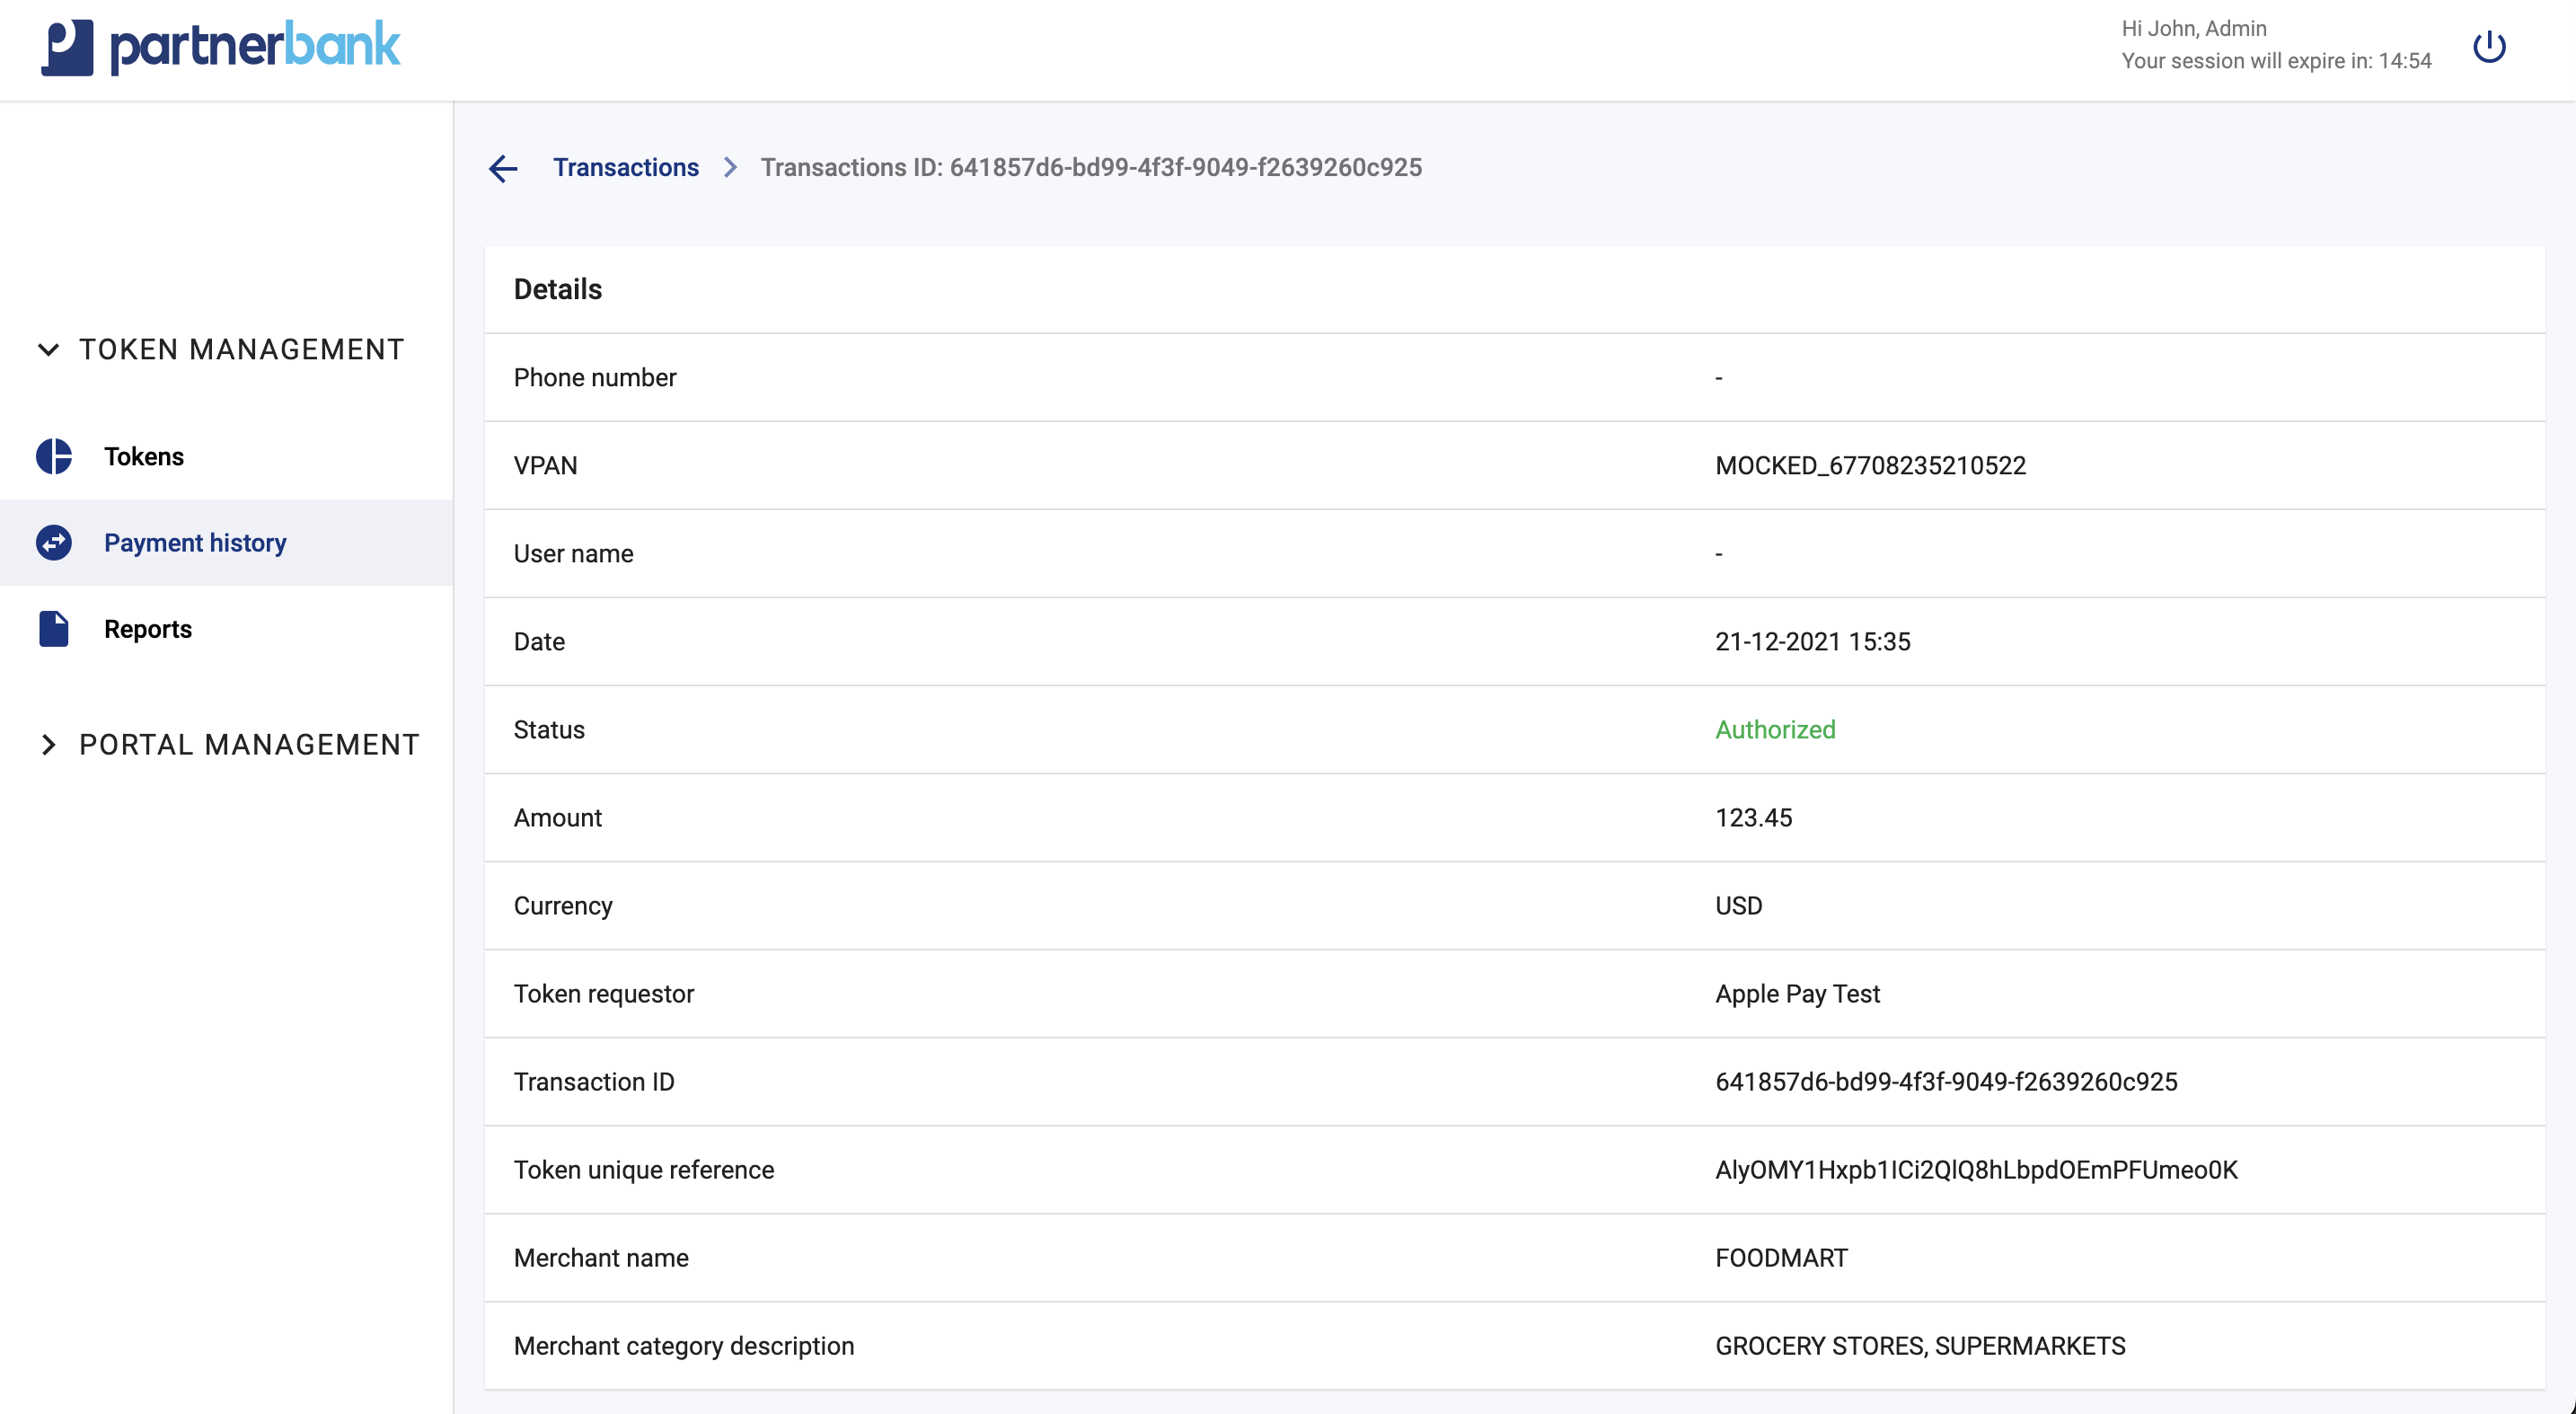
Payment history details
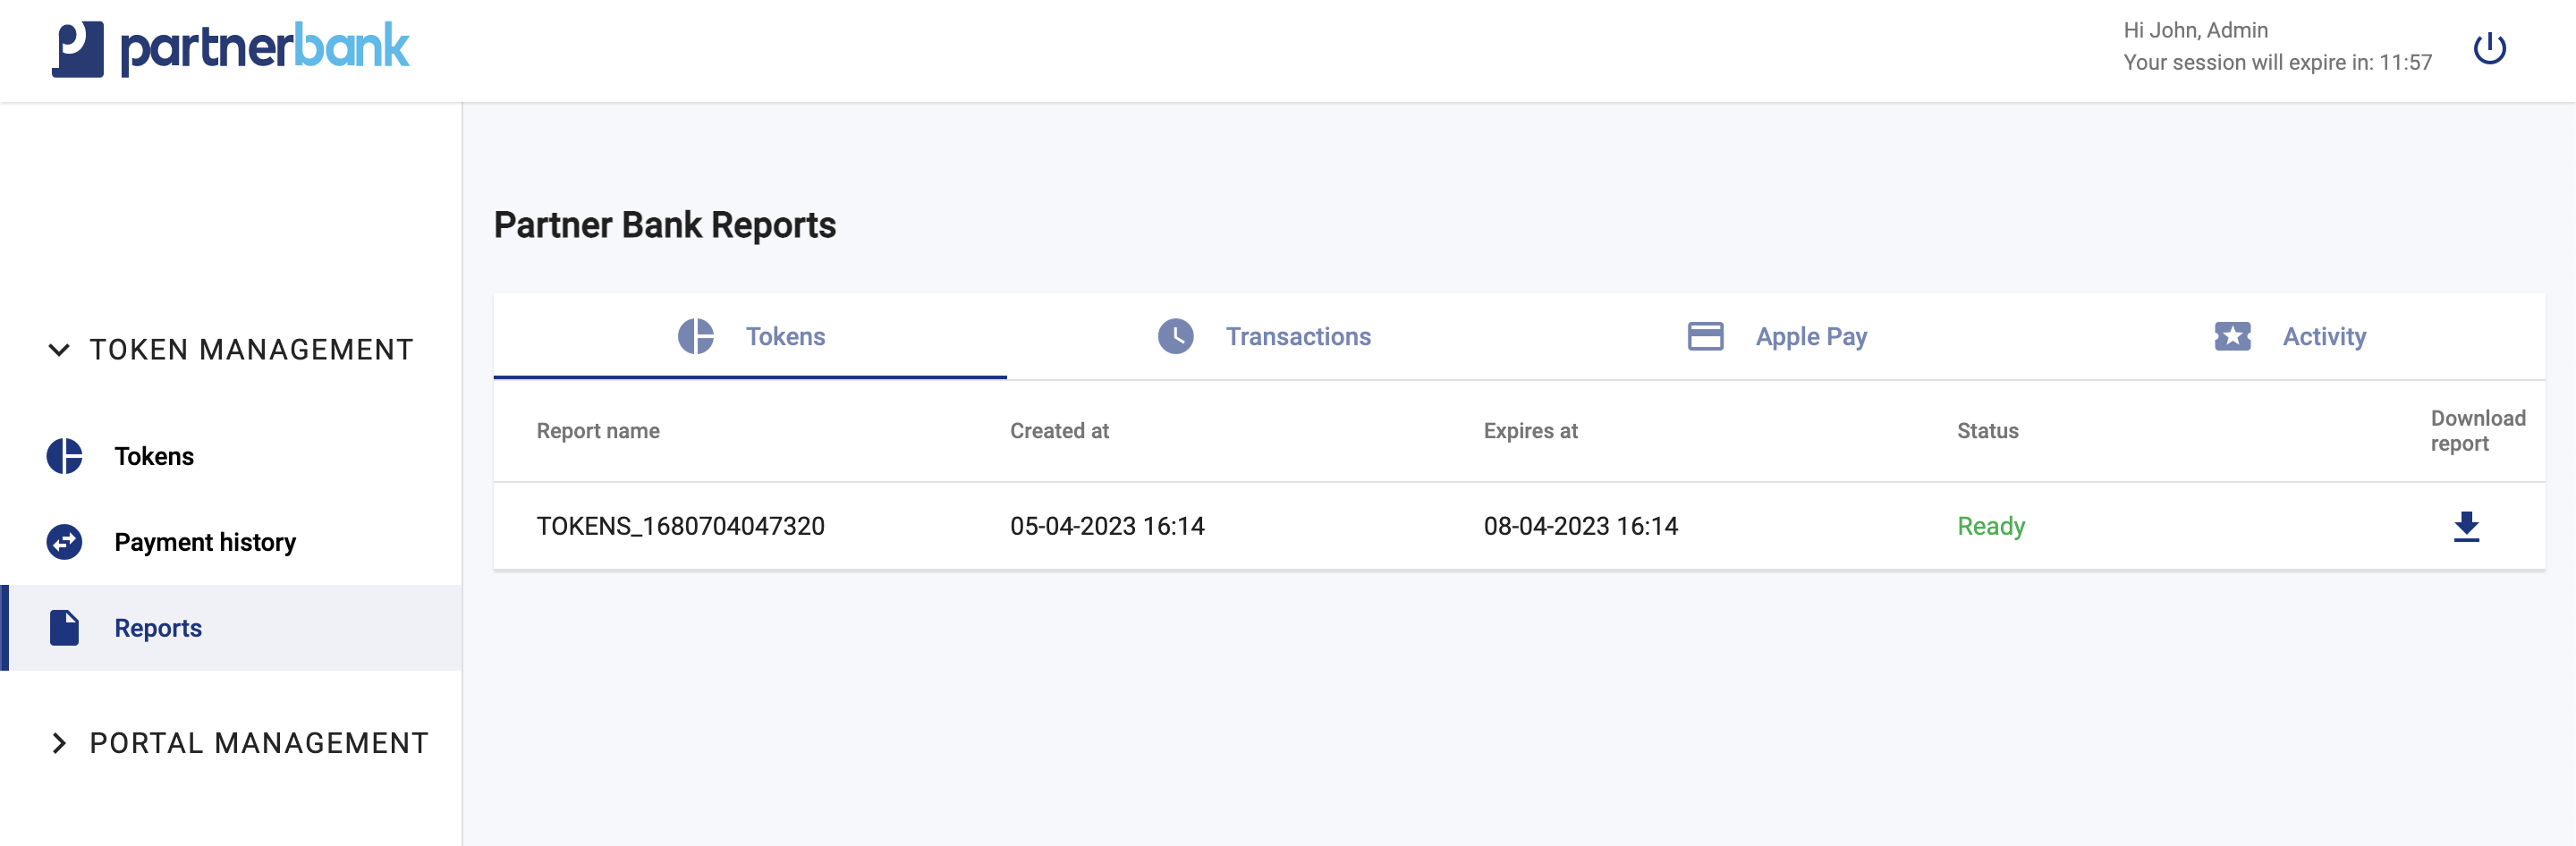
Reports
Reports section contains reports that can be downloaded. Each report is valid for a specific duration and can be "Ready" to download or "In progress", which means that a report is still generating.
Tokens
This tab contains Tokens reports, generated from Tokens section.
Transactions
This tab contains Transactions reports, generated from Transactions section.
Apple Pay
This tab contains Apple Pay reports, which are generated automatically each month.
Activity
This tab contains Activity reports, which are generated daily. Activity report contain the information about all actions performed on Tokens by Admin Panel users.
OPERATOR ADMINISTRATION
Default privileges per role in the portal
Below are the default function settings for described product divided into areas.
|
Aggregate |
Action |
Admin |
Manager |
Employee |
| Token Management - Tokens | View | x | x | x |
| Deactivate | x | x | x | |
| Suspend | x | x | x | |
| Unsuspend | x | x | x | |
| Token Management - Payment history | View | x | x | x |
| Token Management - Reports | View | x | x | - |
| Generate | x | x | - | |
| Token Management - Rules | View | x | x | x |
Overview of Administration Panel main sections
The Administration Panel (or the admin panel/portal for short) is the essential tool for you to work with your online application. Here you can manage customers, their cards, IBANs, devices and track history of payments. The presented solution is prepared for rebranding for the client's brand. The document is divided into sections that describe the various components of the system. Each section contains a screen presenting the functionality and a detailed description of the states occurring in it.
Purpose and scope
This product guide provides a high-level overview of Admin Panel Management. This document covers the following topics:
-
description of the all aggregates of customer, including detailed information and possible actions,
-
description of possible configurations,
-
granting access,
-
description of main processes as: login, reset password,
-
additional and optional functionalities.
Abbreviations & Acronyms
This section explains a number of key terms and concepts used in this document.
|
Name |
Description |
| VPN |
Virtual Private Network |
| MPA |
Mobile Payment Application |
| IBAN |
International Bank Account Number |
| MCBP |
Mastercard Cloud Base Payment |
| MDES |
Mastercard Digital Enablement Services |
| LCAPI |
Lifecycle API |
Terminology
This section explains a number of key terms and concepts used in this document.
|
Name |
Description |
| Customer |
Customer who uses MPA. |
|
User |
User using the Admin Panel. |
|
Card |
Section contains information about customer PANs – physical cards added by customer manually in MPA or bank using LC API. |
|
IBAN |
Customer bank account number. MCBP enables bank account numbers to be digitized and used for payments. |
|
Token |
Payment Token in context of MCBP. Tokens are result of correct digitization. Each token has one wallet account, one card/IBAN number and one device related. |
|
Device |
Device is data aggregate related to customer. Device is entity in MDES – created during MDES registration. Each registration of customer has device on Verestro side, but each customer may have multiple MDES registrations. |
|
Payment history |
It’s possible that transaction history will be stored on Verestro wallet server for infinite time (this setting can be specified during onboarding with Mastercard). If these options are enabled, MPA can retrieve transaction history for given user and payment instrument ID. Transactions are returned in corresponding parts for better user experience. Particular transaction may appear on the list with delay – depending on integrated external components. |
|
LCAPI |
API Used for direct integration to partner. Allows to manage users, cards, etc. |
|
Session token |
Access to the system by a web application user is secured using a session token to uniquely associate the session with the user. It is required to perform any action. |
Main view
Once the authentication process is properly completed, the bank employee has access to the panel. He is shown the main screen of the system. Depending on the assigned rights group its appearance may vary. Different roles in the system have different tabs available.
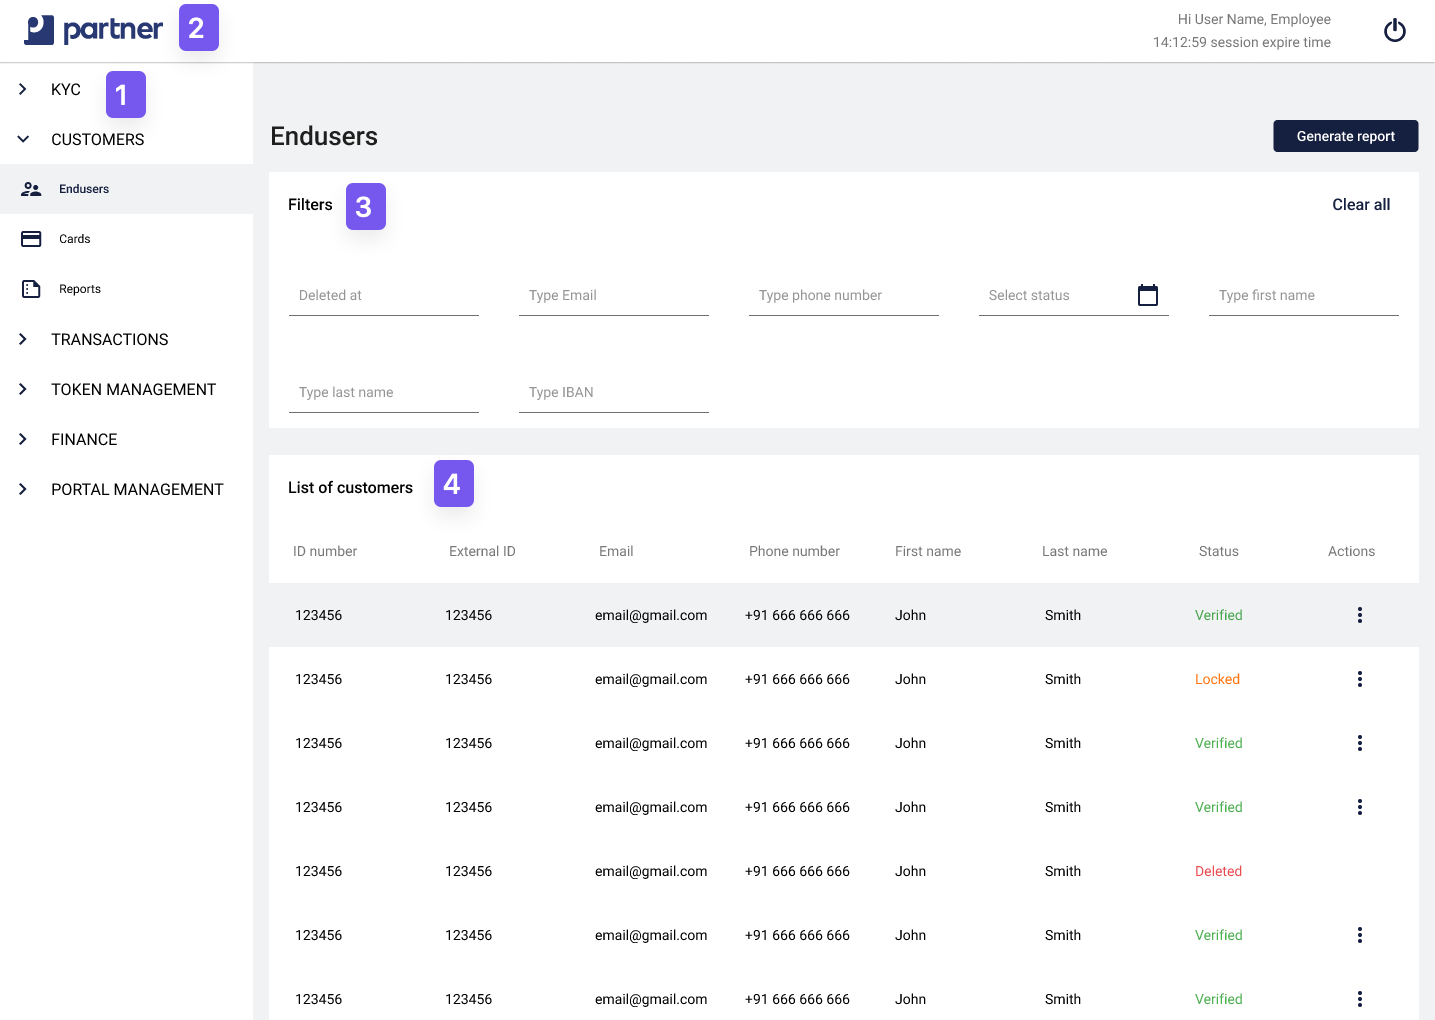
The components that make up the Admin Portal are:
1) Main menu contains aggregates as: customers, transactions, KYC, Token Management, Finance, Portal management (administrators, visuals, logs). Each section is related to different product from Verestro's portfolio.
2) Admin Panel adjusted to the client’s colours and logotype.
3) Filters allows to select multiple filter options and display results that contain information all the selected criteria.
4) List of the most important information referring to each aggregate (example: customers).
5) Actions allows admin to change the status of aggregate or edit data.
Customers management
Customers list
Customer list contains filters and columns with dates. The filters are used for dynamic searching, such data as: customer ID, external ID, e-mail, phone number, status (unverified, verified, locked, deleted).
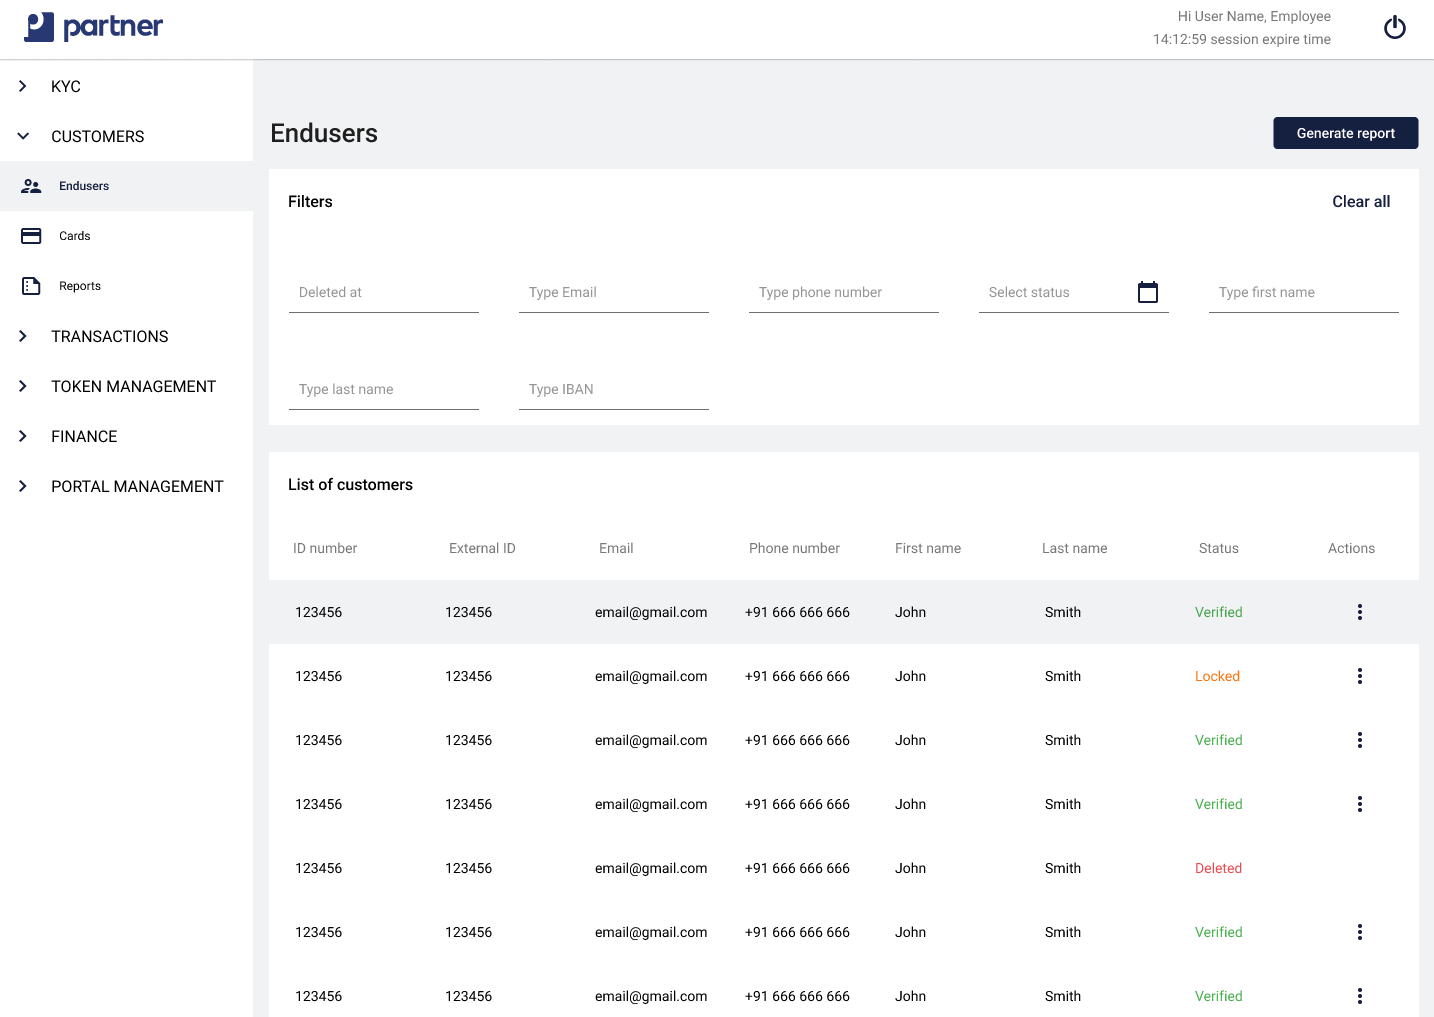
Basic list includes following information:
|
Parameter |
Description |
|
Customer ID |
Internal Verestro Id of customer. |
|
External ID |
External customer identifier provided by client (for example: recordID). |
|
|
Customer e-mail address. |
|
Phone number |
Customer phone number with country prefix. |
|
First name |
Customer first name. |
|
Last name |
Customer last name. |
|
Status |
Customer status (described in customer statuses part). |
|
Action |
Action which can be performed on particular customer (described in customer actions part). |
Customers details
Selecting a specific user allows to see more detailed data. In addition to personal information, a list of related devices, IBANs, tokens, and payment history is available.
Detailed list includes following information:
|
Parameter |
Description |
|
Customer ID |
Internal Verestro Id of customer. |
|
External ID |
External customer identifier provided by client (for example: record ID). |
|
First name |
Customer first name. |
|
Last name |
Customer last name. |
|
Phone number |
Customer phone number with country prefix. |
|
|
Customer e-mail address. |
|
Status |
Customer status. |
|
Number of failed logins |
Number of login failures. |
|
Created at |
Date of customer registration. |
|
Deleted at |
Date of customer deletion (parameter displayed only if customer has been removed from system). |
Additionally, in details are available lists of aggregates related to the particular customer:
• customer devices (more information in devices management),
• customer IBANs (more information in IBANs management),
• customer cards (more information in cards management),
• customer tokens (related to MDES/VTS payment tokens),
• payment history (more information in payment history).
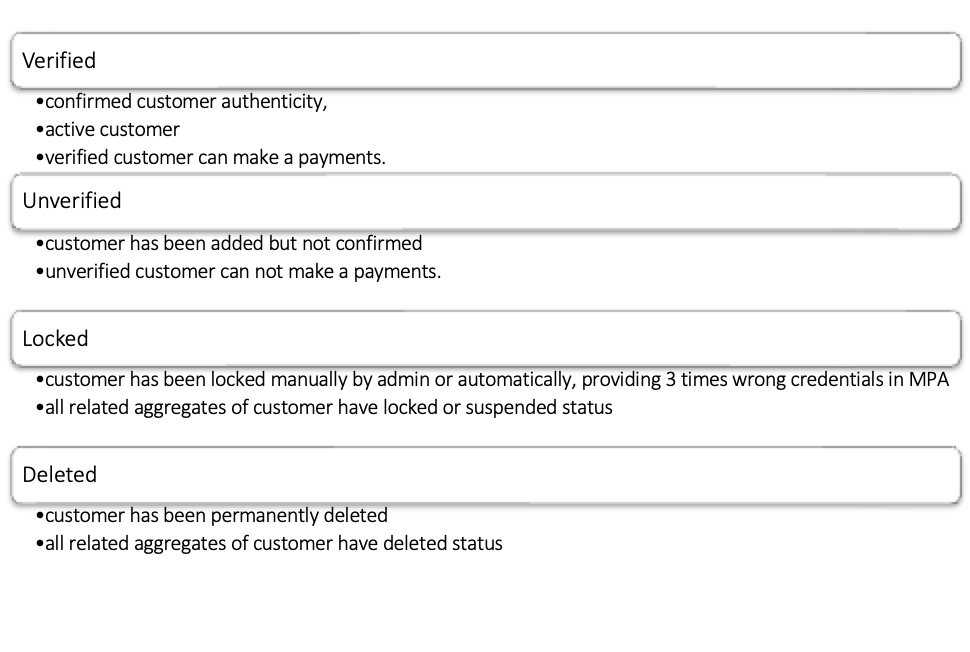
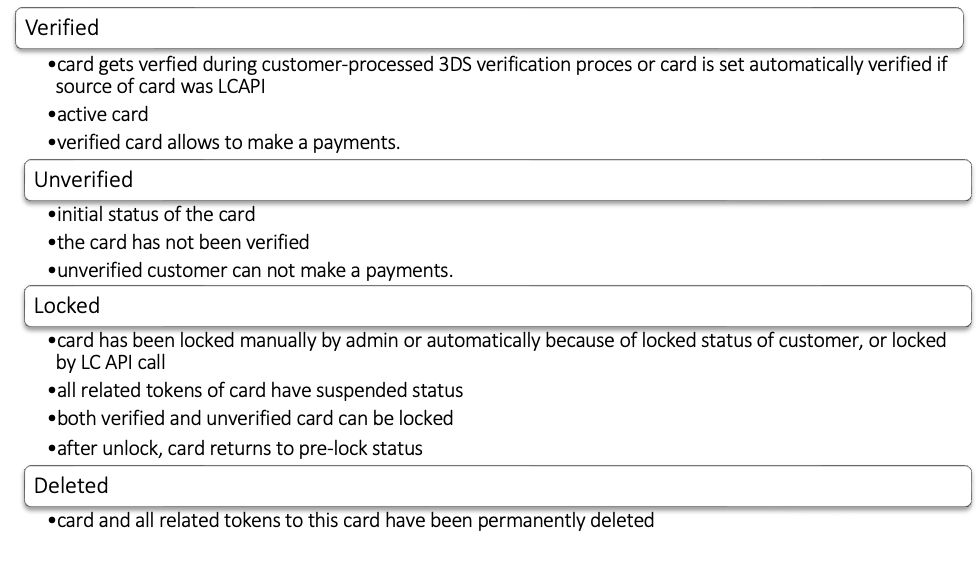
Customer statuses
A user can be defined by one of four statuses. The system created by Verestro divides the statuses into the following:
Customer actions
Admin can perform the following actions on the particular customer:
a) edit customer – redirect to the screen with edition (screen below). The following data can be edited:
• first name,
• last name,
• phone number,
• e-mail,
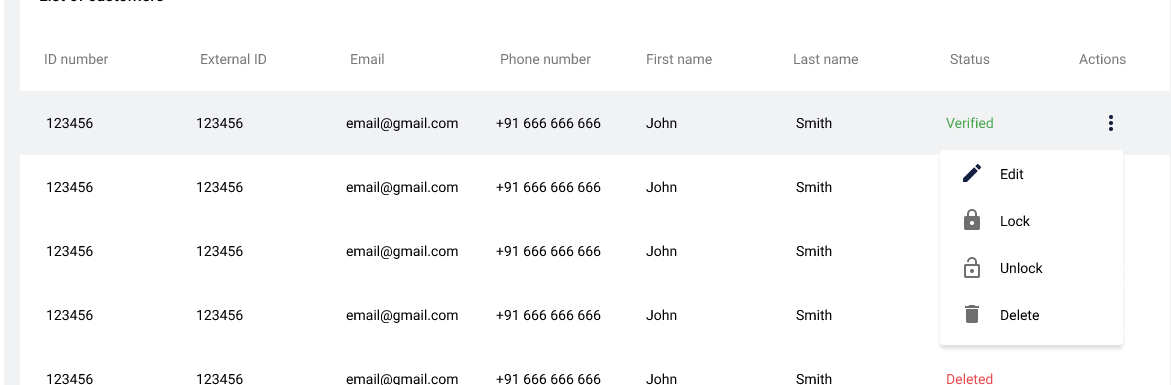
b) lock/unlock customer – temporary lock of customer (more information in customer statuses part),
b) delete customer – permanent delete customer data (more information in customer statuses part).
The following table shows the states of the user's token after performing each action.
|
Action |
Token status |
|
Add customer |
Unverified |
|
User authentication |
Verified |
|
Lock customer |
Locked |
|
Unlock customer |
Verified |
|
Delete customer |
Deleted |
Referring to the above table, a diagram has been created showing the change of states of the user token. This allows for better visualization of actions and dependencies between them.

Cards management
Cards list
Cards list contains filters and columns with dates. The filters are used for dynamic searching, such data as: card ID, last 4 digits, date of creation, status (available: unverified, verified, locked, deleted).

Basic list includes following information:
|
Parameter |
Description |
|
Card ID |
Internal Verestro Id of card. |
|
Customer ID |
Internal Verestro Id of customer. |
|
Last 4 digits |
Last four digits of physical PAN. |
|
Exp date |
Expiration date in MM/YY format. |
|
Type |
Card type (Mastercard, Visa). |
|
Status |
Card status (described in card statuses part). |
|
Action |
Action which can be performed on particular card (described in card actions part). |
Card details
Selecting a specific card allows to see more detailed data. In addition to basic information, a list of related customers, and payment history is available.
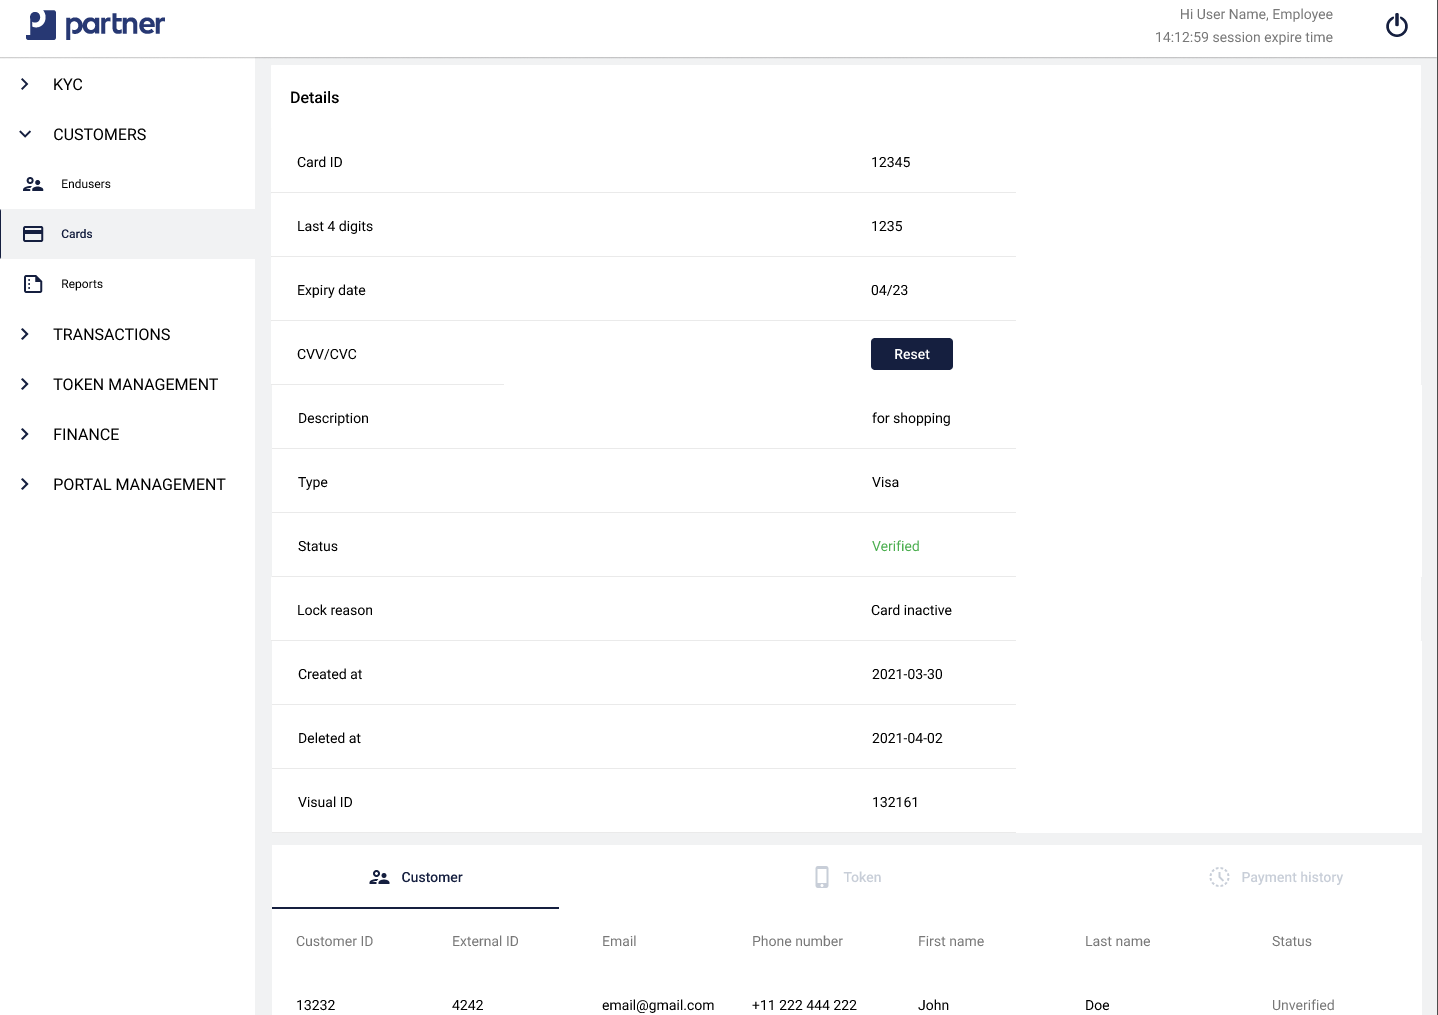
Detailed list includes following information:
|
Parameter |
Description |
|
Card ID |
Internal Verestro Id of card. |
|
Last 4 digits |
Last four digits of physical PAN. |
|
Expire date |
Expiration date in MM/YY format. |
|
Description |
Friendly name of card. |
|
Type |
Card type (Mastercard, Visa). |
|
Status |
Card status. Available: verified, unverified, deleted, locked. |
|
Created at |
Date of card addition to the wallet database. |
|
Deleted at |
Date of card deletion from the wallet database. |
Additionally, in details are available aggregates related to the particular card:
• customers (more information in customers management),
• customer tokens (more information in tokens management),
• payment history (more information in payment history).
Card statuses
A customer can be defined by one of four statuses. The system created by Verestro divides the statuses into the following:
Card actions
Admin can perform the following actions on the particular card:
a) view card – redirect to the screen with card details data,
b) lock card – temporary lock of card (more information in card statuses part)
c) delete card – permanent delete card data (more information in card statuses part).
Below table presents how action may change the statuses of card
|
Action |
Statuses |
|
|
|
Card’s status |
Token’s status |
|
Add card |
Unverified |
|
|
Verify card |
Verified |
|
|
Lock card |
Locked |
Suspended |
|
Unlock card |
Verified |
Active |
|
Delete card |
Deleted |
Deleted |
Referring to the above table, a diagram has been created showing the change of states of the card. This allows for better visualization of actions and dependencies between them.
 If project has enabled Issuer wallet, each action on card - like lock, delete - will initiate process of suspend or deleting related MDES/VTS tokens (transacion credentials) with logic described in Issuer Wallet use cases.
Devices management
Devices details
Selecting a specific device allows to see more detailed data. In addition to basic information, a list of related customers, and payment history is available.
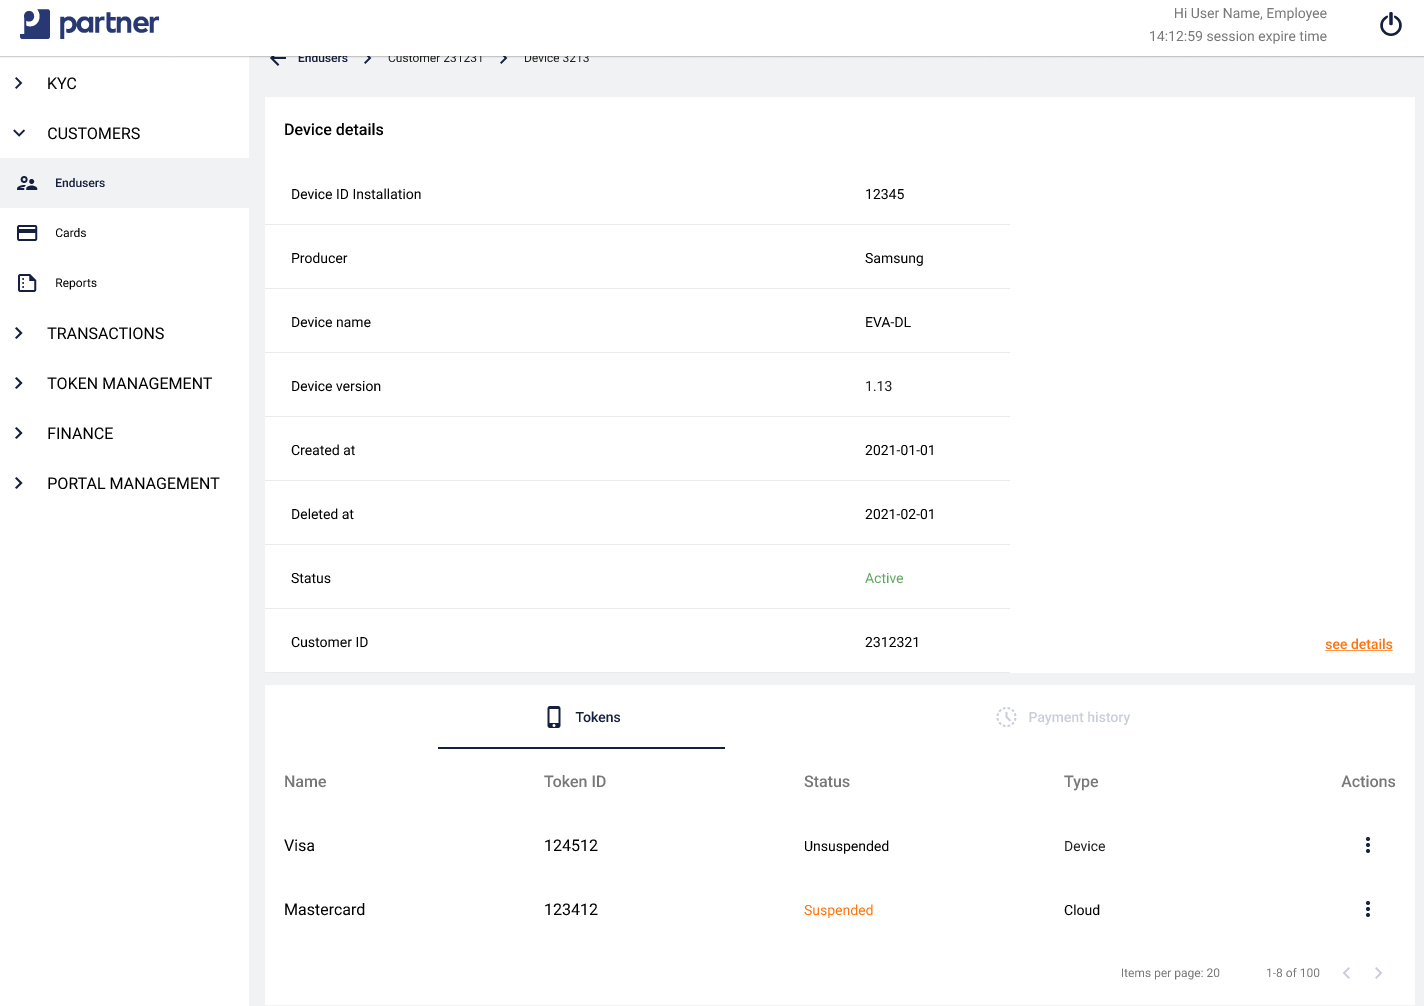
Detailed includes following information:
|
Parameter |
Description |
|
Device ID installation |
Unique identifier of app installed on device. |
|
Producer |
Description of phone device manufacturer. |
|
Device name |
Description of phone device model. |
|
Device version |
Version of operating system. |
|
Created at |
Creation date greater than specified date or equal. Format Y-M-D. |
|
Deleted at |
Deletion date greater than specified date or equal. Format Y-M-D. |
|
Status |
Device status. |
In details there are available aggregates related to the particular device:
• customers (more information in customers management),
• customer tokens (more information in tokens management),
• payment history (more information in payment history).
Device statuses
 Device actions
Admin can perform the following actions on the particular device:
a) view device – redirect to the screen with device details data,
b) lock device – lock of device. None actions on this device are possible
c) delete device – permanent delete device data.
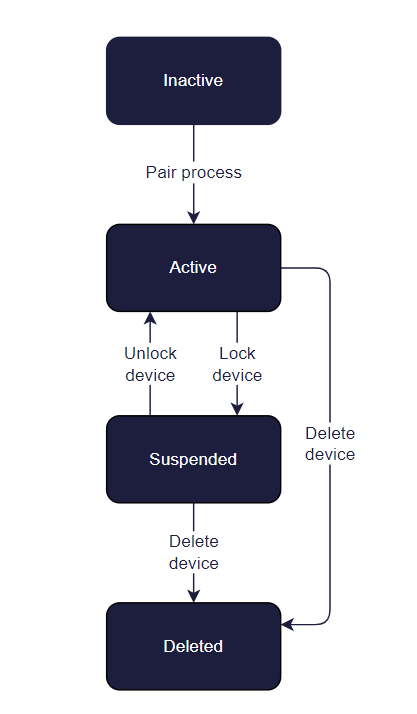
Below table presents how action may change the statuses of device
|
Action |
Statuses |
|
|
|
Device’s status |
Token’s status |
|
Add device (not paired yet) |
Inactive |
- |
|
Pair device |
Active |
- |
|
Lock device |
Locked |
Suspended |
|
Unlock device |
Active |
Active |
|
Delete device |
Deleted |
Deleted |
Referring to the above table, a diagram has been created showing the change of states of the device token. This allows for better visualization of actions and dependencies between them.
If project has enabled Issuer wallet, each action on card - like lock, delete - will initiate process of suspend or deleting related MDES/VTS tokens (transacion credentials) with logic described in Issuer Wallet use cases.
Payment history
Payment history list
Payment history list contains filters and columns with dates. In this section actions don’t occur. The filters are used for dynamic searching, such data as: Card ID, amount, currency, date of transaction, status (available: cleared, declined, authorized, reversed). The date displayed in both the transaction list and details is in UTC+0 and ISO8601 compliant. Also, the filters are selected by the user in UTC+0. At no time is there a conversion to the local time zone of the portal operator.

Basic list includes following information:
|
Parameter |
Description |
|
Transaction ID |
Internal Verestro transaction identifier. |
|
Card ID |
Internal Verestro Id of Card. |
|
Created at |
The date/time when the transaction was made. In ISO 8601 extended format. |
|
Amount |
The transaction monetary amount in terms of the minor units of the currency. |
|
Currency |
3-character ISO 4217 currency code of the transaction. |
|
Status |
Transaction status (described in transaction statuses part). |
Payment history details
Selecting a specific payment history allows to see more detailed data.
Detailed list includes following information:
|
Parameter |
Description |
|
Transaction ID |
Internal Verestro transaction identifier. |
|
Token ID |
Internal Verestro Id of Token. |
|
Card ID |
Internal Verestro Id of Card. |
|
IBAN ID |
Internal Verestro Id of IBAN. |
|
Created at |
The date/time when the transaction was made. In ISO 8601 extended format. |
|
Amount |
The transaction monetary amount in terms of the minor units of the currency.. |
|
Currency |
3-character ISO 4217 currency code of the transaction. |
|
Status |
Transaction status. |
|
Decline reason |
Additional information provided by the issuer for a declined transaction.* |
|
Customer ID |
Internal Verestro customer identifier. |
|
External ID |
External customer identifier provided by client (for example: recordID). |
|
|
Customer e-mail address. |
|
Phone number |
Customer phone number. |
|
Transaction channel |
Information about transaction channel. One of: [CONTACTLESS, CLOUD, MONEYSEND]. |
|
Merchant name |
The merchant ("doing business as") name. |
|
Merchant postal code |
The postal code of the merchant. |
|
Transaction country code |
The country in which the transaction was performed. Expressed as a 3-letter (alpha-3) country code as defined in ISO 3166-1. |
|
Type |
Transaction type.** |
*Type of declined transactions:
a) invalid card number,
b) format error,
c) maximum amount exceeded,
d) expired card,
e) PIN authorization failed,
f) tranaction not permitted,
g) exceeds withdrawal amount limit,
h) restricted card,
i) exceeds withdrawal count limit,
j) allowable number of PIN tries exceeded,
k) incorrect pin,
l) duplicate transmission detected.
**Type of transactions:
a) purchase transaction,
b) refund transaction,
c) payment transaction,
d) ATM cash withdrawal,
e) cash disbursement,
f) ATM deposit,
g) ATM account transfer.
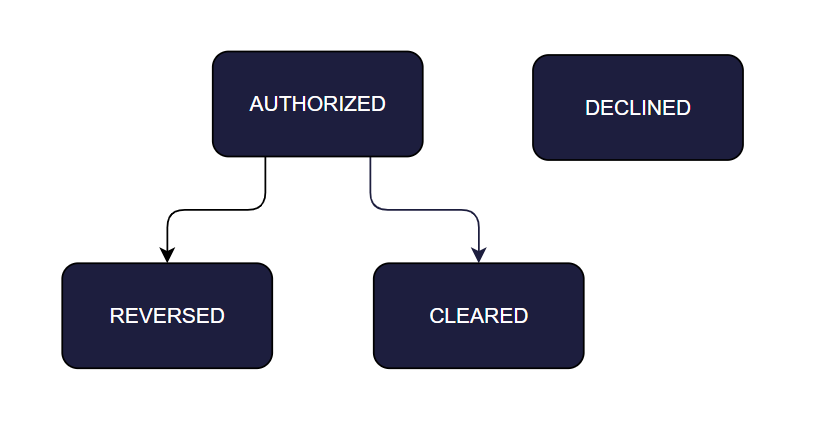
Transaction statuses
Each transaction has a transaction id given by the client, a type and a status. In payment systems, when a transaction is of type REFUND, it has the same id as a transaction of type PURCHASE. Therefore, the unique key is(the id given by the customer and the transaction type). Transaction amounts are stored in the system as a minor(1.25 to 125).
Each transaction has a type that can have different statuses. Immediately after a transaction is executed, it may receive one of the following statuses:
|
Parameter |
Description |
|
AUTHORIZED |
The transaction was authorized correctly. The funds in the Cardholder's account are blocked and an amount of the same value is "promised" to the Merchant. No transfer of funds is performed at this time. |
|
DECLINED |
The transaction was declined. No funds are blocked/transferred from Cardholder's account. |
For a transaction authorized correctly (AUTHORIZED), the following scenarios are possible. It may go into status:
|
Parameter |
Description |
|
REVERSED |
The transaction is reversed, e.g. due to an error reported by Merchant. The lock is lifted and the funds remain on the Cardholder's account. No transfer of funds is performed. |
|
CLEARED |
The transaction was settled correctly. The funds in the Cardholder's account are unblocked, and are then transferred to the Merchant's account. The block on the Cardholder's account becomes a debit, and the "promised" funds become a credit on the Merchant's account. |
Referring to the above tables, the possible transition of transaction states is presented in the diagram below.
Operator administration
Default privileges per role in the portal
Below are the default function settings for described product divided into areas.
|
Aggregate |
Action |
Admin |
Manager |
Employee |
| Customers - Cards | View | x | x | x |
| Delete | x | x | - | |
| Block | x | x | - | |
| Unblock | x | x | - | |
| Customers - Endusers | View | x | x | x |
| Edit | x | x | - | |
| Delete | x | x | - | |
| Lock | x | x | x | |
| Unlock | x | x | x | |
| Customers - Devices | View | x | x | x |
| Lock | x | x | x | |
| Unlock | x | x | x | |
| Delete | x | x | - | |
| Customer - Tokens on details of Endusers/Devices/Cards | View | x | x | x |
| Suspend | x | x | x | |
| Unsuspend | x | x | x | |
| Delete | x | x | - | |
| Customers - Payment history | View | x | x | x |
| Customers - Reports | View | x | x | - |
| Generate | x | x | - |
Reports
Payment history report
Payment history reports use the same filters that are used to select the payment history list. After applying the appropriate set of filters (Card ID, amount, currency, data range and status) it is possible to generate a report that will include the records displayed in the list.
Clicking the "Generate transactions report" button launches the generation mechanism. If the generation request was successful a popup is displayed at the bottom of the panel informing about the start of work (image below). In case of an error caused by missing data in the specified filter range the message "Cannot find transactions to generate the report" is displayed.
When user opens the "Reports" tab, a list of reports is displayed. It contains ready to download output files (.xlsx) in Ready status and information about reports currently being processed - In_Progress.
The report file contains the following columns:
|
Column |
Description |
|
Transaction ID |
Internal Verestro transaction identifier. |
|
Payment token ID |
Internal Verestro token identifier. |
|
IBAN ID |
Internal Verestro IBAN identifier. |
|
Card ID |
Internal Verestro Id of Card. |
|
Card last four digits |
Last four digits of card, which has been used to process transaction. |
|
Created at |
The date/time when the transaction was made. In ISO 8601 extended format. |
|
Amount |
The transaction monetary amount in terms of the minor units of the currency. |
|
Currency |
3-character ISO 4217 currency code of the transaction. |
|
Status |
Transaction status (described in transaction statuses part). |
|
Issuer response information |
Additional information received from Issuer in context of transaction. |
|
Customer ID |
Internal Verestro customer identifier. |
|
Customer external ID |
External system customer identifier. |
|
Customer email |
Customer email address in format alias@domain. |
|
Customer phone number |
Customer mobile phone number with prefix. |
|
Transaction channel |
Type of transaction channel used to perform the transaction. |
|
Merchant name |
The merchant ("doing business as") name. |
|
Transaction country code |
3-character ISO 3166-1 country code of the transaction. |
By default, both report generation and report retrieval are unlimited, meaning that any role can use this functionality in an unlimited way. If there are reasons to limit e.g. only Administrator to generate reports and allow everyone to view them - please let us know during project configuration stage.
Finance Administration Panel Overview
The Finance Administration Panel is the essential tool for you to work with your online application. Here you can manage balances for both corporations and endusers and generate virtual cards also. The presented solution is prepared for rebranding for the client's brand. The document is divided into sections that describe the various components of the system. Each section contains a screen presenting the functionality and a detailed description of the states occurring in it.
Purpose and scope
This product guide provides a high-level overview of Admin Panel Finance section. This document covers the following topics:
-
managing End-user Balance,
-
managing Master balances,
- managing Company balances,
-
transaction clearing,
-
partner accounting,
- AML user lock
- privileges per role.
Terminology
This section explains a number of key terms and concepts used in this document.
|
Name |
Description |
| Customer, Partner |
Customer who uses MPA. |
|
Operator |
User using the Admin Panel. |
|
BIN Sponsor |
Financial institution holding a direct license from card networks (e.g., Visa, Mastercard). The BIN Sponsor provides its Bank Identification Number (BIN) and acts as the formal guarantor responsible for the regulatory and legal compliance of transactions processed by its Client. |
|
Balance |
Representation of funding collection in specific currency. |
|
Session token |
Access to the system by a web application user is secured using a session token to uniquely associate the session with the user. It is required to perform any action. |
|
IBAN |
International Bank Account Number |
|
AML |
Anti-Money Laundering |
Customer Balance
Customer balances can be managed from end-user detail view, in "Balances" section. (Customers tab -> Endusers tab -> Enduser details -> Balances section).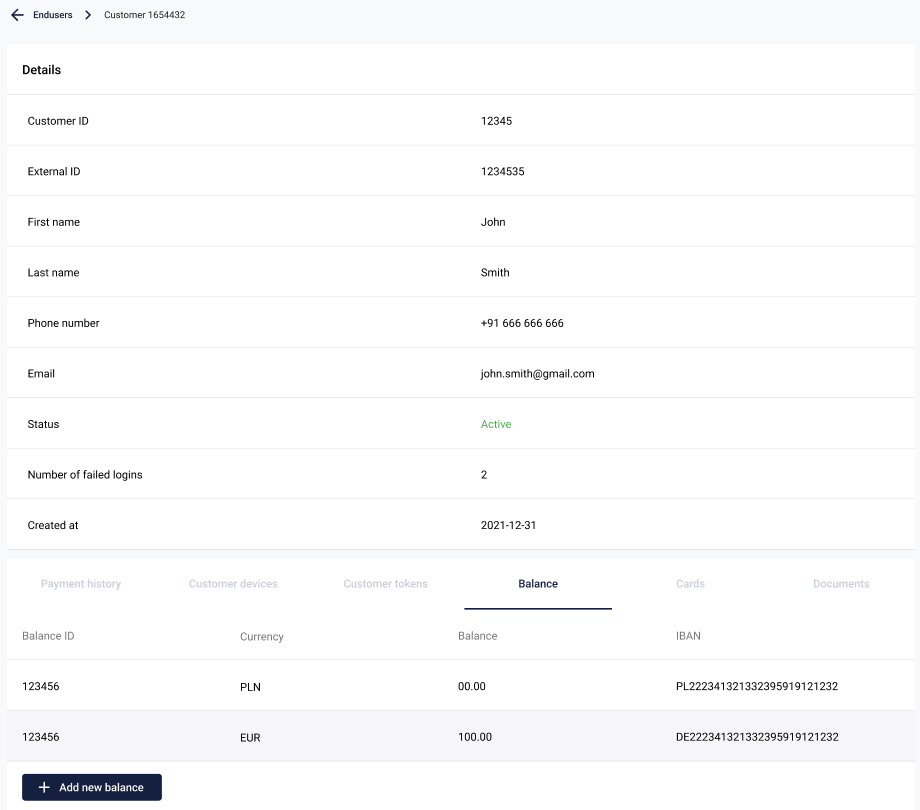
Balance view provides the following key information for each entry:
|
Parameter |
Description |
|
Balance ID |
Unique balance ID. |
| Currency |
Currency for given balance in ISO 4217 format. |
| Balance |
Amount of funds available on the balance. |
| IBAN |
IBAN for the given balance. By default, it is hidden for security reasons and can be viewed by clicking the 'Reveal' button. This functionality is available only if IBANs are within the scope of the project.
|
Add new balance
Operator can create new balances with Add new balance button. After clicking it, operator should choose currency for new balance from dropdown list. Newly created balance is visible on Balances list right away.
Balances can be created for any currency. However cards can be created only for currency compliant with end-user balance currency and currency configured in terminal for given project.
Balance detail view
Balance detail view can be entered by click on a row in Balance table, described above.
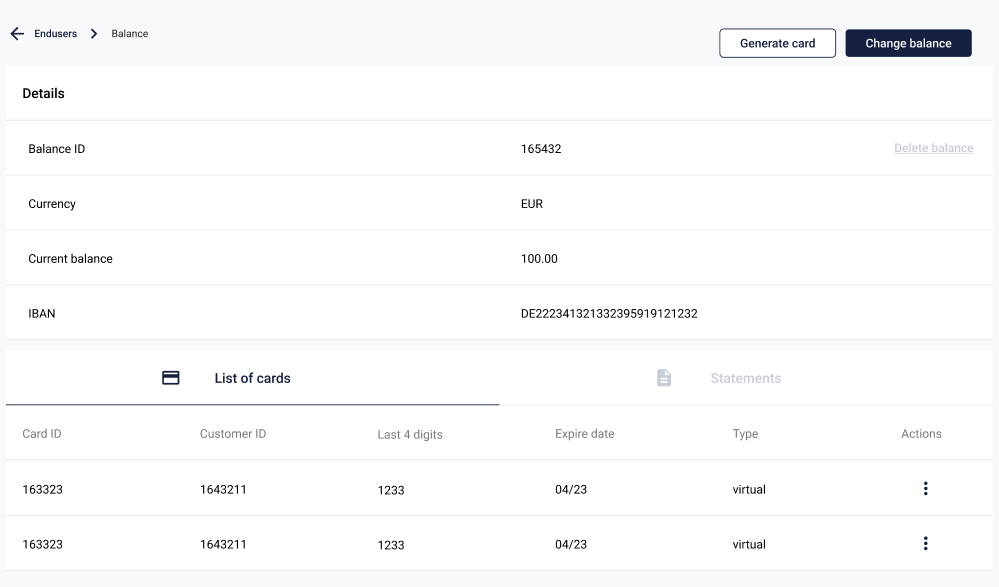
The page is divided into four distinct sections:
1. Details
Contains: Balance ID, Balance Currency and Current Balance.
2. List of IBANs
Contains all IBAN information: IBAN ID, Created date, Currency, IBAN, Status.
3. List of cards
Contains all cards assigned to given balance along with informations: Card ID, Activation date, Expiration date, Type and Processor ID.
4. Statements
A list of statements generated for the given balance. These statements can be automatically generated and added on a monthly basis.
Generate card
This functionality enables the Operator to create a virtual card. Upon clicking Generate card, a pop-up displays a list of terminals configured for the project.
The Operator must select a terminal with a currency that corresponds to the end-user's balance currency. The newly generated virtual card is verified immediately.
Change balance
Operator with Admin role can change end-user balance using Change balance button.
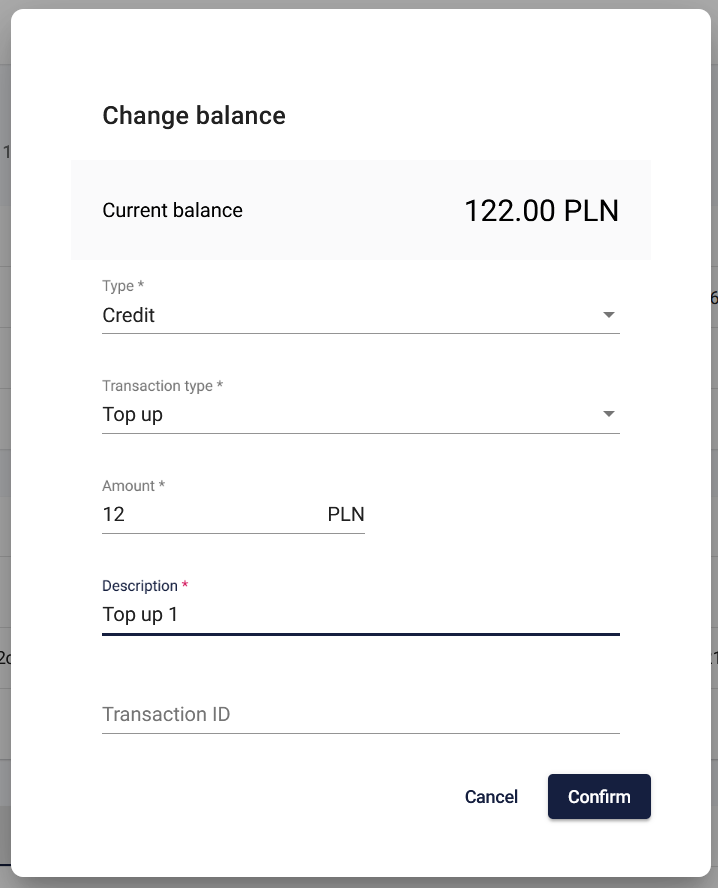
- Select Type:
a) Credit - A transaction crediting the balance
b) Debit - A transaction debiting the balance - Select Transaction type (described in the table below).
- Enter Transaction amount.
- Enter Transaction description.
- Enter Transaction ID - optional parameter.
- Click
Confirm.
The balance is updated immediately.
|
Type |
Transaction type |
Description |
|
Credit |
Cashback |
Internal transaction for a Partner who wants to top up the user's balance as part of the loyalty program. Antaca automatically debits the credit Master balance with this transaction. |
| Loan |
Internal transaction for a Partner who want to top up end user's balance as part of the credit agreement. Antaca automatically debits the credit Master Balance with this transaction. |
|
| Payment |
Internal transaction type used to top up the user's balance. This type indicates that the funds come from the Antaca system, usually in conjunction with a funding type a debit transaction on the user's balance. Antaca automatically debits the credit Master balance with this transaction. |
|
| Top up |
Internal transaction type used to top up end user balance. This type indicates that the funds come from outside the Antaca system, e.g. payment to an account at a bank branch. Antaca automatically debits the credit Master balance with this transaction. |
|
|
Debit |
Commission |
Internal transaction for a partner who wants to debit user balance as a commission referenced to the other transaction. |
| Fee |
Internal transaction for a partner who wants to debit user balance as a fee. Antaca automatically credits Company balance with the funds debited from end user balance. |
|
| Funding |
Internal transaction type used to debit the user's balance. This type indicates that the funds still remain in the Antaca system, usually in conjunction with a credit type transaction on the user's balance. Antaca automatically credits the credit Master Balance with this transaction. |
|
| Withdrawal |
Internal transaction type used to debit end user balance. This type indicates that the funds go outside of Antaca system, e.g. withdrawal from an account at a bank branch. |
Delete balance
Delete balance option is available only for balances equal to 0.00 and all transactions are cleared. Deleted balance is no longer visible in the End-user's Balances tab. All cards assigned to deleted balance are deleted as well.
Operator with Admin or Manager role can delete end-user balance on balance detail view.
Master balance
The Master Balance tab allows for the management of the Master Balance account and provides visibility into all transactions that have been executed on that balance.
1. Deposits - includes a list of Master Balances created for Partner with amount of funds and currency.
2. Filters - allow searching for transactions specific for given time frame, type (credit or debit), amount and transaction title.
3. List of transactions - list of transactions generated for selected Master Balance.
List includes following information:
|
Parameter |
Description |
|
Transaction date |
Transaction date in YYYY-MM-DD format and 24 hour format (UTC+0). |
| Title |
Description of the transaction. |
| Amount |
Amount of transaction with currency code. |
| Type |
Type of transaction. Available values "Debit" and "Credit". |
Change balance
To generate a transaction on the Master Balance, the Operator should perform the following actions:
1. Select proper Master balance.
2. Select "Change balance" button.
3. Select transaction type.
4. Enter transaction amount.
5. Enter transaction description.
6. Add transaction ID (optional).
7. Click "Confirm".
This action results in a change to the Master Balance and the immediate saving of a transaction in the "List of transactions" table. These transactions are recorded instantly with the status CLEARED.
Only the BIN Sponsor is authorized to modify the state of the Master Balance.
Generate report
Additionally, this screen allows for the generation of a transaction report based on the applied filters.
The report includes the following data fields:
|
Parameter |
Description |
| ID |
Unique ID of the transaction. |
| External ID |
An identifier from an external system linked to this transaction. |
| EventType |
Indicates the type of event that triggered the transaction. Available values: Credit, Debit. |
| Type |
Transaction type. |
| TransactionDate |
The date and time when the transaction was initiated. |
| Amount |
The original value of the transaction before any adjustments or reversals (minor value). |
| AdjustmentAmount |
The amount added or subtracted due to a correction or modification of the original transaction. This value is typically 0 for Master Balance transactions. |
| ReversalAmount |
The amount related to the cancellation or partial-reversal a previously posted transaction. This value is typically 0 for Master Balance transactions. |
| Finalamount |
The final amount calculated after considering the original amount, adjustments, and reversals. |
| Currency |
The three-letter ISO 4217 code of the currency used for the transaction amount (e.g., PLN, USD). |
| Description |
Description of the transaction. |
| Status |
The current processing status of the transaction. This value is typically |
| ReferenceTransactionId |
The ID of another transaction related to this transaction. |
| AccountingBalance |
The balance of the company account after this transaction was cleared. |
| ClearedAt |
The date and time when the transaction was finally settled (cleared). |
| TerminalId |
The ID of the card terminal that processed the transaction associated with this record. |
The maximum time range allowable for generating reports is 3 months.
Balance statistics
The Balance Statistics page provides crucial information regarding the necessary capital a Partner must maintain in their bank account to ensure money liquidity for their project. It aggregates the totals of end users' balances and the Partner's own balances for a selected currency.
On this screen, you can choose the currency you are interested in. After selection, the page shows the current values for:
|
Parameter |
Description |
|
Total user balance |
The aggregate funds across all end-user balances. |
| Total company balance |
The total amount held in the company balance. |
| Total deposit Master balance |
The total amount held in the deposit Master balance. Is applicable only if the Partner has the deposit Master Balance enabled. |
| Total credit Master balance |
The total amount held in the credit Master balance. Is applicable only if the Partner has the credit Master Balance enabled. |
| Bank Account |
The sum of the Total User Balance, Total Company Balance, and Total Master Balance. |
Manual clearings
The Manual Clearings page displays all transactions registered in Antaca as well as settlements generated within the payment network. The Manual Clearings feature enables the BIN Sponsor to clear transactions that were not processed automatically.
Page is divided into two sections:
1. Transactions
Operator can filter transactions using following filters:
- Date from,
- Date to,
- Terminal,
- Transaction ID,
- Customer ID,
- Card ID,
- Type,
- Status
The main list provides the following information about the transactions:
|
Parameter |
Description |
|
Transaction ID |
An identifier from an external system linked to this transaction. |
| Description |
Description of the transaction. |
| Card ID |
The unique, internal numerical identifier assigned to the card (integer). |
| Type |
Type of transaction. |
| Final amount |
The final amount calculated after considering the original amount, adjustments, and reversals (gross value). |
| Transaction date |
Transaction date in YYYY-MM-DD format and 24 hour format (UTC+0). |
| Status |
The current processing status of the transaction. Available values:
|
Clicking on a transaction record opens a popup window displaying the detailed transaction information:
|
Parameter |
Description |
|
Transaction ID |
Unique ID of the transaction. |
|
Transaction External ID |
An identifier from an external system linked to this transaction. |
| Amount |
The original value of the transaction before any adjustments or reversals (gross value). |
| Currency |
The three-letter ISO 4217 code of the currency used for the transaction amount (e.g., PLN, USD). |
| Adjustment amount |
The amount added or subtracted due to a correction or modification of the original transaction. |
| Reversal amount |
The amount related to the cancellation or partial-reversal a previously posted transaction. |
|
Related transactions |
A list of transactional events (e.g., authorizations, settlements, reversals, adjustments) that influenced to the final state and amount of the current transaction record. |
2. Settlements
Operator can filter settlements using following filters:
- Date from,
- Date to,
- Terminal,
- Transaction ID,
- Customer ID,
- Card ID,
- Status,
- Processed.
The main list provides the following information about the settlements:
|
Parametr |
Description |
|
Transaction ID |
An identifier from an external system linked to this transaction. |
| Description |
Transaction description. |
| Card ID |
The unique, internal numerical identifier assigned to the card (integer). |
| Amount |
The final, confirmed amount transferred during the clearing process. |
| Transaction date |
Transaction date in YYYY-MM-DD format and 24 hour format (UTC+0). |
| Processed at |
Settlement clearing date in YYYY-MM-DD format and 24 hour format (UTC+0). |
Clicking on a settlement record opens a popup window displaying the detailed information:
|
Parameter |
Description |
|
Currency |
The three-letter ISO 4217 code of the currency used for the transaction amount (e.g., PLN, USD). |
| Type |
describes the transaction type, such as:
|
| Settlement amount |
Settlement amount of the transaction. |
| Transaction narrative |
The merchant’s description. |
| System date |
Issuer processor's system date. |
|
Sequence number |
Unique sequence card identifier from the Issuer processor. |
|
Tracking number |
Unique tracking identifier from the Issuer processor. |
|
Interchange amount |
Cost or income generated as a result of settlement previously authorized transactions. |
Download settlement
Download settlement option allows for the re-initiation of the settlement file download for a specific day and terminal, in cases where the automatic download failed for any reason.
Reverse transaction
It is possible to reverse a transaction that remains in the AUTHORIZED status (not CLEARED or REVERSED).
-
Select the relevant transaction on the list.
-
Choose the "Clear transaction" option.
-
Enter the amount to be reversed.
Possible results:
-
Partial Reversal - If the amount entered is lower than the authorized transaction amount, a partial reversal should be generated.
-
Full Reversal - If the amount entered is equal to the authorized transaction amount, the entire transaction is reversed, and its status changes to
REVERSED. -
Error - If the amount entered is higher than the authorized transaction amount, an error should be returned indicating this discrepancy.
Clear transactions
To clear transactions, the Operator should perform the following actions:
-
Select one or more transactions to be cleared.
-
Select the settlement to be linked with the transactions chosen in step 1 (this step is optional).
-
Click the Clear transactions button at the top right of the page.
Following this process:
-
-
The status of the selected transactions is changed to
CLEARED. -
The settlement chosen in step 2 (if selected) will have its
Processed atparameter set to the date of the clearing action. -
The corresponding
INTERCHANGEtransaction will be generated.
-
Manual clearings tab is only available to the BIN Sponsor.
Partner accounting
The Partner Accounting page was designed to present information regarding the Partner's profit for a given project. It contains a list of transactions, such as fees, interchange, FX conversion and transactions generated manually by the BIN Sponsor.
The page is divided into 3 sections:
1. Company balance - list of Partner balances with balanceId and specific currency.
2. Filters - allow searching for transactions specific for given time frame and type of transaction (credit or debit).
3. List of transactions
|
Parametr |
Description |
|
Transaction date |
Transaction date in YYYY-MM-DD format and 24 hour format (UTC+0). |
| Title |
Transaction description. |
| Amount |
Transaction gross value with currency. |
| Type |
Transaction type. Available values: Credit, Debit. |
| Subtype |
Detailed transaction classification Examples:
|
| Terminal ID |
The ID of the card terminal that processed the transaction associated with this record. |
Generate a transaction
To generate a transaction and modify the Company balance, the Operator should perform the following actions:
- Select proper company balance.
2. Select 'Generate a transaction' button.
3. Select transaction type.
4. Enter transaction amount.
5. Enter transaction description.
6. Add transaction ID (optional).
7. Click 'Confirm'. - The transaction will be processed with a subType of
COMPANY.
The 'Generate a transaction' action can only be performed by the BIN Sponsor.
Generate a report
Additionally, this screen allows for the generation of a transaction report based on the applied filters.
The report includes the following data fields:
|
Parameter |
Description |
| ID |
Unique ID of the transaction. |
| External ID |
An identifier from an external system linked to this transaction. |
| EventType |
Indicates the type of event that triggered the transaction. Available values: Credit, Debit. |
| Type |
Transaction type. |
| TransactionDate |
The date and time when the transaction was initiated. |
| Amount |
The original value of the transaction before any adjustments or reversals (minor value). |
| AdjustmentAmount |
The amount added or subtracted due to a correction or modification of the original transaction. This value is typically 0 for Company Balance transactions. |
| ReversalAmount |
The amount related to the cancellation or partial-reversal a previously posted transaction. This value is typically 0 for Company Balance transactions. |
| Finalamount |
The final amount calculated after considering the original amount, adjustments, and reversals. |
| Currency |
The three-letter ISO 4217 code of the currency used for the transaction amount (e.g., PLN, USD). |
| Description |
Description of the transaction. |
| Status |
The current processing status of the transaction. This value is typically |
| ReferenceTransactionId |
The ID of another transaction related to this transaction. |
| AccountingBalance |
The balance of the company account after this transaction was cleared. |
| ClearedAt |
The date and time when the transaction was finally settled (cleared). |
| TerminalId |
The ID of the card terminal that processed the transaction associated with this record. |
The maximum time range allowable for generating reports is 3 months.
Operator with any role can use 'Generate report' functionality.
AML User lock
The AML User Lock enables an Operator with any role to lock a resource that does not comply with AML (Anti-Money Laundering) regulations. This functionality results in the transactional blockade of the resource. Any transaction being processed for the locked resource will be automatically rejected with the reason code: FRAUD_SUSPECTED.
The page is divided into two main sections:
-
Filters – Allows browsing locked resources by their type (e.g., Customer), ID, and Lock reason.
-
List of locked resources – Displays the resulting list of locked entries.
|
Parameter |
Description |
| Blocked resource |
Shows blocked resource type. Available values: CUSTOMER CORPORATION |
| Resource ID |
Verestro ID for given resource. |
| Reason |
Available values: DOCUMENT EXPIRED |
| Action |
Available actions: - Remove the lock. |
Add new lock
To create a new lock, use the "New lock" button in the top right corner of the page. Clicking this button opens a popup window:
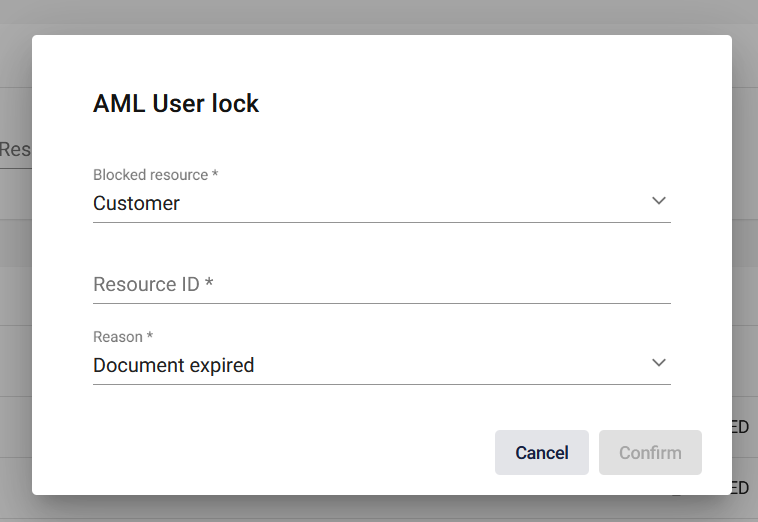
Once the Blocked resource, Resource ID, and Reason for lock are entered, the newly added lock becomes visible in the list of locked resources.
Remove the lock
To remove the lock, the Operator should click on the 'Action' menu within the lock list and select the "Remove the lock" option.
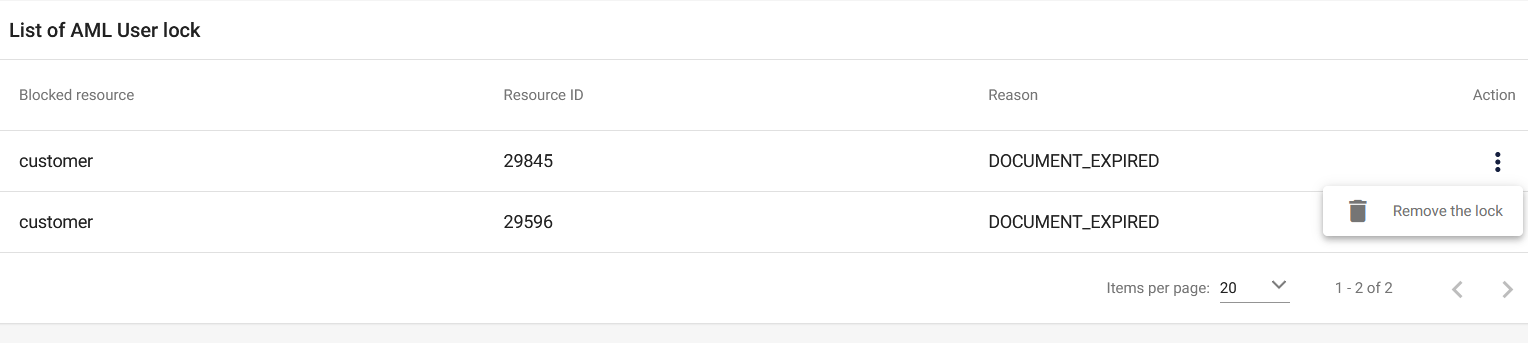
The lock will be instantly removed from the list.
The 'Remove the lock' option is available only to Operators with the Admin role.
Automatic Lock Triggers
In addition to manual creation by an Operator, locks may also be imposed by automated processes. These automated locks typically occur based on predefined system rules or risk assessments. Automated processes that can result in a lock being placed are:
- Document Expired - Applied when the documents required for the KYC (Know Your Customer) process have expired.
- Screening Detected - Applied when a customer screening reveals a match on a sanctions list.
Default privileges per role in the portal
Below are the default function settings for described product divided into areas.
|
Area |
Action |
Admin |
Manager |
Employee |
| Customer Balance |
View Company Balance |
x | x | - |
| Create Customer Balance | x | x | - | |
| View Customer Balance | x | x | x | |
| View Customer Balance Details | x | x | x | |
| Topup Customer Balance | x | - | - | |
| Delete Customer Balance | x | x | - | |
| Customer |
Delete Customer | x | x | - |
| Master Balances |
View Master Balance |
x |
x |
- |
| Edit Master Balance |
x |
- |
- |
|
| KYC |
View KYC applications |
x |
x |
- |
| Update KYC applications |
x |
x |
- |
|
| Cards |
Create virtual card |
x |
x |
x |
| View cards |
x |
x |
- |
|
| Delete cards |
x |
x |
- |
|
| Create Card Limit | x | x | x | |
| View Card Limits | x | x | x | |
| Update Card Limits | x | x | x | |
| Delete Card Limits | x | x | x | |
| Generate CVV | x | x | x | |
| Clearing | Manual clearing | x | - | - |
| Manual reversal | x | - | - | |
| Partner accounting |
View Company Balance |
x | x | - |
|
Edit Company Balance |
x | - | - | |
|
Report generating |
x | x | x | |
| AML User Lock | List of locks | x | - | - |
| Add new lock | x | - | - | |
| Remove the lock | x | - | - |
IBAN Management Administration Panel Overview
The IBAN Management Service module provides a centralized interface for managing bank accounts and transfers. As a Payment Institution, you are granted extended administrative capabilities, allowing you to manage the full lifecycle of banking products and maintain regulatory compliance.
The document is divided into sections that describe the various components of the system. Each section contains a screen presenting the functionality and a detailed description of the states occurring in it.
You can find more about the IBAN Management Service product here.
Purpose & scope
This product guide provides a high-level overview of Admin Panel IBAN Management section.
|
Name |
Description |
| Transaction & bank account monitoring |
Provides continuous visibility into all bank accounts and transfers. You can track transaction history, verify account and transfer statuses and details. |
|
Account generation |
It provides the ability to generate a bank account assigned to a specific balance. |
|
AML Decision Management |
It allows payment institutions to exercise direct control over compliance processes. You can manage and execute AML-related decisions for both incoming and outgoing transfers, including reviewing and approving or rejecting transactions based on established rules and your risk assessment. |
Terminology
This section explains a number of key terms and concepts used in this document.
|
Name |
Description |
| Partner |
An institution using Verestro products. Essentially, a Partner can be referred to as a Verestro client. |
|
Operator |
User using the Panel regardless of role or level of rights. |
|
AML Operator |
User using the Administration Panel which actions are connected with Anti-Money Laundering area. Issuing Institution representative. |
|
Upload |
The process of transferring (importing) the bulk transfer data files to the banking system. |
| Master balance | The total funds in Master Account. Master Account is the main account number assigned to the Partner in the bank's system |
| Technical balance | A balance that takes into account funds pending finalisation, such as held transfers for AML reasons. |
Transaction & bank account monitoring
Transfers
|
The
Each entry provides access to all essential transfer data. By selecting a specific transaction, you can access:
For enhanced transparency and streamlined investigation, the details view allows for direct navigation to the associated user profile or related transfers, ensuring all necessary information is just one click away. |
|
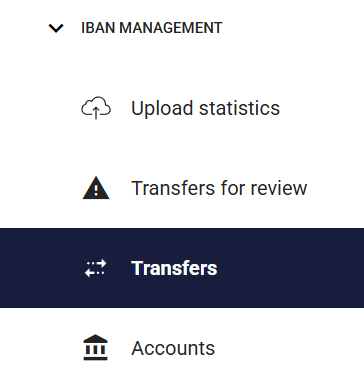
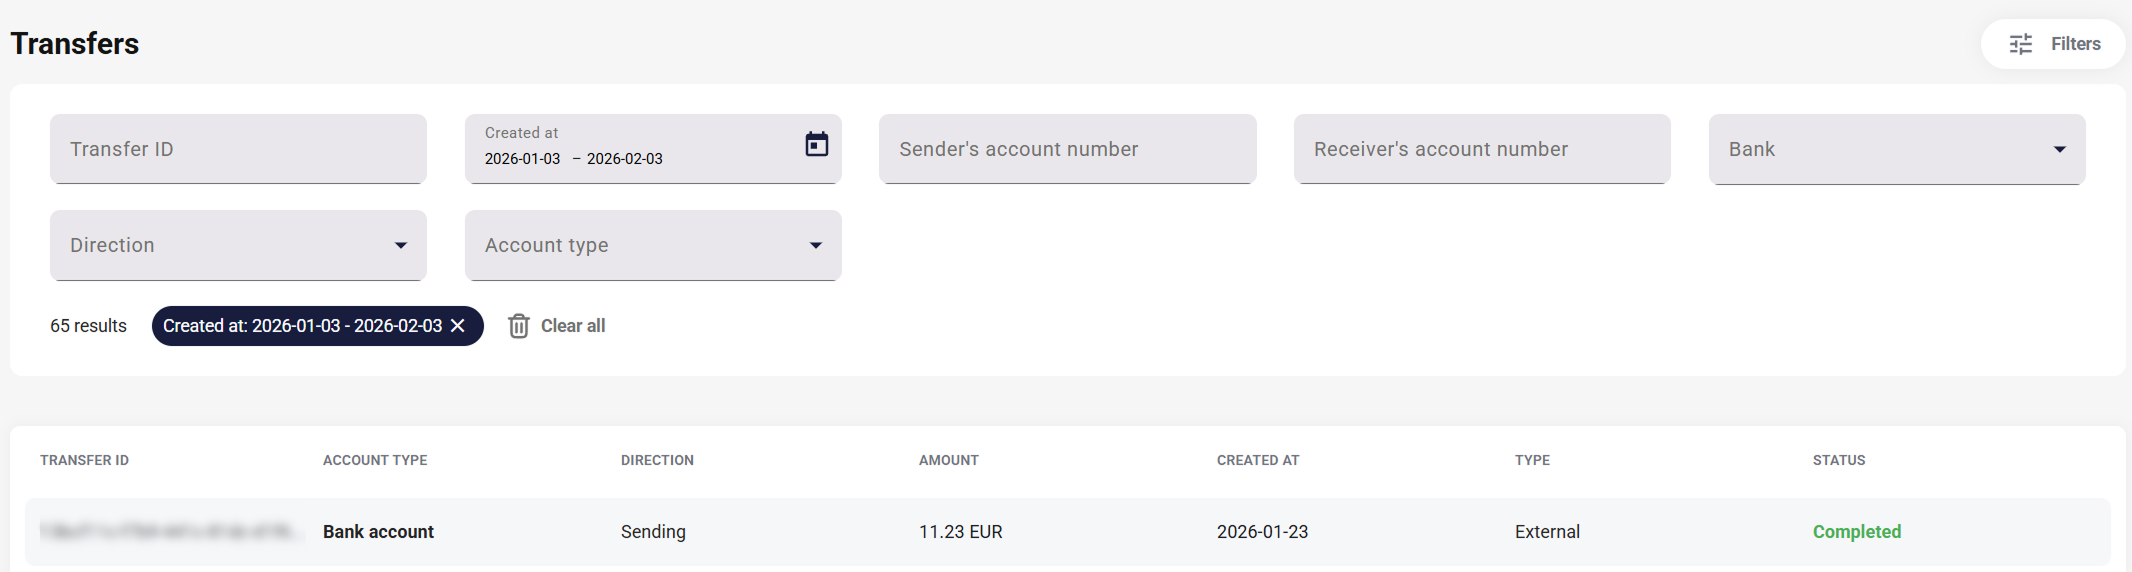
The list view allows you to access the details of any transfer. It includes the specific transfer history and its connections to others. Furthermore, you can navigate to the tab of a user holding an Antaca balance by clicking on their ID.
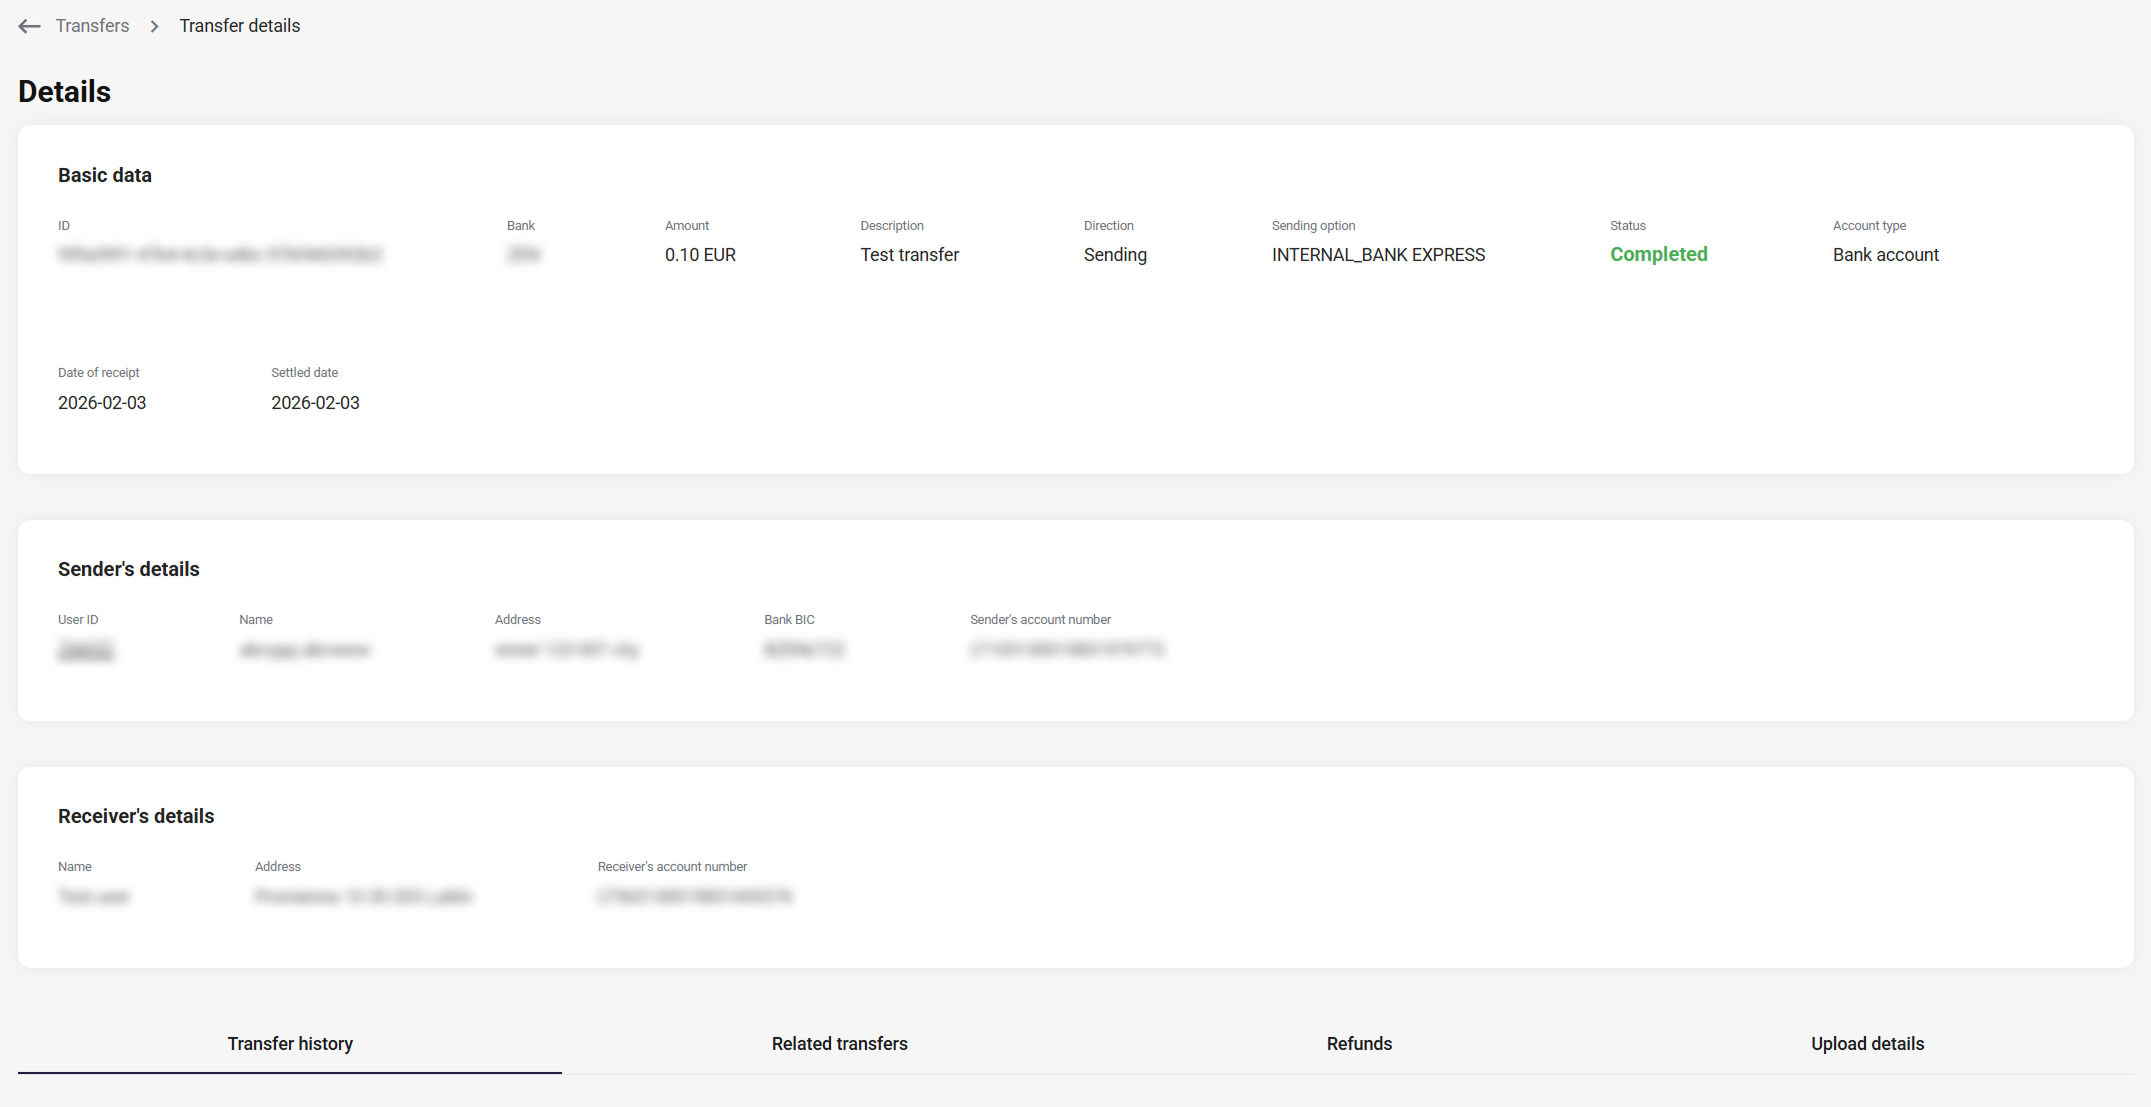
|
Name |
Description |
| Transfer history |
The history of changes made during transfer execution, including the date, owner, and the name of the change. |
|
Related transfers |
All transfers associated with the main transaction, e.g., moving funds to the technical balance when a transfer is held. |
|
Refunds |
Refunds made within a given transfer, e.g. after rejection by the department or AML rules. |
|
Upload details |
Applies to transfers sent to the bank for execution via bank upload. This doesn't apply to internal transfers (within the same implementation) or incoming transfers. |
Bank accounts
|
The
You can check the bank
Just like in the Transfers tab, you can filter the results. The available filters are:
You can view all accounts in the Accounts tab, but generation is handled via the specific customer profile, found here. |
|
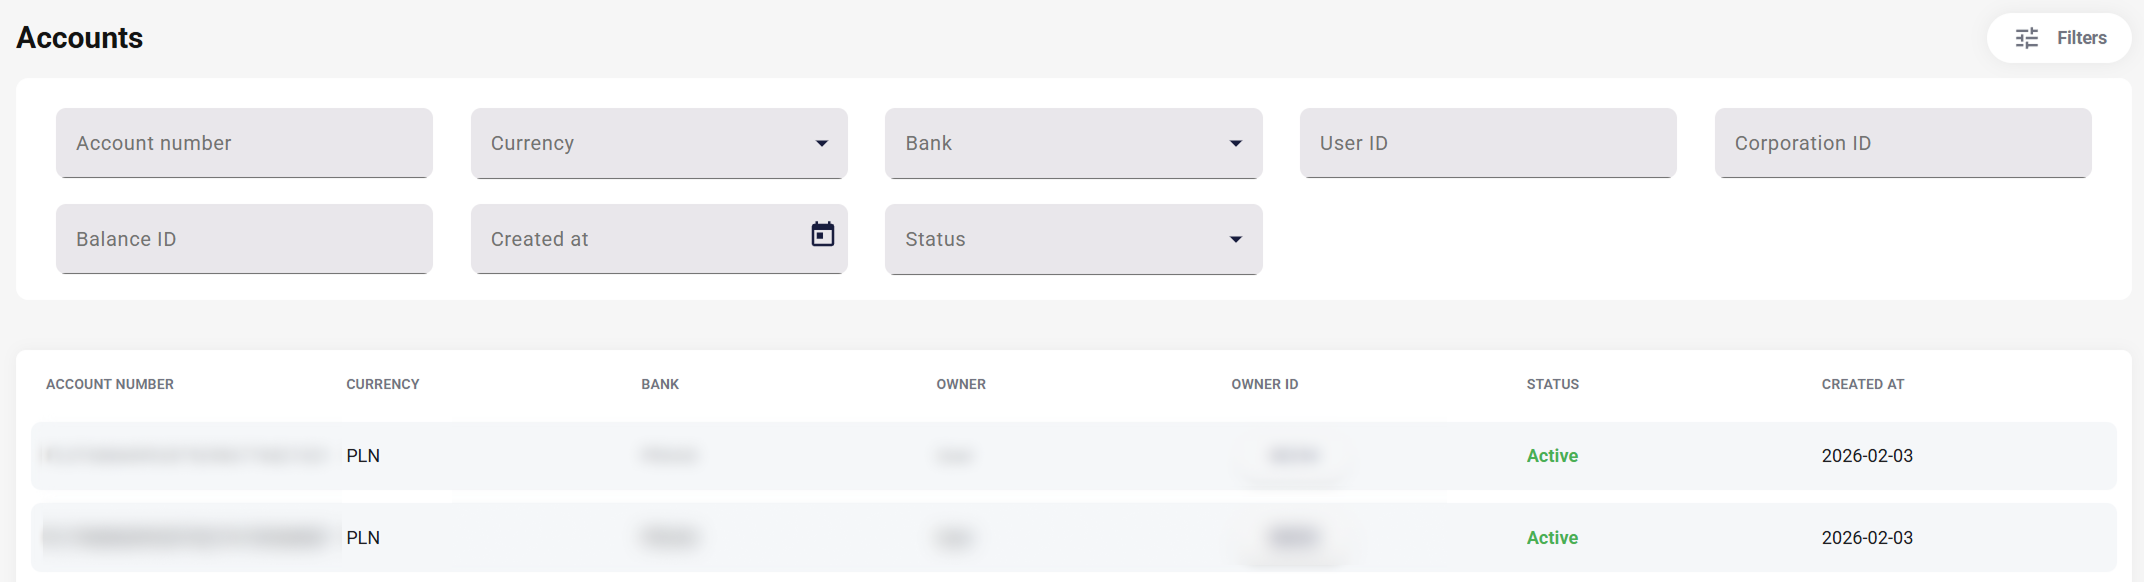
After entering the details of a specific account, both the information from the list and also the Bank BIC and Balance are visible- with redirection to the tab of this balance.
Account generation
Generate bank account
|
Depending on your business model and configuration, your customers may consist of endusers or corporations. To generate an account for a customer, follow these steps:
If an account has already been generated for a given balance, this section allows you to view or delete it.
You can find more information about bank accounts and their generation flow here. |
|
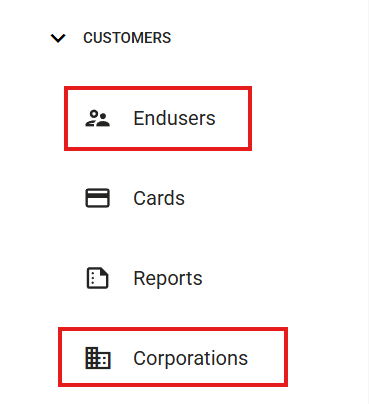
AML Decision Management
Transfers for review
|
This section contains transfers separated from the main pool (found in the
The list view displays the following transfer parameters:
Records in the Transfers for Review tab can be filtered using the following parameters:
Access to the functionalities in this section is limited to the AML team. |
|
|
A held transfer can be either These actions are available from both the list view and the details view. The details view is identical to the one in the Transfers tab.
The outcome of rejecting a transfer depends on its direction:
|
|

|
|
If the transfer is rejected, the AML operator from Payment Institution defines further reprocessing of the transfer. Depending on the case, the transfer may return to the original sender or change the intended recipient.
After rejecting a transfer, the AML operator has the option to initiate a refund of the given transfer. This will be visible in the transfer history module, as well as in the
The sum of the amounts of refund transfers cannot exceed the amount of the original transfer.
Manual refunds are available once an incoming transfer is rejected.
Since a held transfer results in funds being posted to a technical balance, both approval and refunding require a transfer of funds from the technical balance, which will be reflected in the transfer history.
|
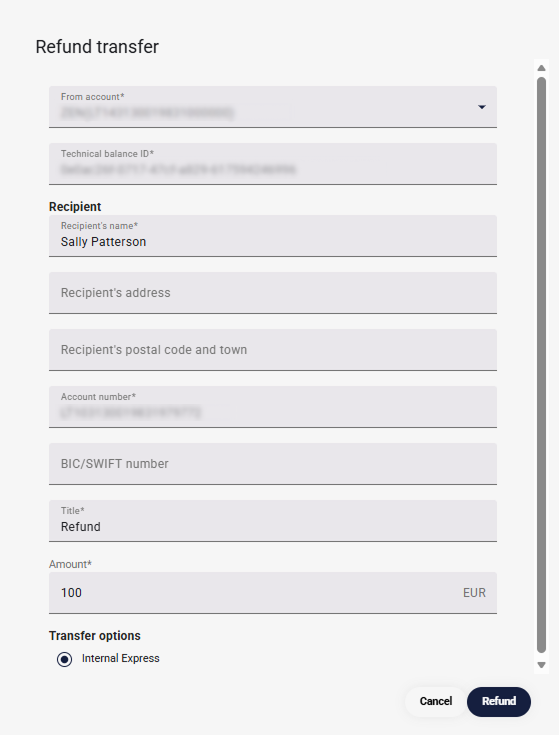
Roles and labels
Below are the default function settings for described product. In addition to roles, there are also labels for actions in the IBAN Management area, which extend the role's permissions. The roles of ADMIN, MANAGER, EMPLOYEE overlap with the ADMIN, MANAGER, EMPLOYEE labels.
|
Roles |
Labels |
| Admin |
Admin |
| Manager |
Manager |
| Employee |
Employee |
| Transfer_maker | |
| AML |
|
Action |
Admin |
Manager |
Employee |
Transfer_maker |
Aml |
| Views | X | X | X | ||
| Display bank account number details |
X | X | X | X | |
| Display bank accounts list | X | X | X | X | |
| Reveal bank account | X | X | X | X | |
| Display main accounts | X | ||||
| Create bank account | X | X | |||
| Assign main bank account | X | ||||
| Delete bank account | X | X | |||
| Display transfers |
X | X | X | ||
| Display transfers details | X | X | X | ||
|
Make transfer (create, cancel, calculate options) |
X | X | |||
| Accept transfer | X | X | |||
| Reject transfer | X | X | |||
| Display refunds | X | X | X | ||
| Display transfers for review | X | X | X | ||
| Display transfer history | X | X | X | ||
| Display related transfers | X | X | X | ||
| Display transfer bank upload | X | X | X |
KYC Panel Overview
The KYC Administration Panel is the essential tool for you to work with your online application. Here you can manage Know Your Customer applications. The presented solution is prepared for rebranding for the client's brand. The document is divided into sections that describe the various components of the system. Each section contains a screen presenting the functionality and a detailed description of the states occurring in it.
Terminology
This section explains a number of key terms and concepts used in this document.
|
Name |
Description |
| Customer, Partner |
Customer who uses MPA. |
|
Operator |
User using the Admin Panel. |
|
Balance |
Representation of funding collection in specific currency. |
|
Session token |
Access to the system by a web application user is secured using a session token to uniquely associate the session with the user. It is required to perform any action. |
KYC
KYC (Know Your Customer) page enables Operator with Admin role to manage end users' verification applications. Customer application page consists of:
1. Filters section - application can be filtered by Customer ID, date of creation and status.
2. Lists of applications
|
Parametr |
Description |
|
ID |
KYC application ID. |
| Customer ID |
End user ID given by Verestro. |
| First name |
End user first name. |
| Last name |
End user last name. |
| Status |
KYC application status. Available values: In progress, Accepted, Rejected. |
After clicking on a row of the list, Operator is navigated to KYC application detailed view. 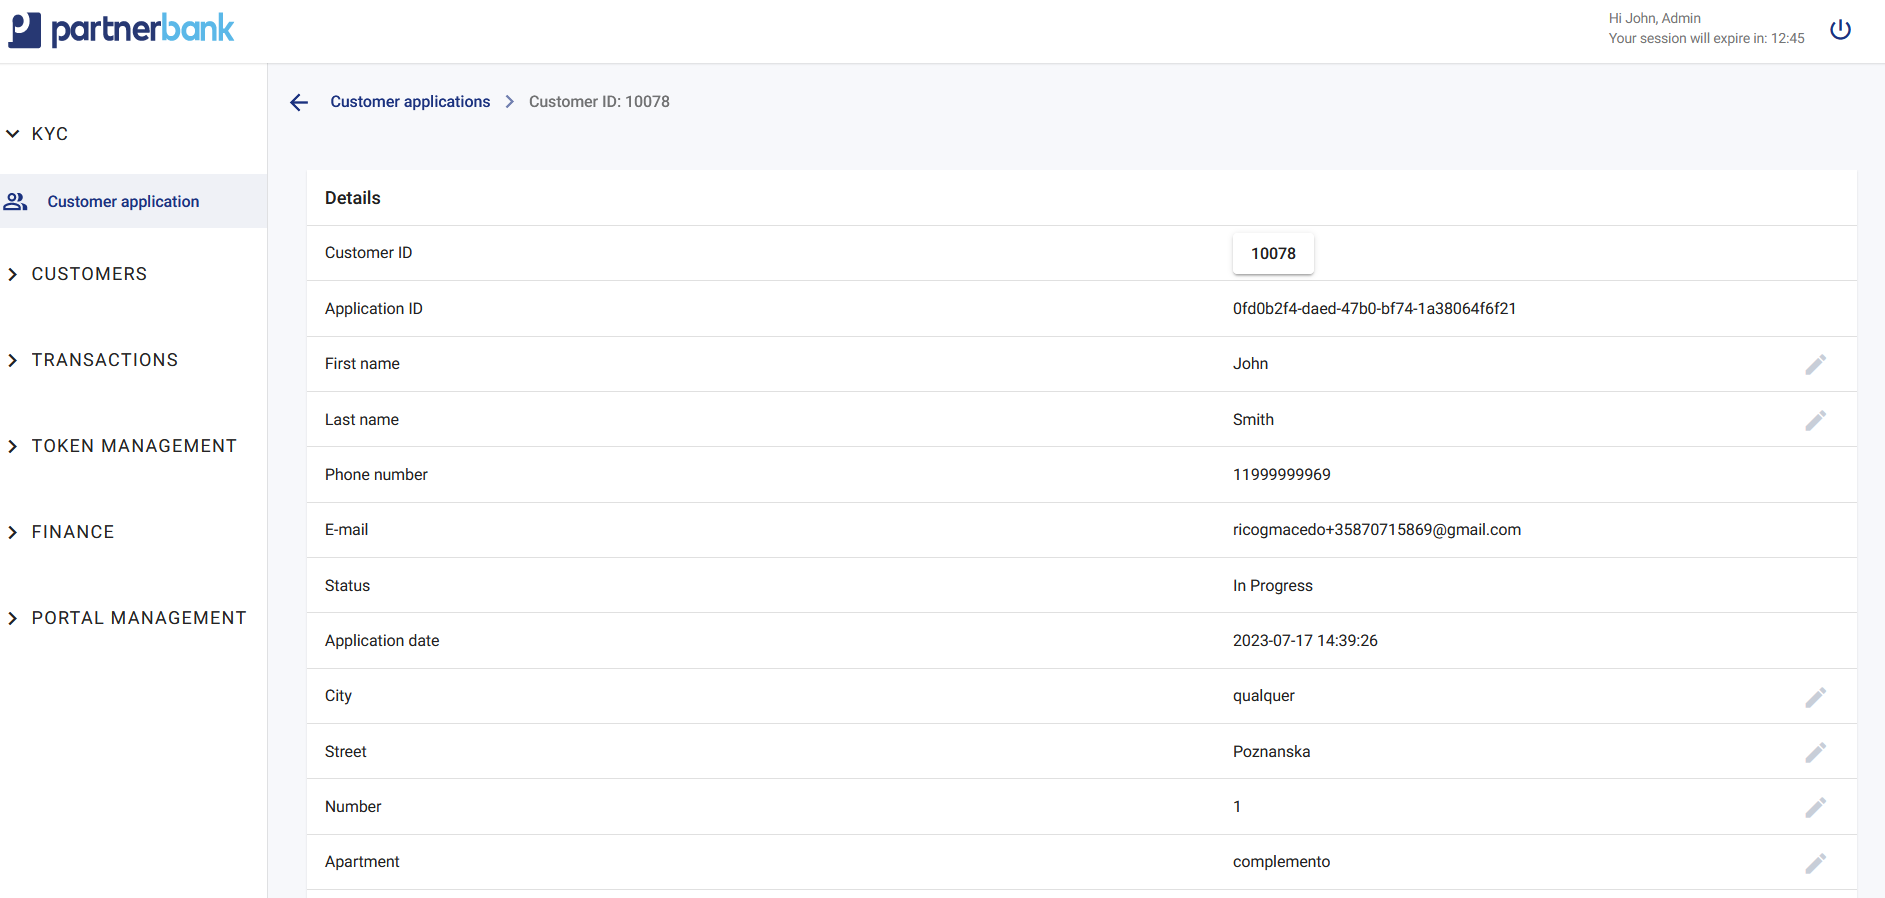
In Details section all informations provided by end user are presented. Some of the data can be edited regardless of KYC application status [?]. Pencil icon indicates editable data.
Below Details section Operator can find documents attached to KYC application. Files can be added by end user during KYC process or by Operator with "Drag and drop" functionality available below files list. Admin Panel support following file formats: pdf, jpeg, png and jpg. Each file size is limited to 2 MB.
At the right bottom corner of the page Operator with Admin role can see 3 buttons to change KYC apllication status:
1. Success - changes KYC application status to "Accepted"
2. Fail - changes KYC application status to "Rejected". End user has to create new KYC application.
3. Block - changes KYC application status to "Rejected". End user cannot create another KYC application.
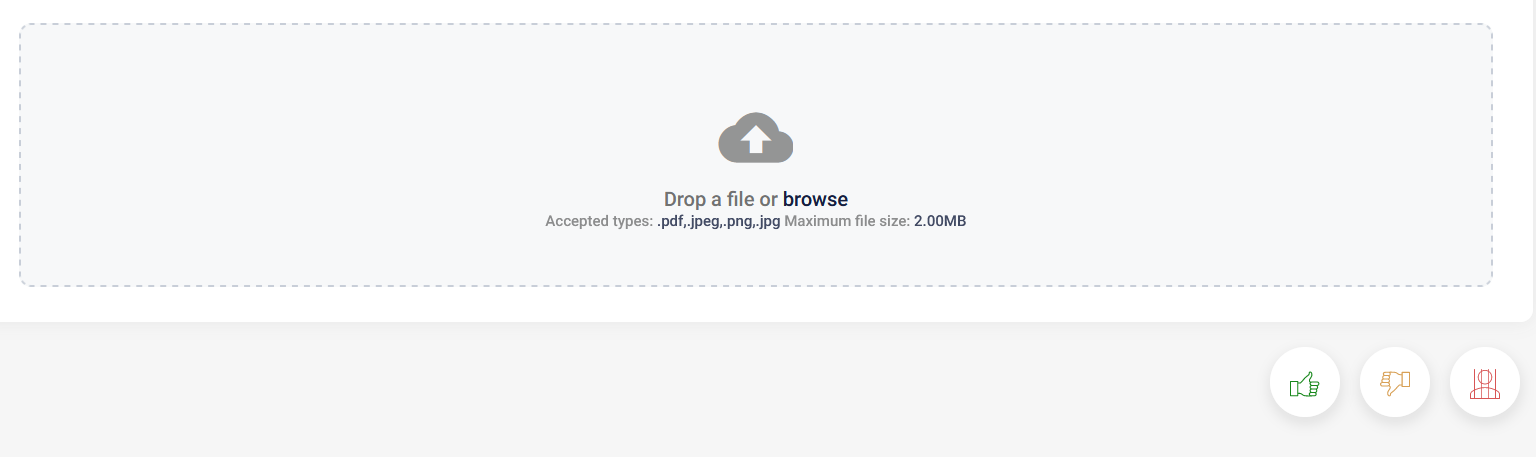
When changing KYC status to "Success" Operator has to select Risk Level for given end user, selecting one of folloing values: Low, Medium, High.
AML Transaction Monitoring - Administration Panel Overview
The AML Transaction Monitoring GUI enables operators to configure custom rulesets, define value sets and actions for transaction monitoring, and manage user watchlists. The system is currently being enhanced with a testing feature for dry‑run ruleset validation and an analytics dashboard for monitoring AML transaction patterns and statistics.
Purpose & scope
This documentation covers the primary processes within the AML configuration module of the partnerbank Admin Panel.
| Name | Description |
| Ruleset management | Creating and managing rule configurations for transaction monitoring. |
| Actions management | Defining actions returned by the AML system. |
| Value set management | Managing internal variables and stored values. |
| Watchlist management | Adding and removing users from blacklists and greylists. |
Terminology
| Name | Description |
| End user | Cardholder performing transactions. |
| Operator | User working with the Administration Panel. |
| Ruleset | Predefined sets of conditions checked and processed after receiving a transaction verification request. |
| Action | Response returned by the AML system that must be processed by the external product sending the verification request. |
| Value set | Internal variable storing multiple values (for example: UHRC country codes in ISO Alpha‑2 format). |
| Watchlist | Internal storage for suspicious users, checked during transaction verification to determine appropriate decisions and actions. |
RULESETS TAB
This section of the GUI is responsible for managing rulesets, value sets and actions.
Rulesets
Defining a ruleset
To create a new ruleset, follow these steps. On the right you can insert a screenshot of the Add ruleset page to illustrate the process.
|
|
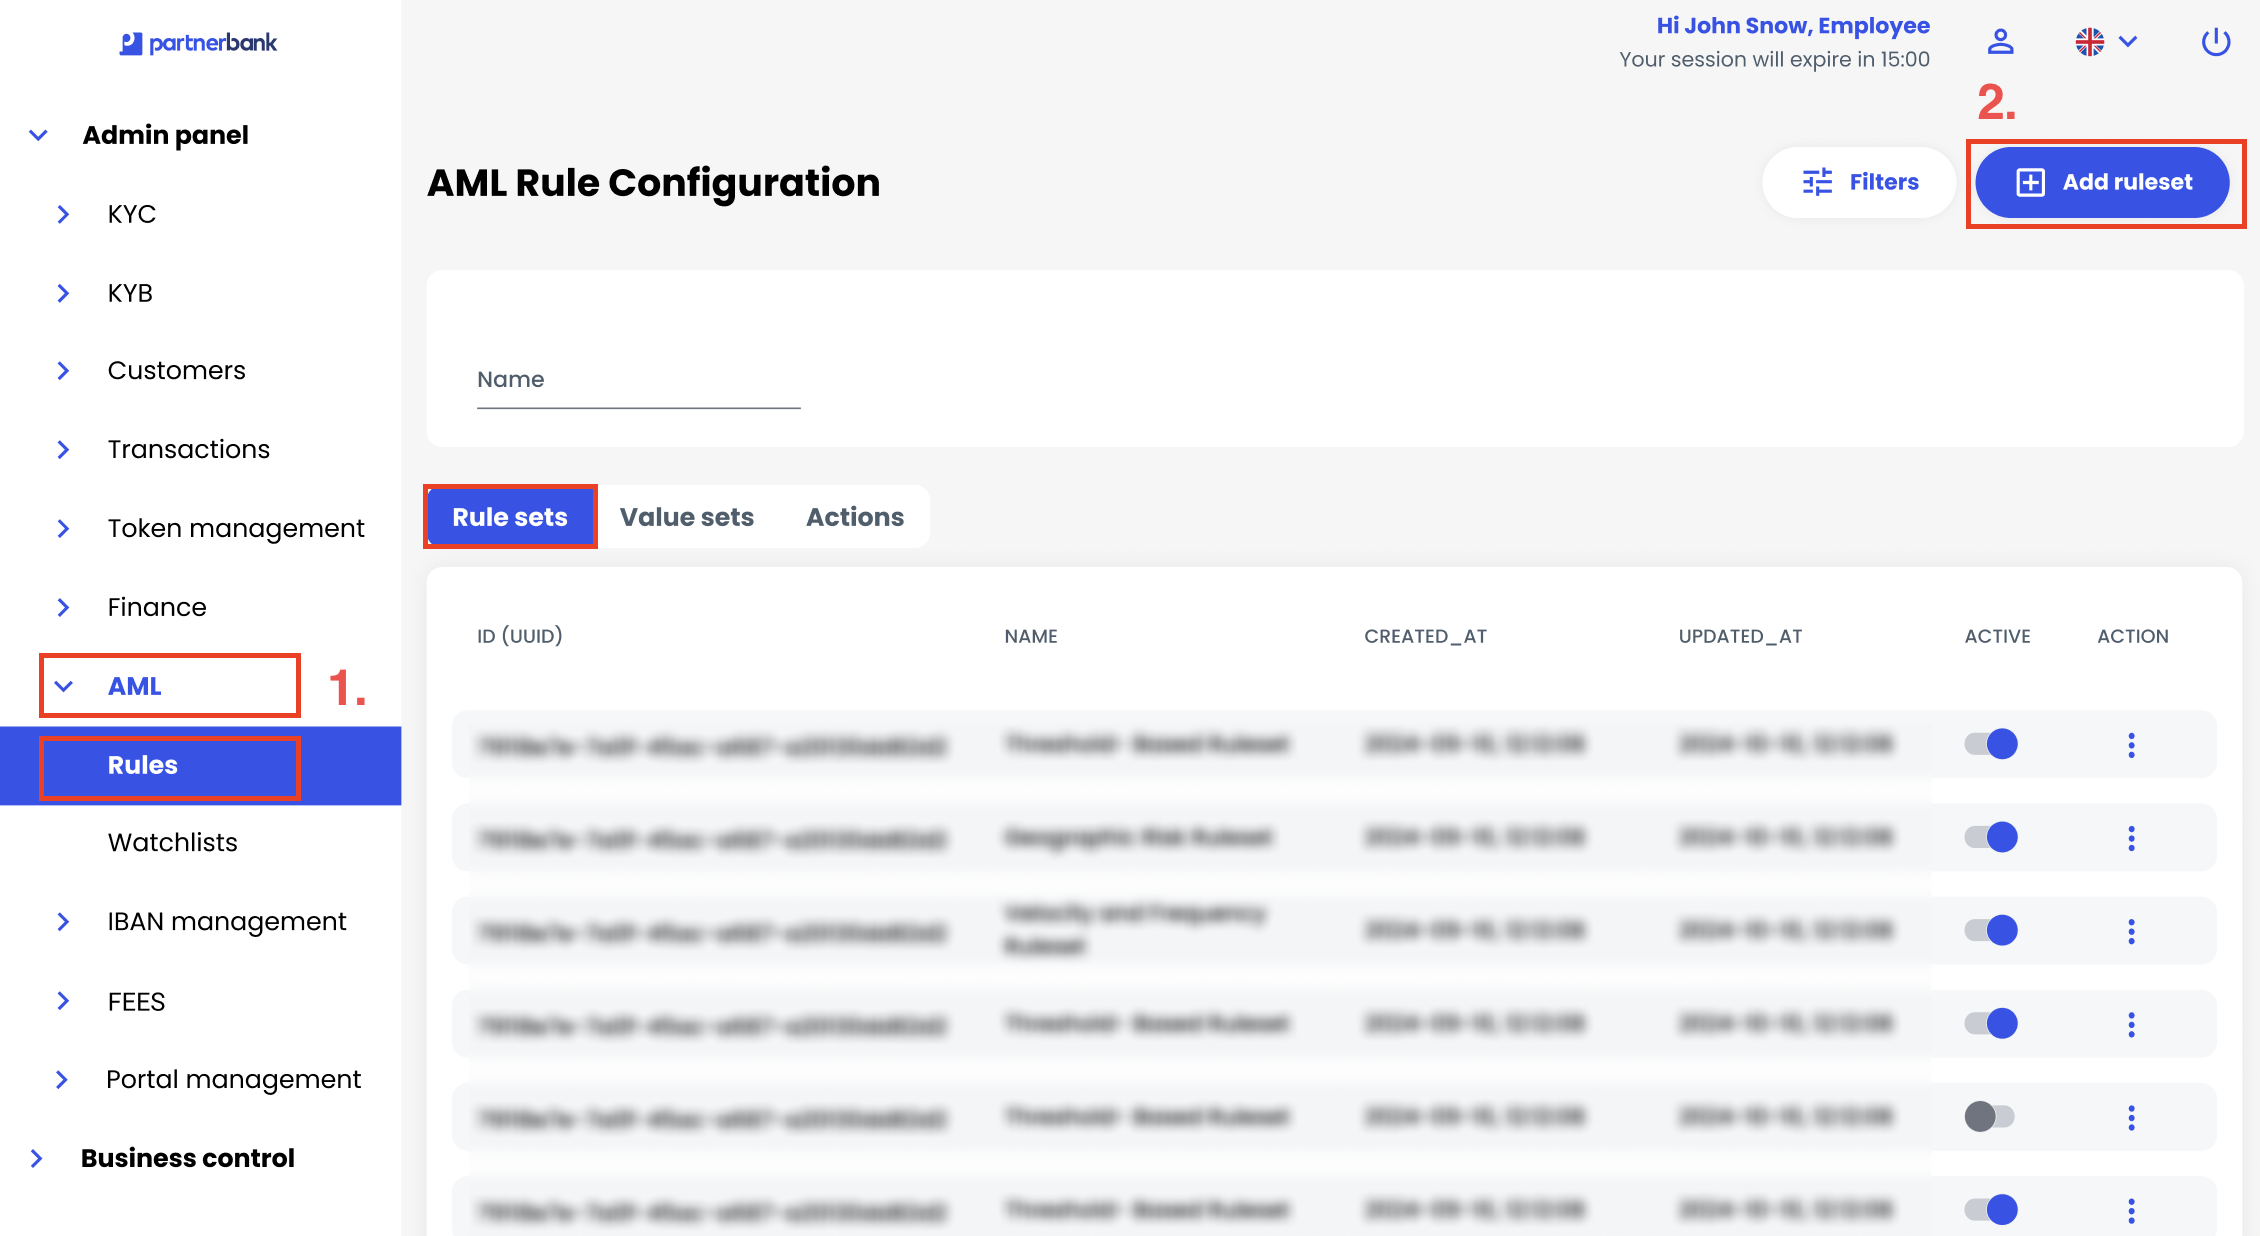
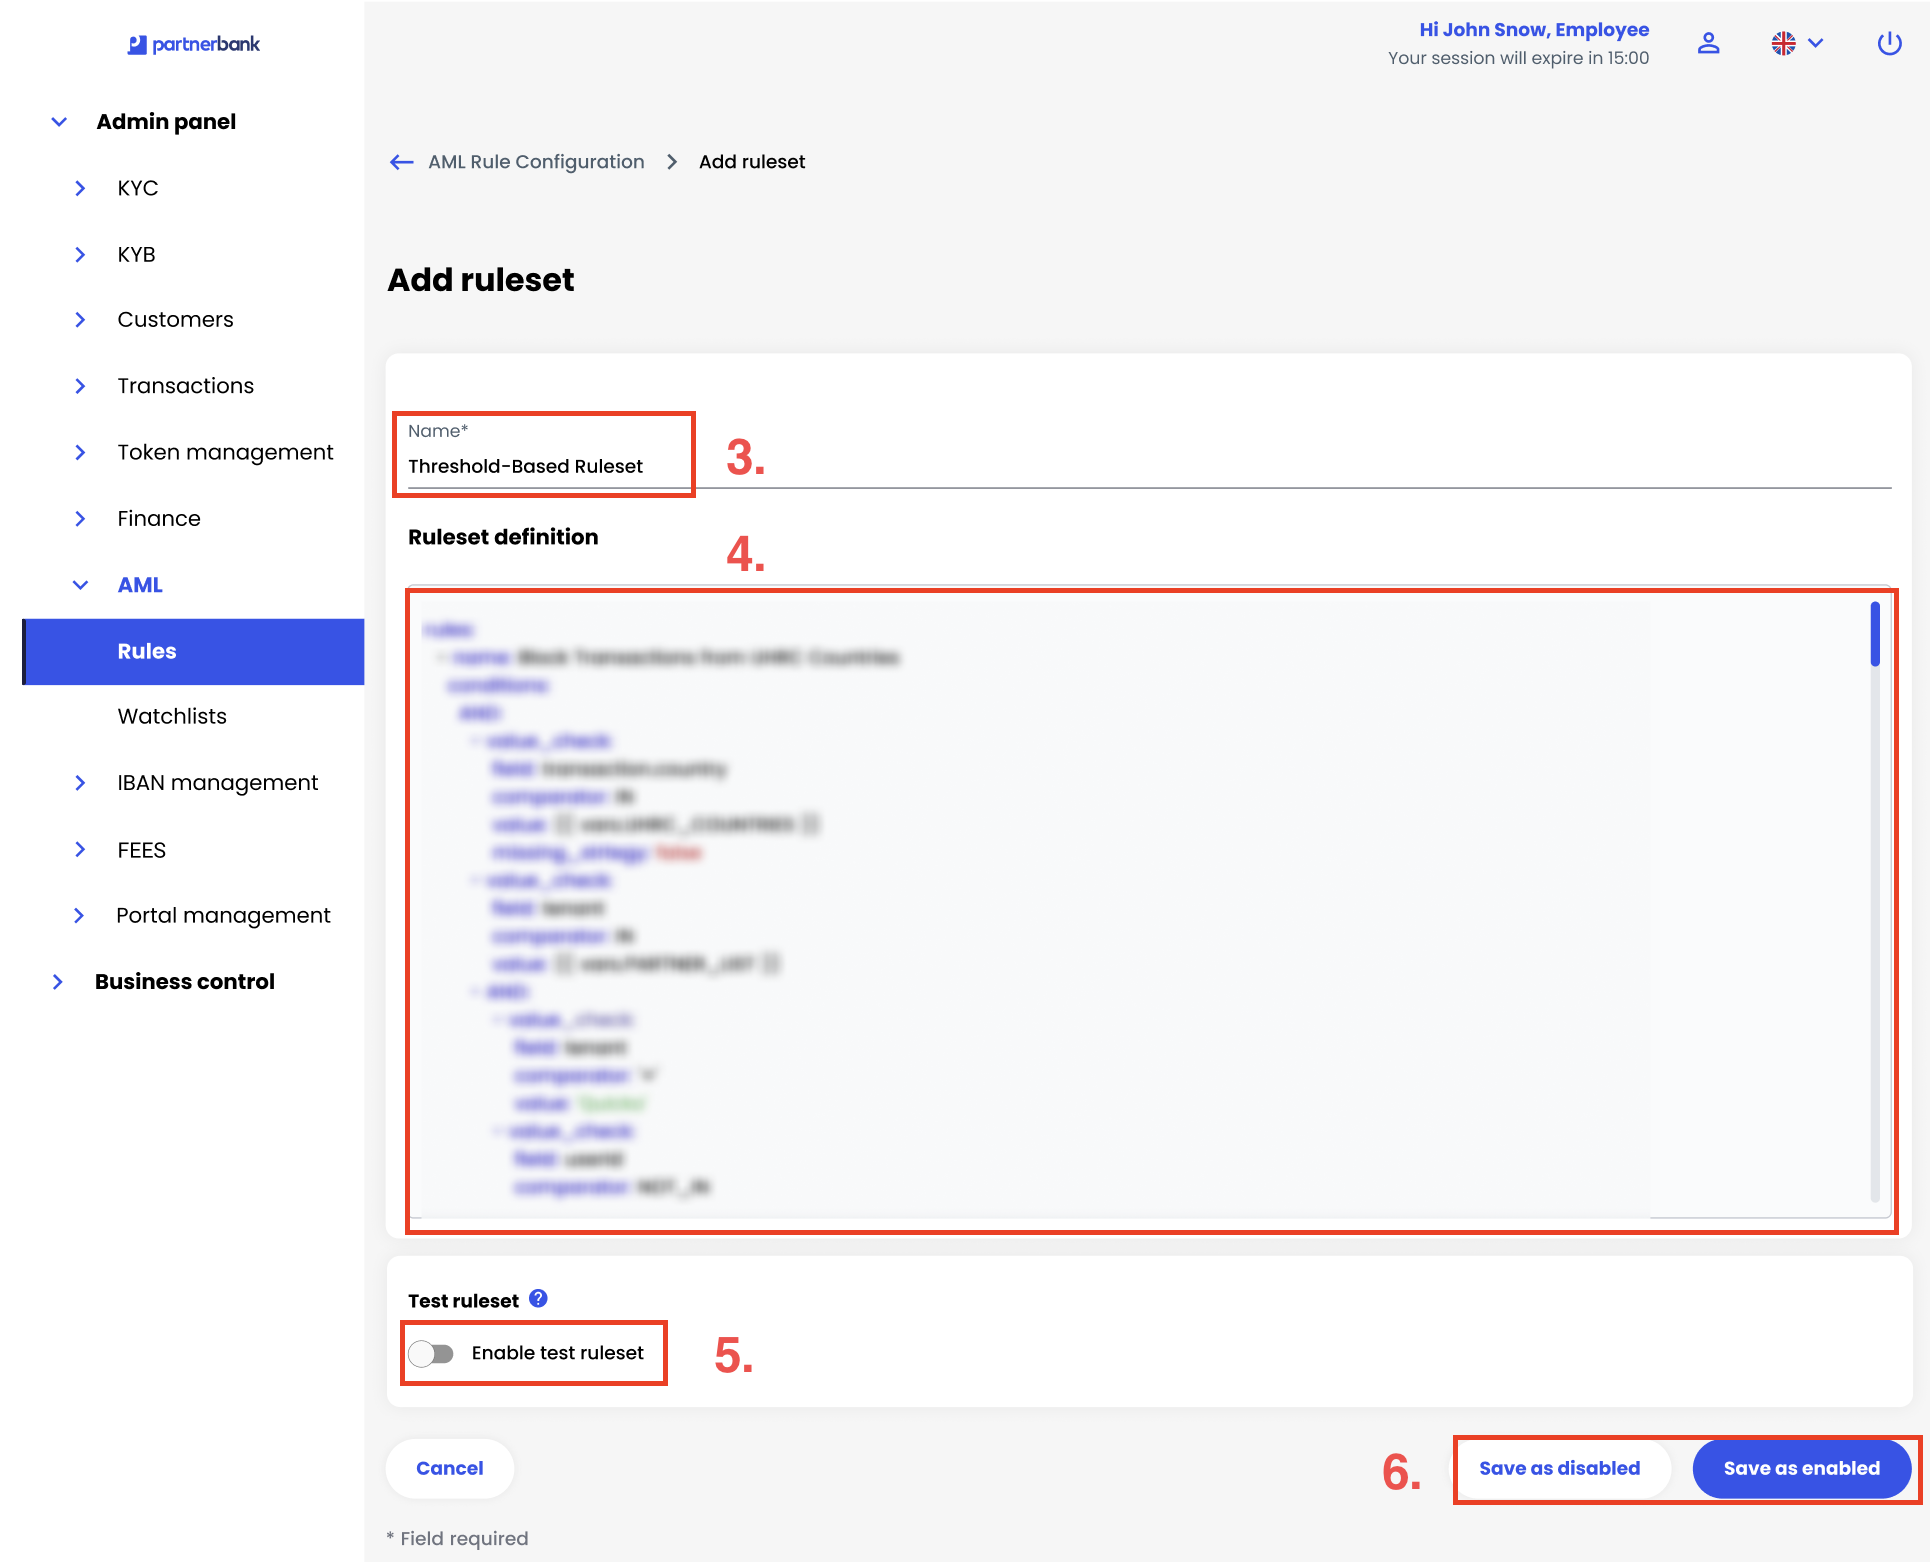
Note: A traditional YAML builder using forms and blocks is under development. In the final version, rulesets can be defined either with the text editor or with an easy-to-use form.
Ruleset list
You can view all configured rulesets in the Rule sets tab. The list displays:
| Column | Description |
| ID (uuid) | Unique internal identifier of the ruleset. |
| NAME | Descriptive name of the ruleset. |
| CREATED_AT | Date and time when the ruleset was created. |
| UPDATED_AT | Date and time when the ruleset was last modified. |
| ACTIVE | Indicates whether the ruleset is enabled (blue switch) or disabled (grey switch). |
| ACTION | Menu containing actions such as view details, edit or delete. |
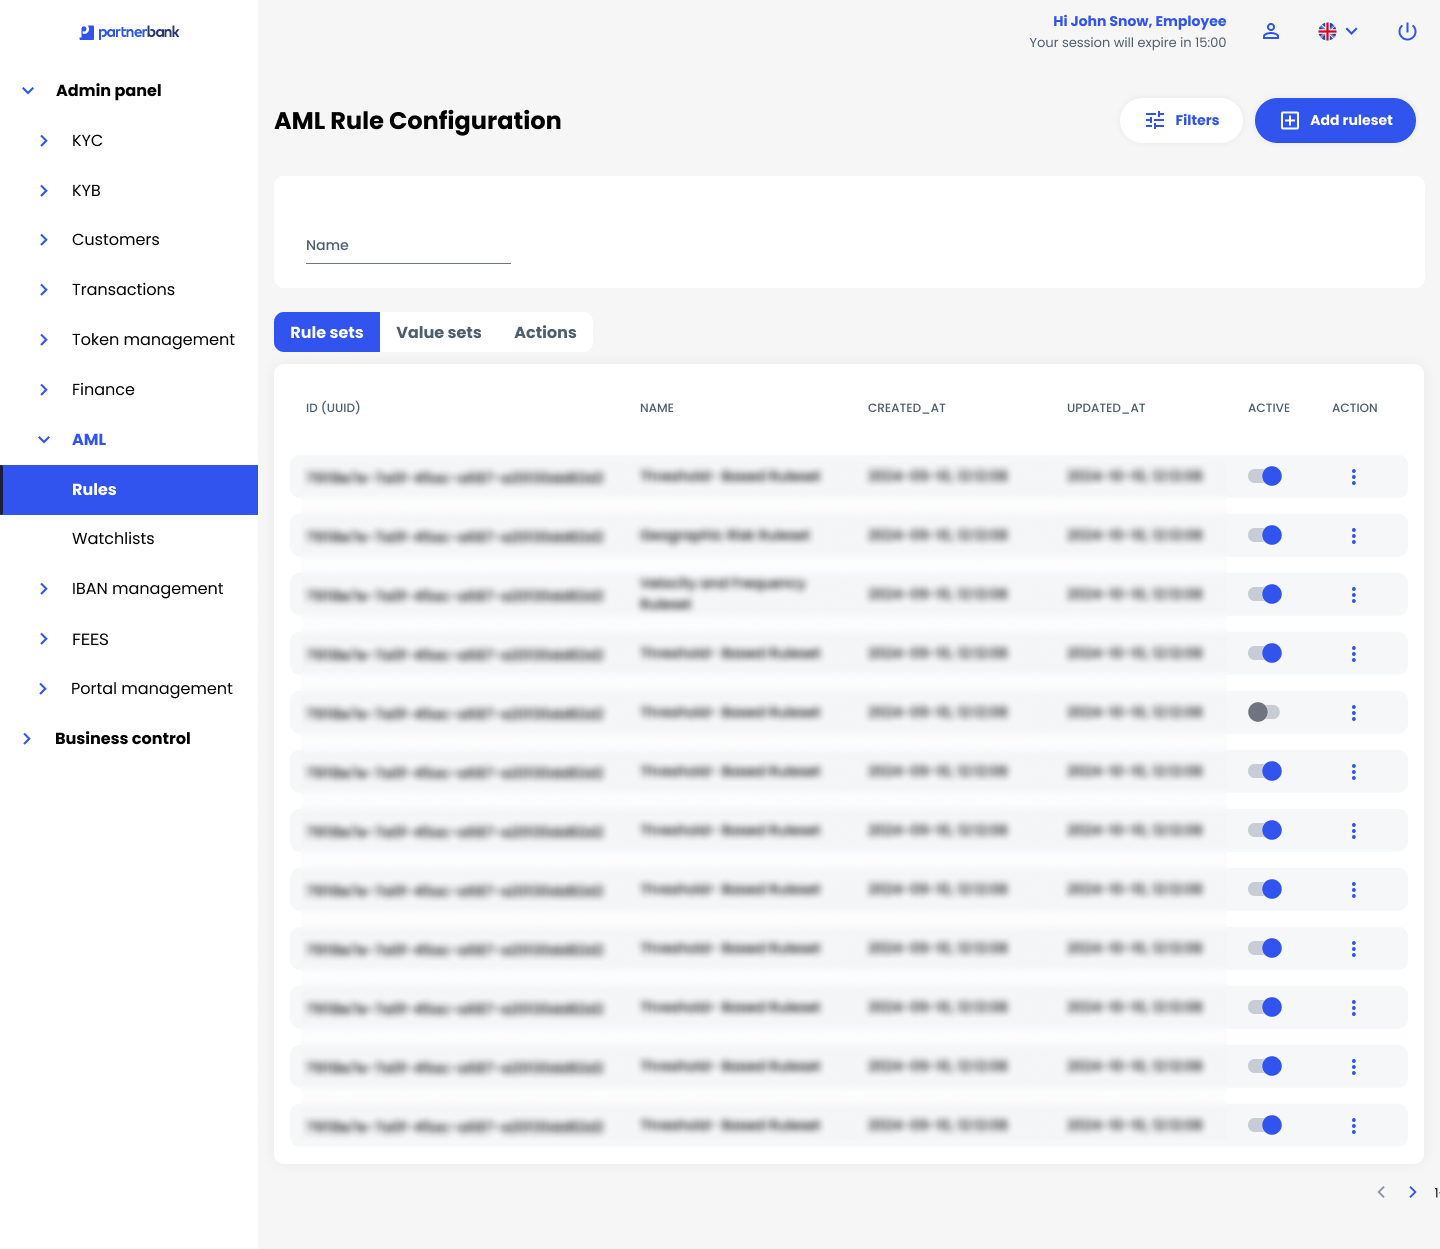
Ruleset details
When you click a ruleset row, a detailed view opens showing all configuration fields. The table below summarises these elements.
| Element | Description |
| Basic data | The panel that summarises the ruleset’s ID (uuid), Name, Created_at and Updated_at values. |
| ID (uuid) | Unique identifier of the ruleset, displayed in the Basic data panel. |
| Name | The descriptive name of the ruleset, shown in the Basic data panel. |
| Created_at | The date and time when the ruleset was created. |
| Updated_at | The date and time when the ruleset was last modified. |
| Ruleset definition tab | The tab that displays the YAML definition of the ruleset, including conditions, triggers, decisions and actions. |
| Ruleset tests tab | The tab used for running and viewing test results for the ruleset. |
| Edit button | A button that opens the ruleset edit form. |
| Test ruleset button | A button that runs a dry‑run test on the ruleset using historical transaction data. |
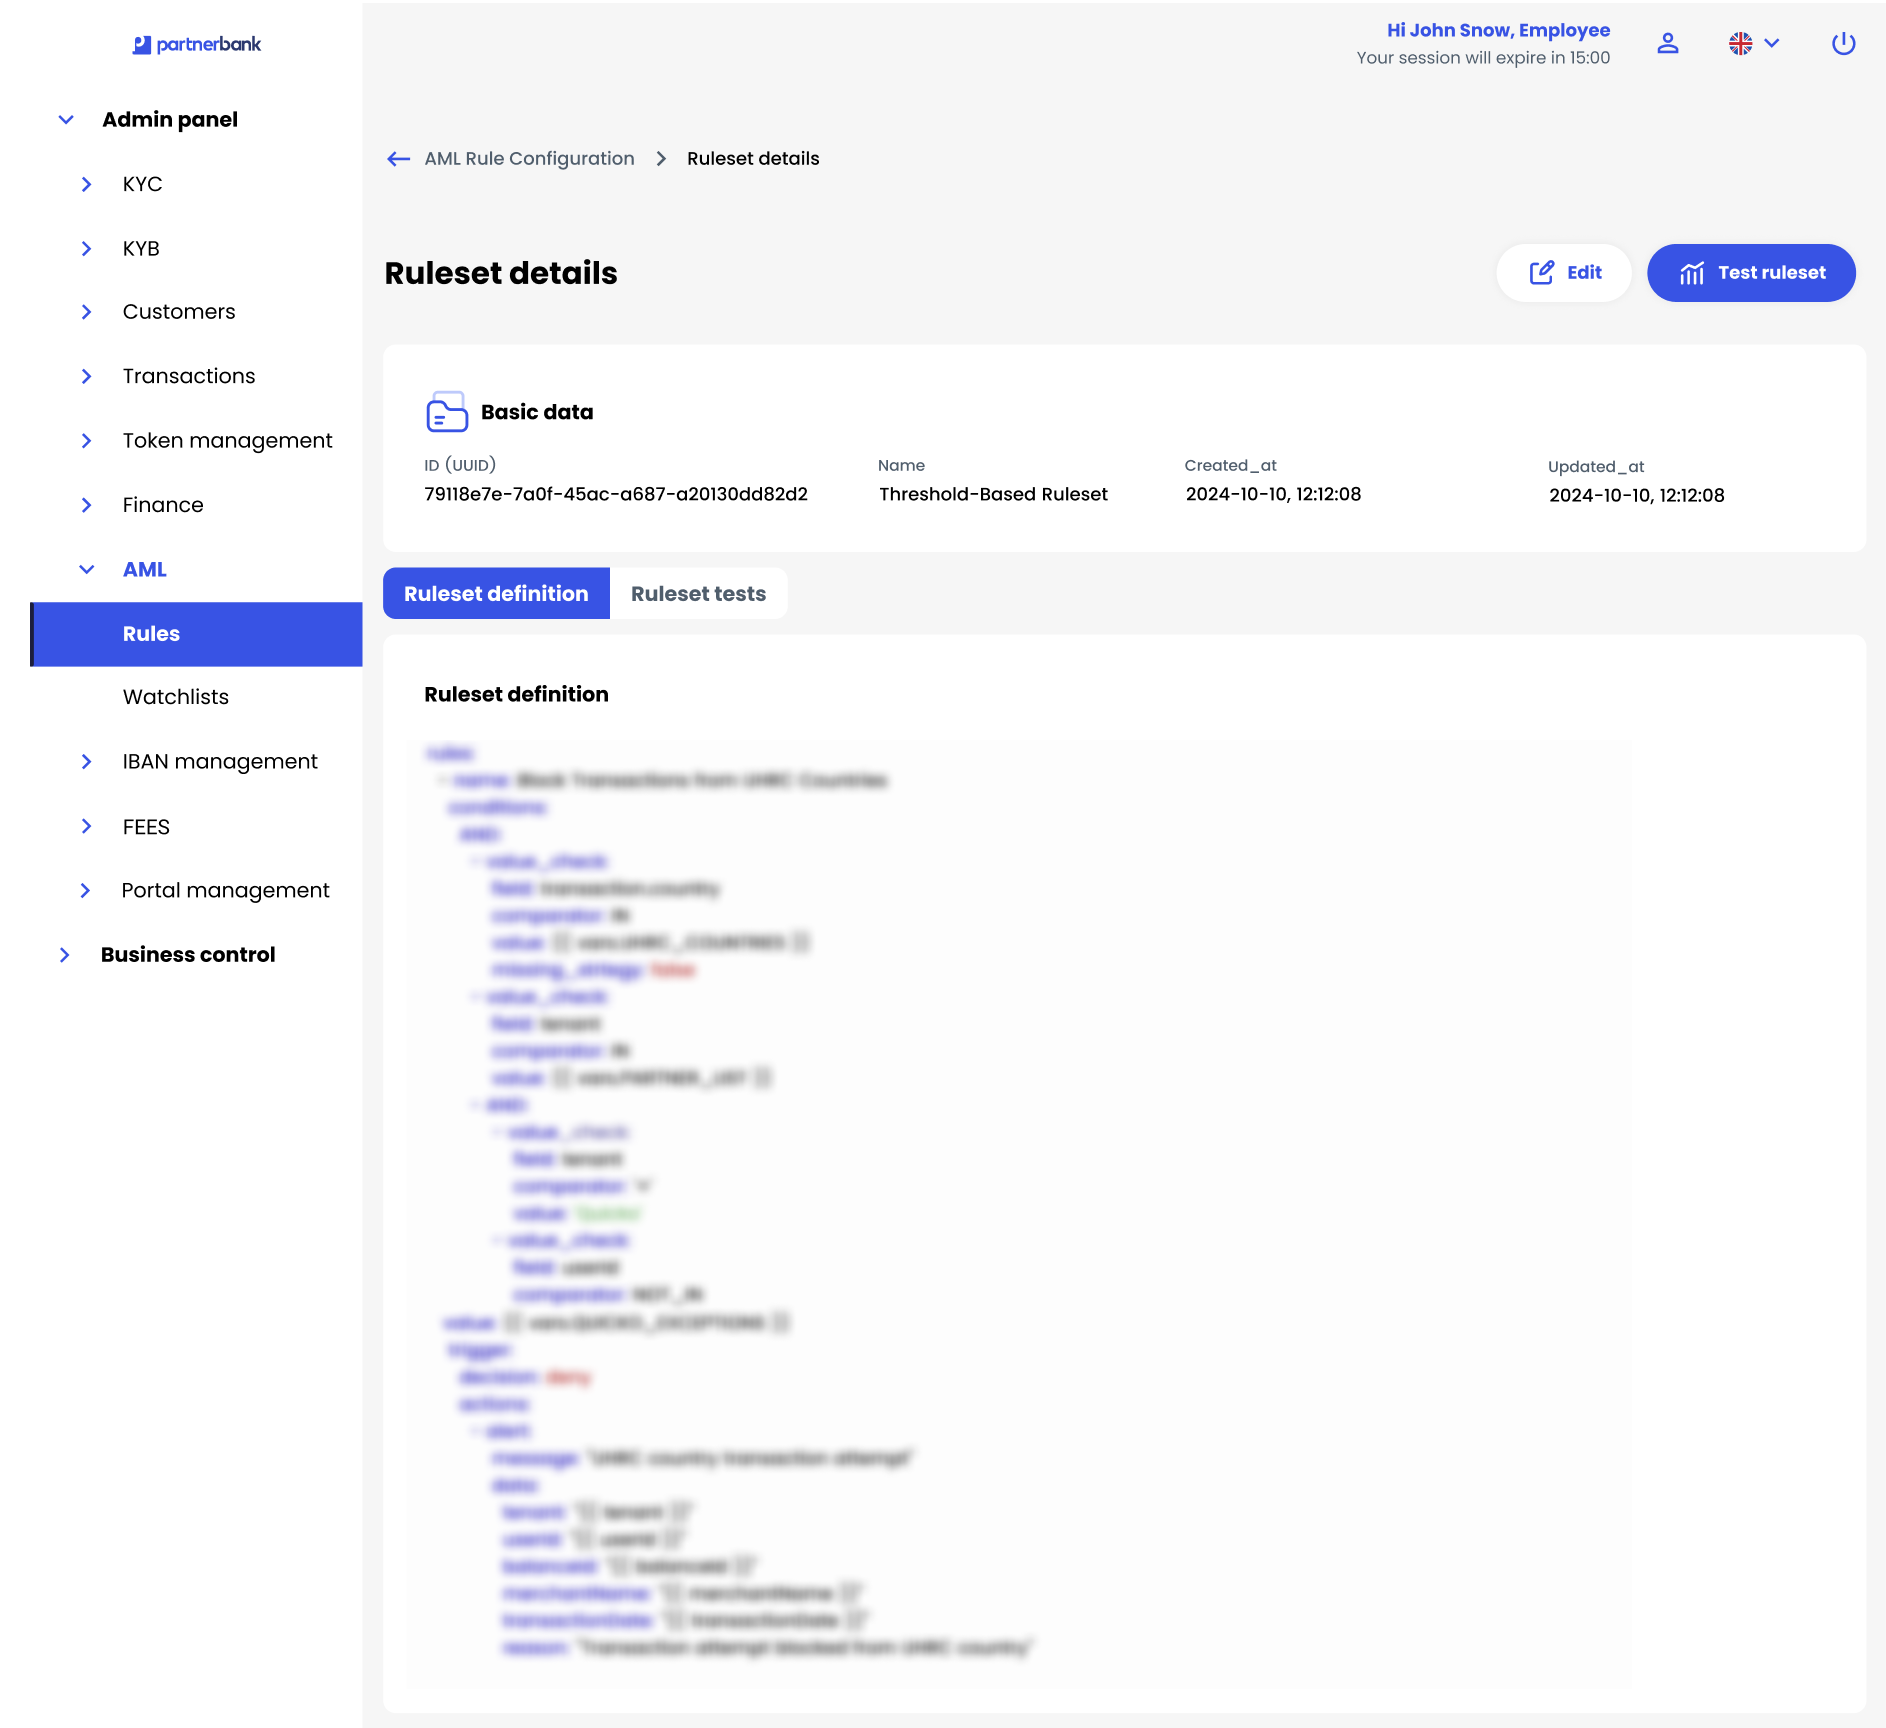
Ruleset activation / deactivation
When creating a ruleset, the operator chooses whether the ruleset should be active right away or saved in a disabled state by selecting Save as enabled or Save as disabled. Once the ruleset exists, its state can be toggled on or off at any time from the list view: use the status switch to enable or disable the ruleset and confirm the change. Changes take effect immediately after confirmation.
| Status indicator | Description |
| Blue switch | The ruleset is enabled. The toggle switch is coloured blue and positioned to the right. |
| Grey switch | The ruleset is disabled. The toggle switch is grey and positioned to the left. |
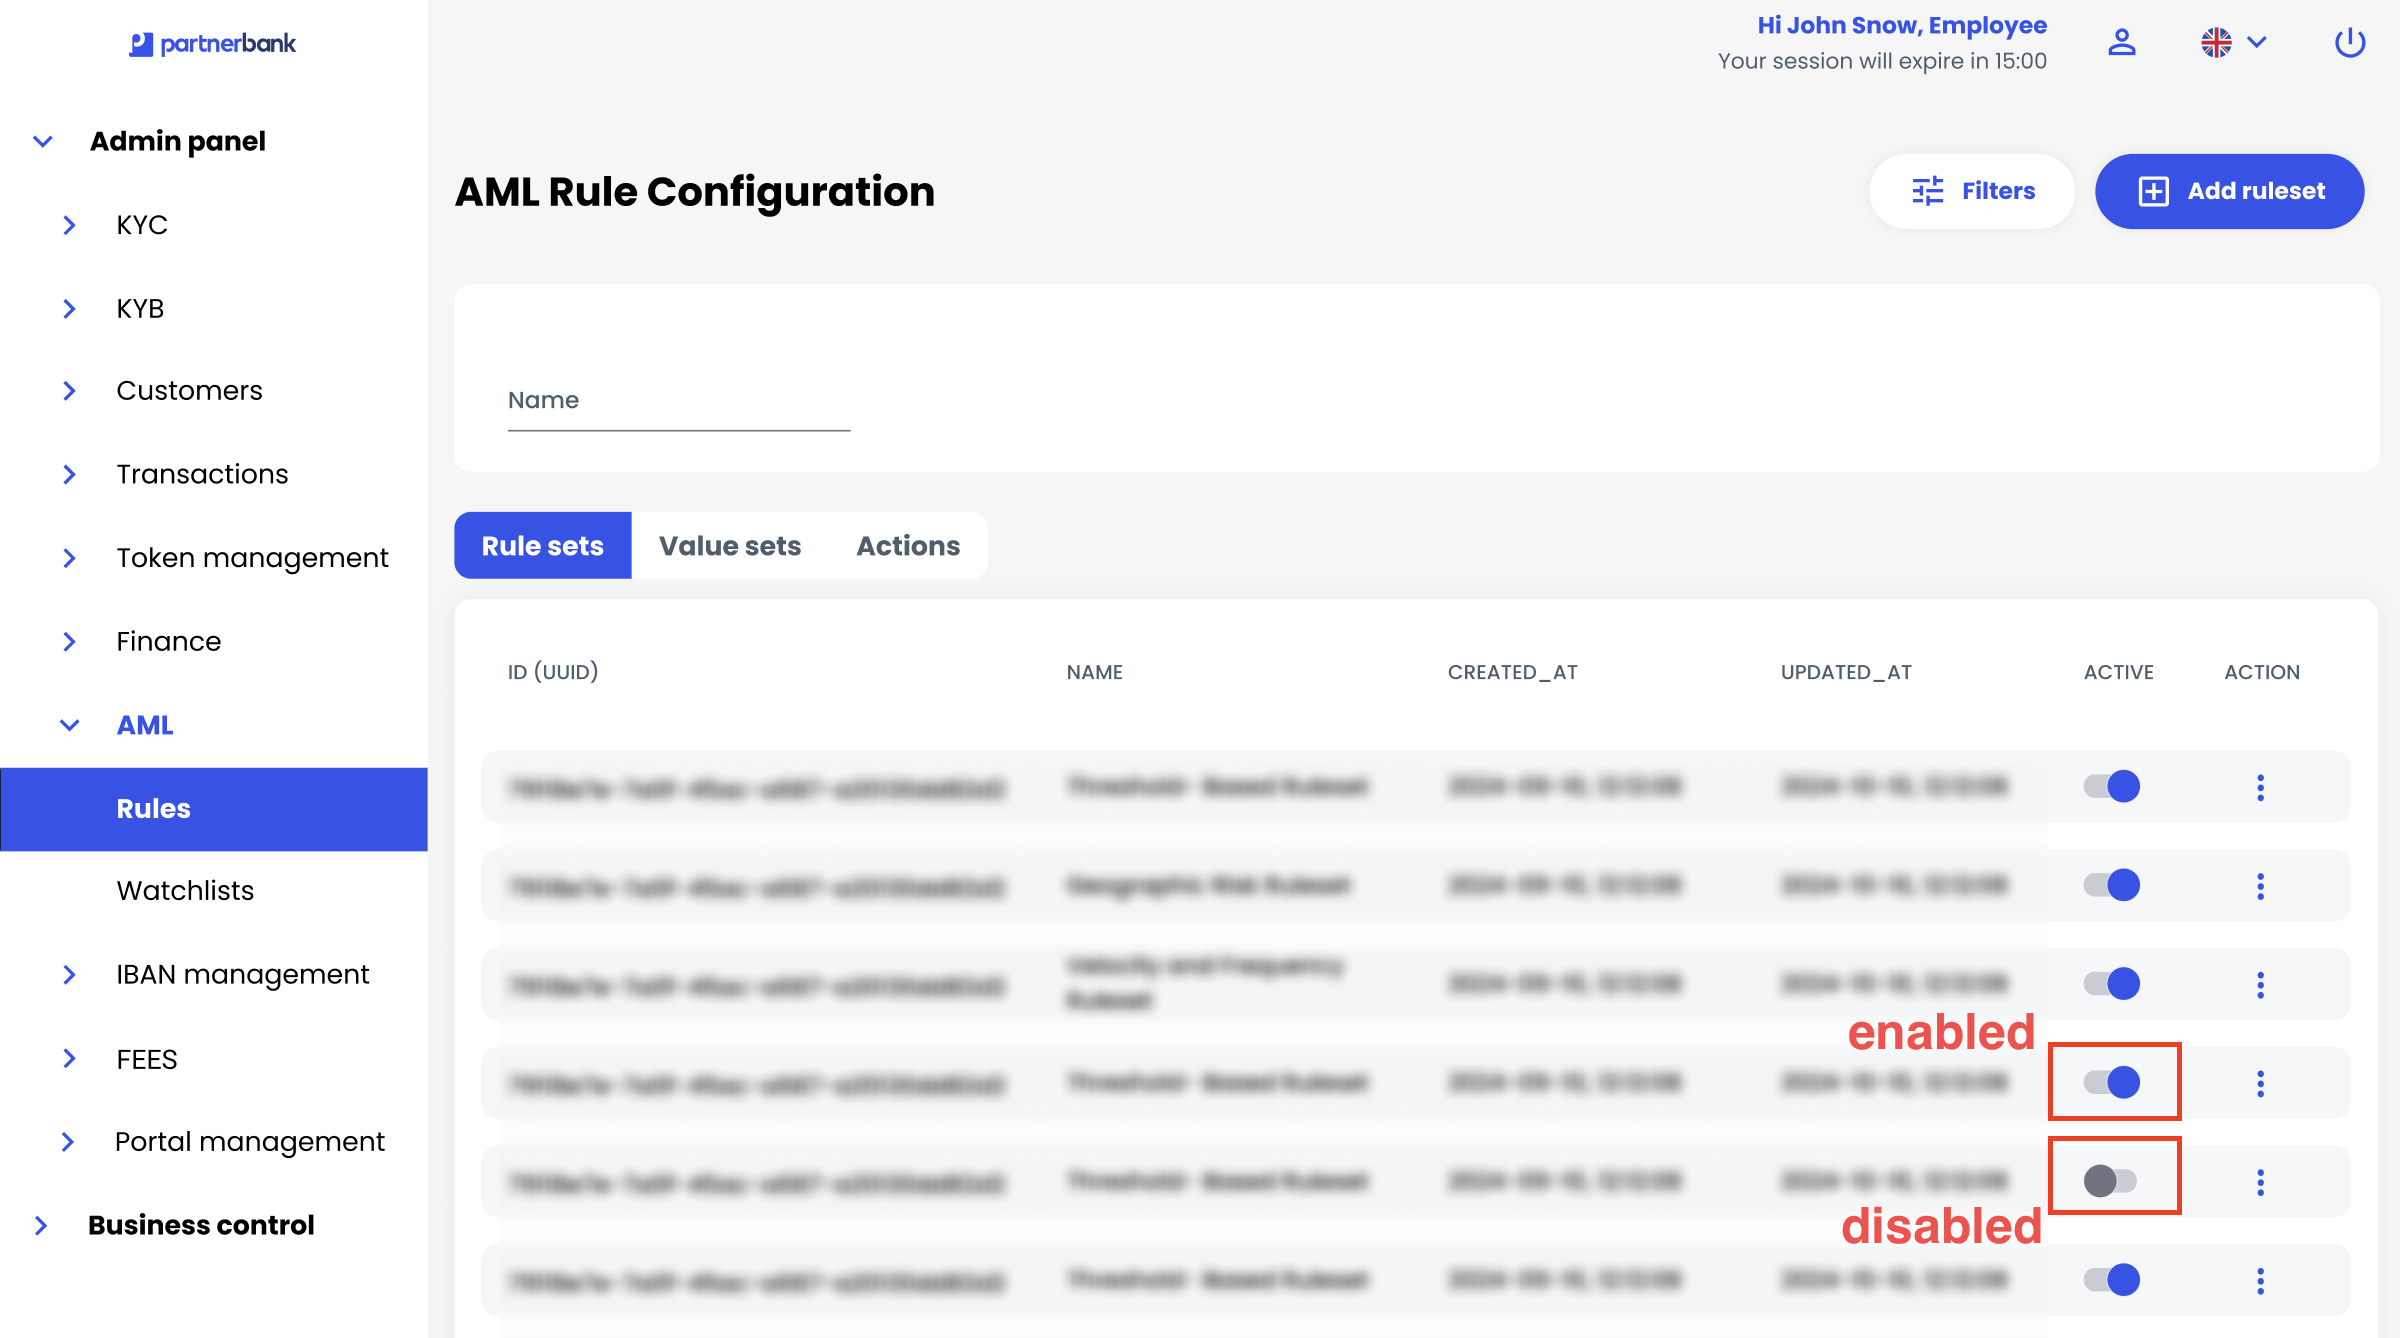
Ruleset testing (dry‑run)
Note: Feature under development. The dry‑run engine will allow operators to run rulesets against historical transaction data and view the result that the ruleset would return without impacting live processing.
Value sets
Defining a value set
Follow these steps to create a new value set. Use the right column for a screenshot of the “Add value set” page.
|
|
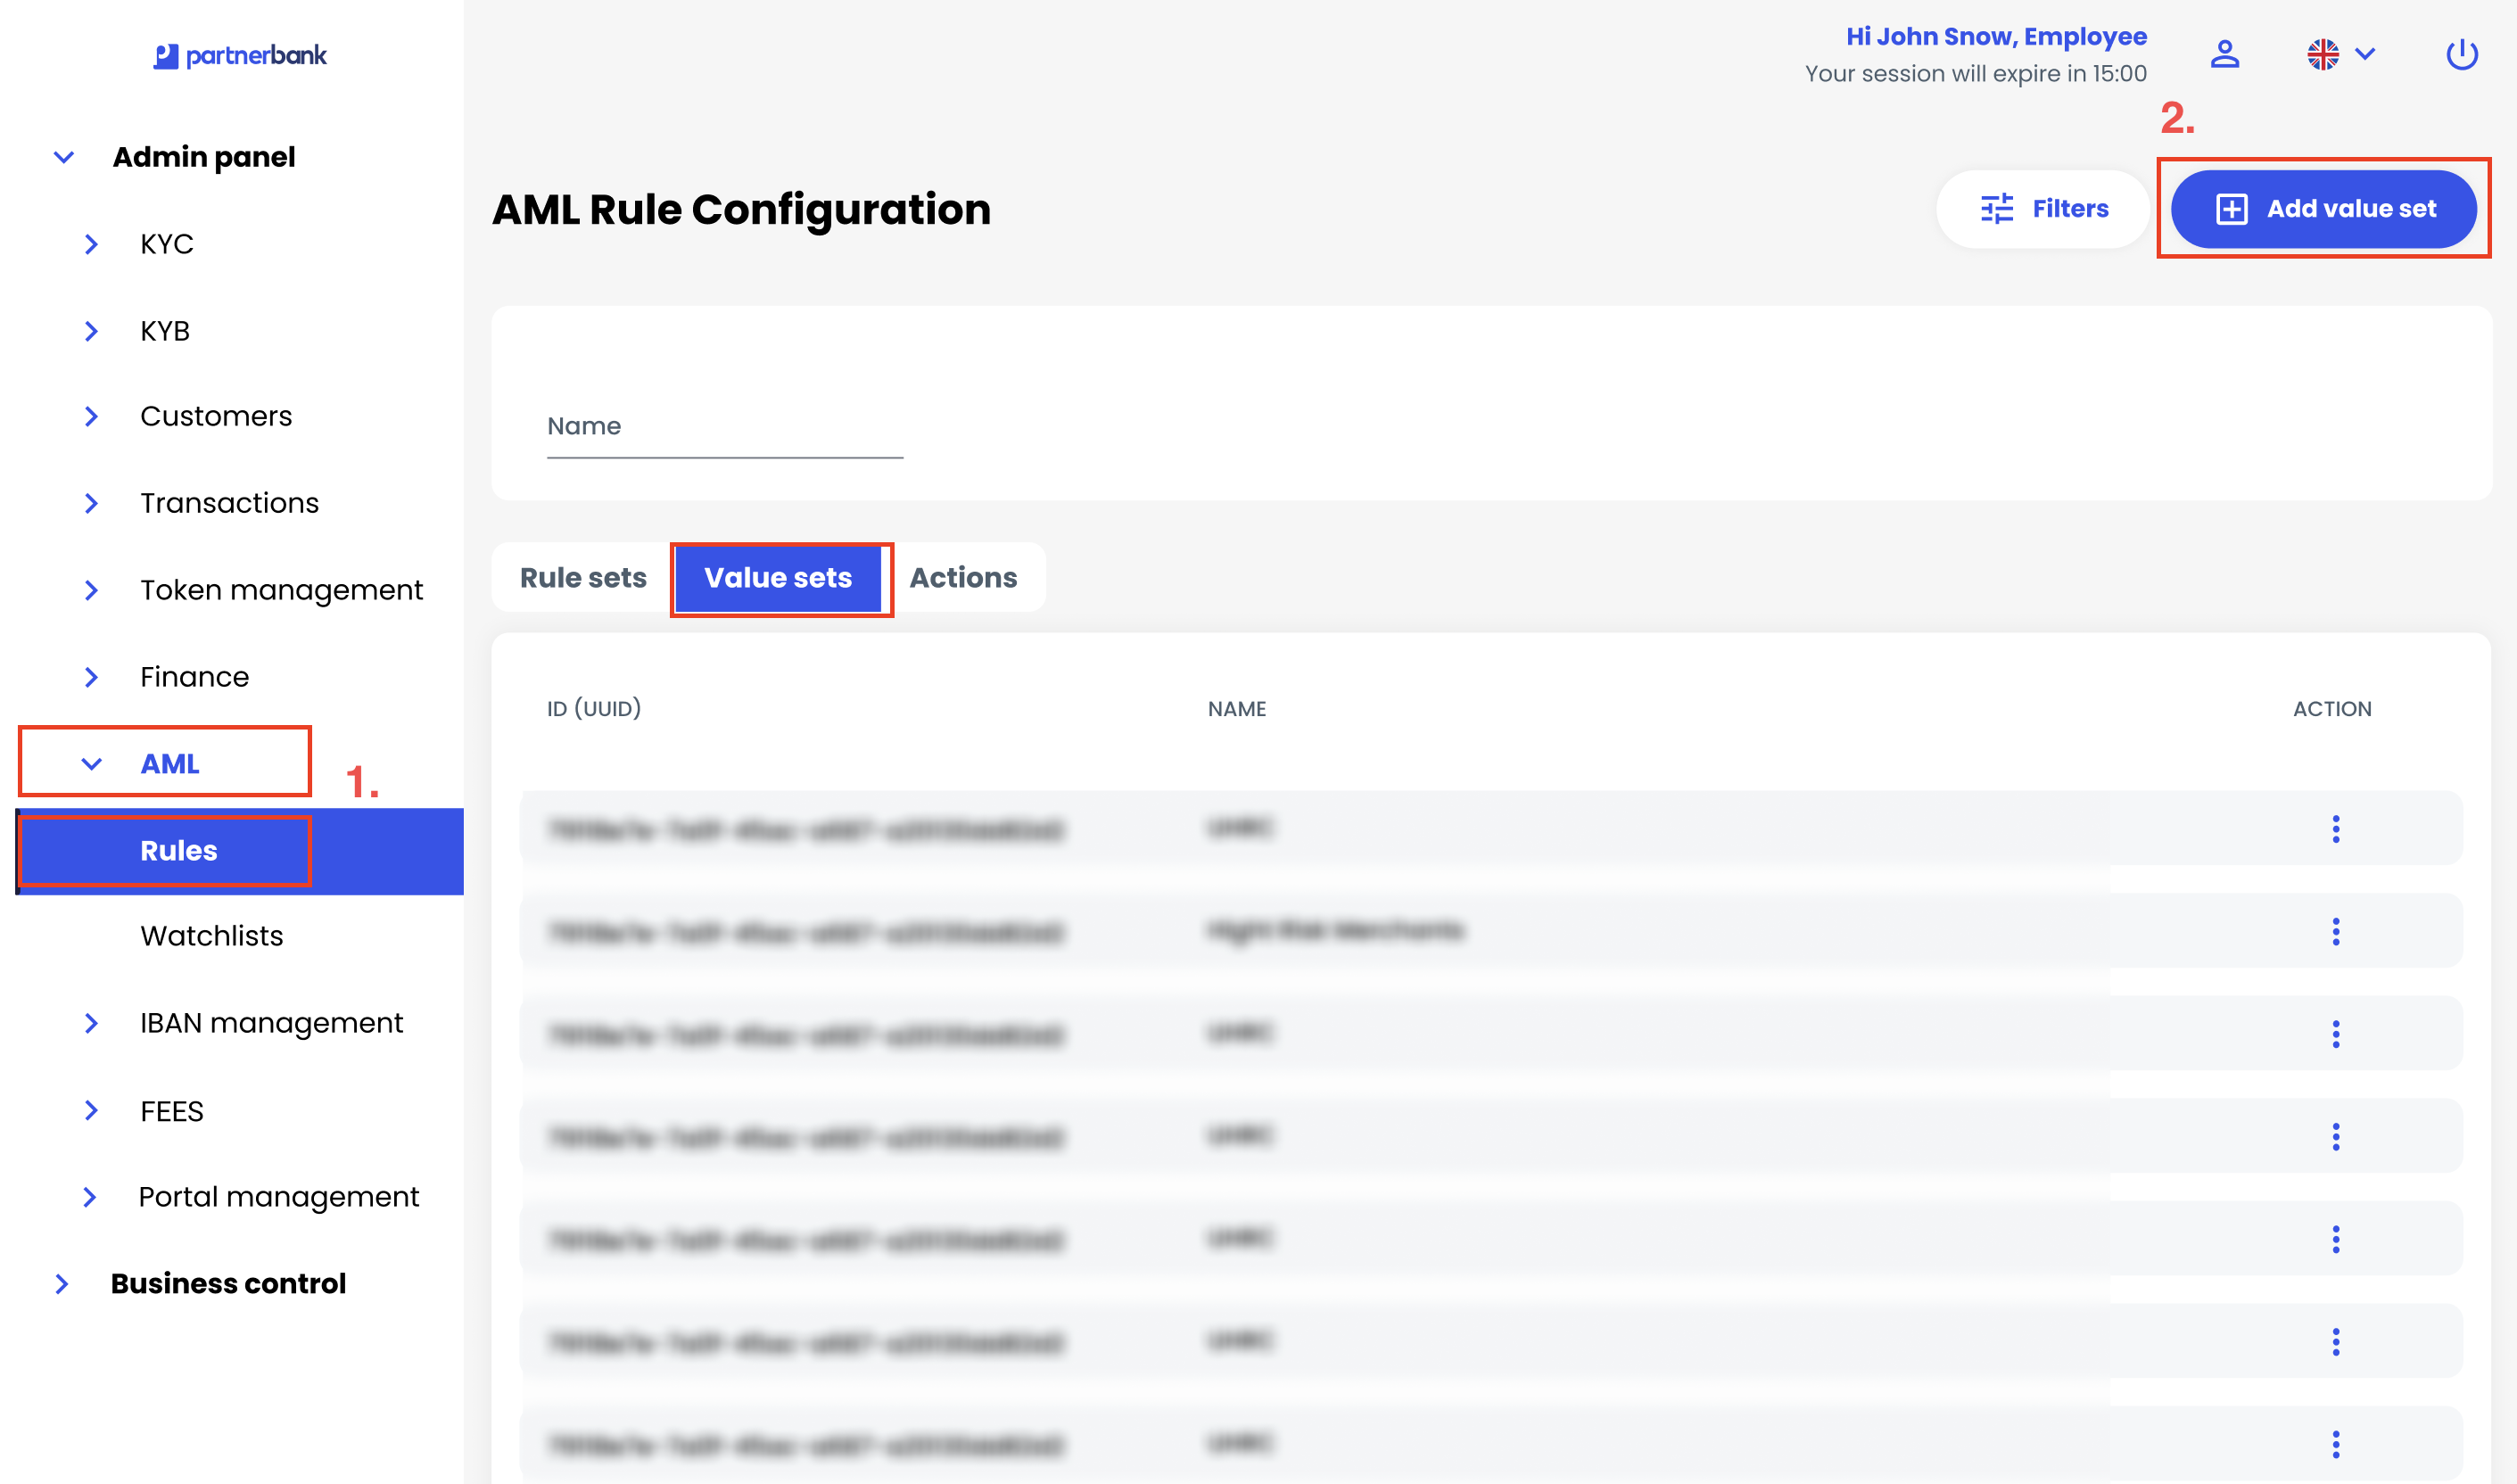
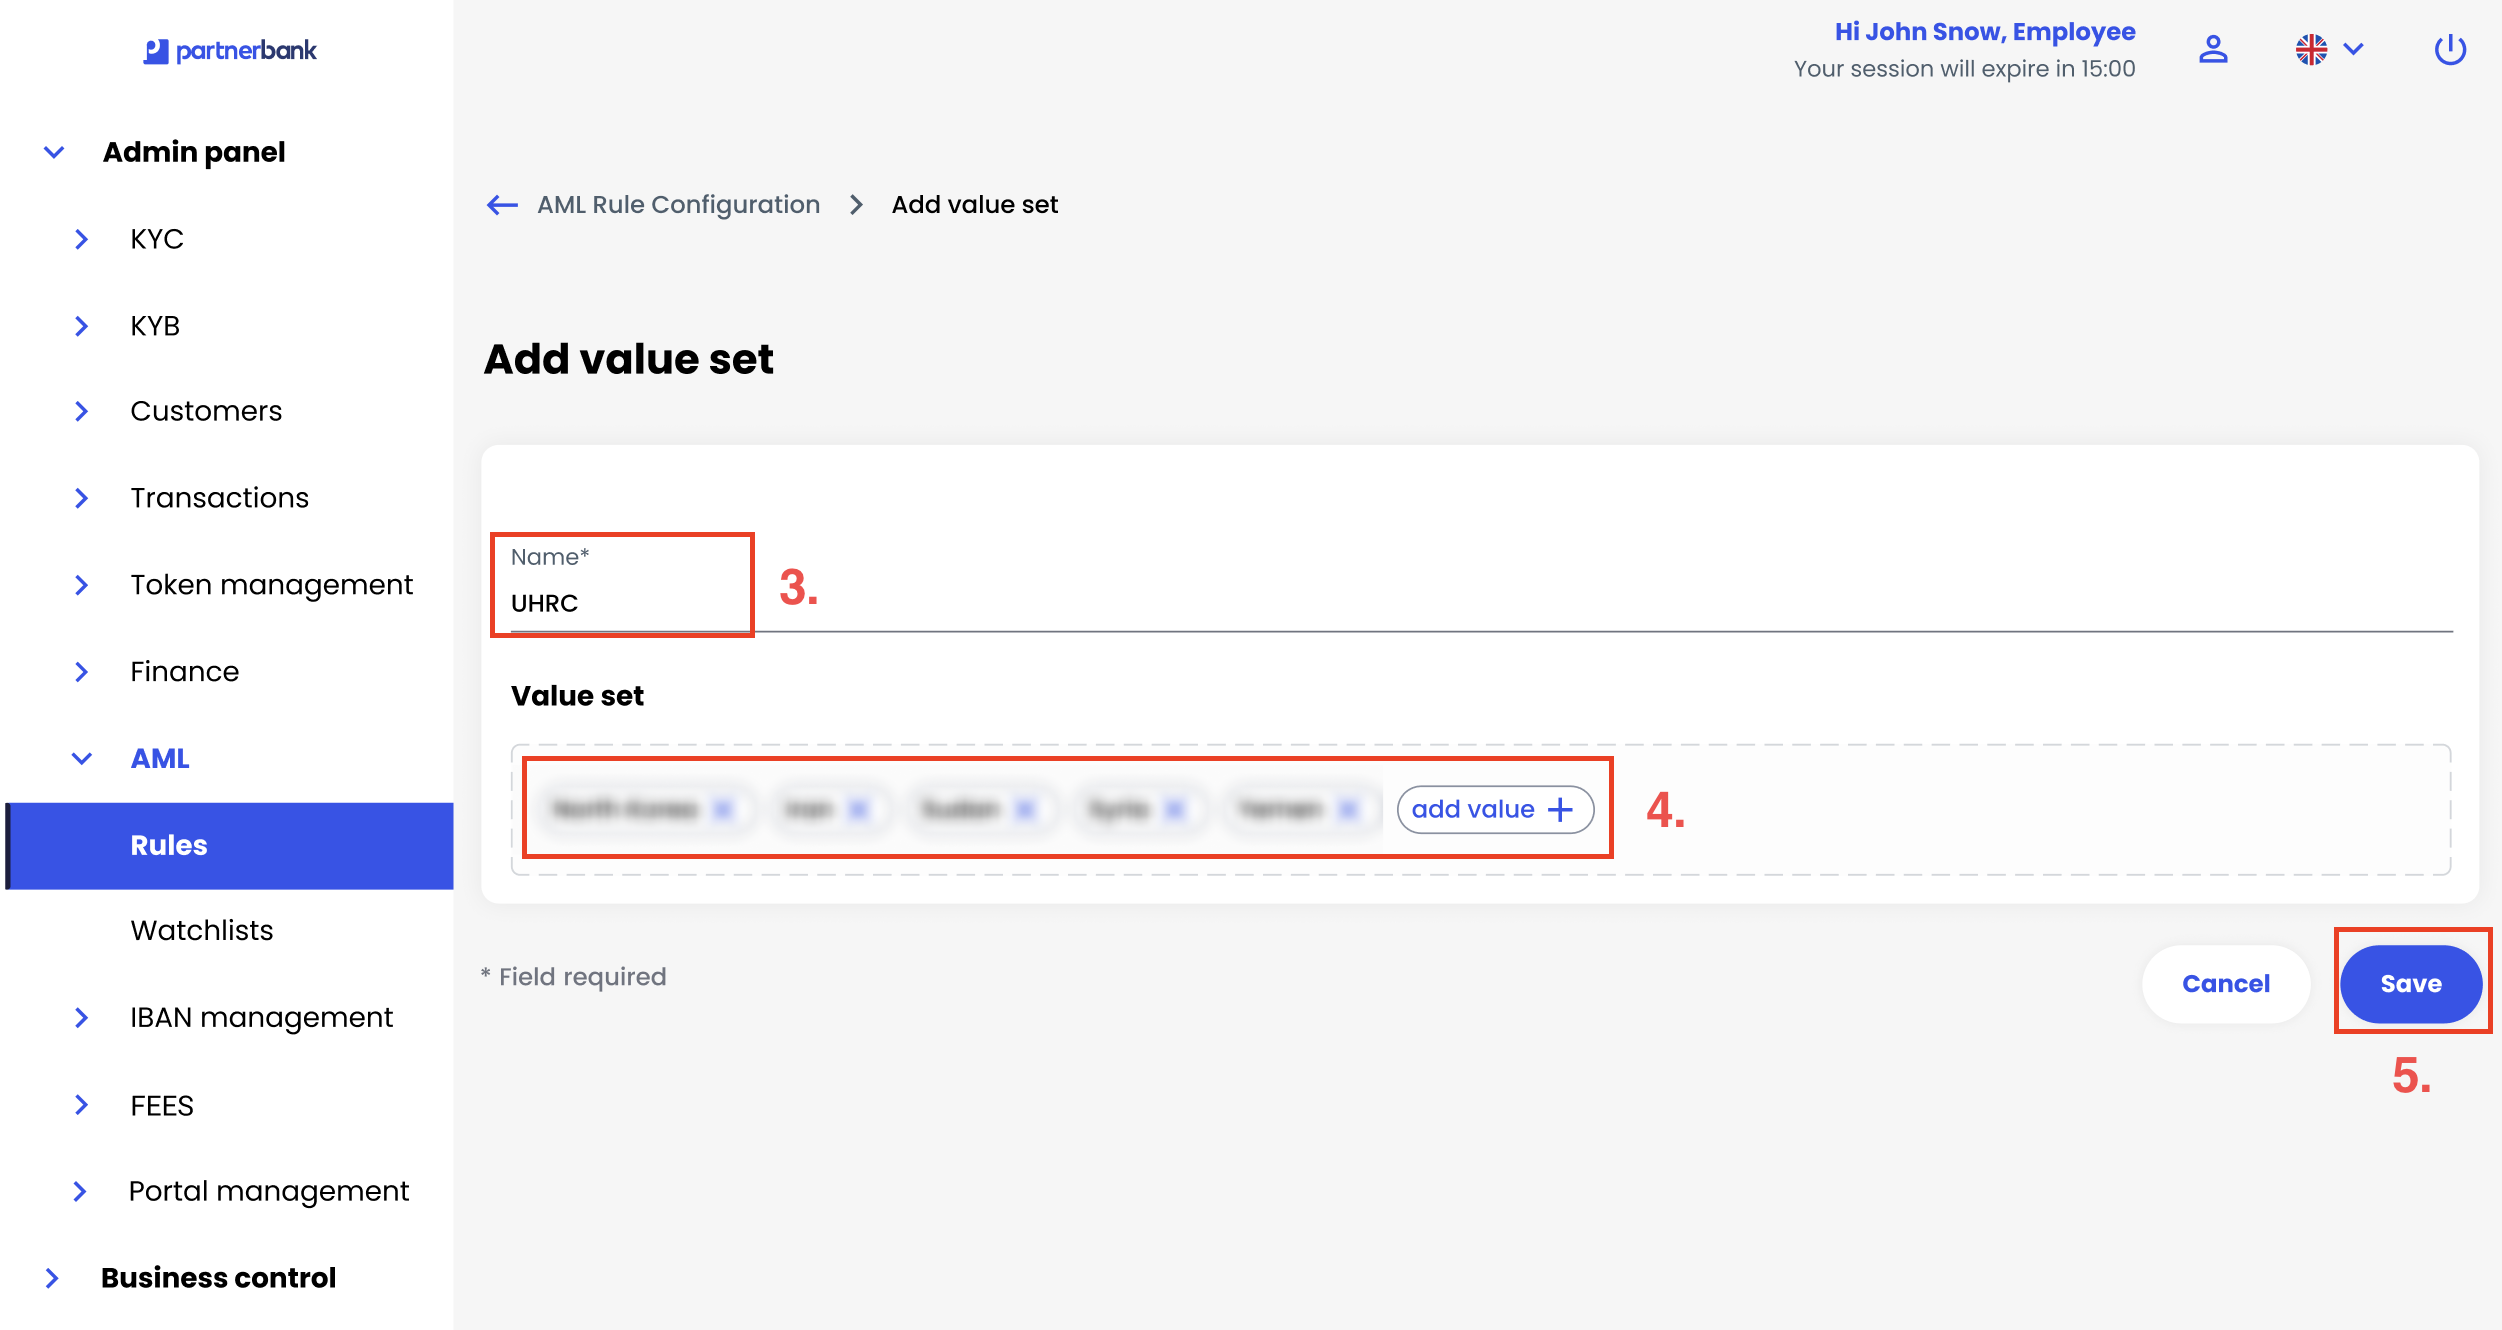
Value sets list
The Value sets tab lists all defined value sets. Each row includes the following columns:
| Column | Description |
| ID (uuid) | Unique identifier of the value set. |
| NAME | The name of the value set. |
| ACTION | Menu containing available operations such as view details, edit or delete. |
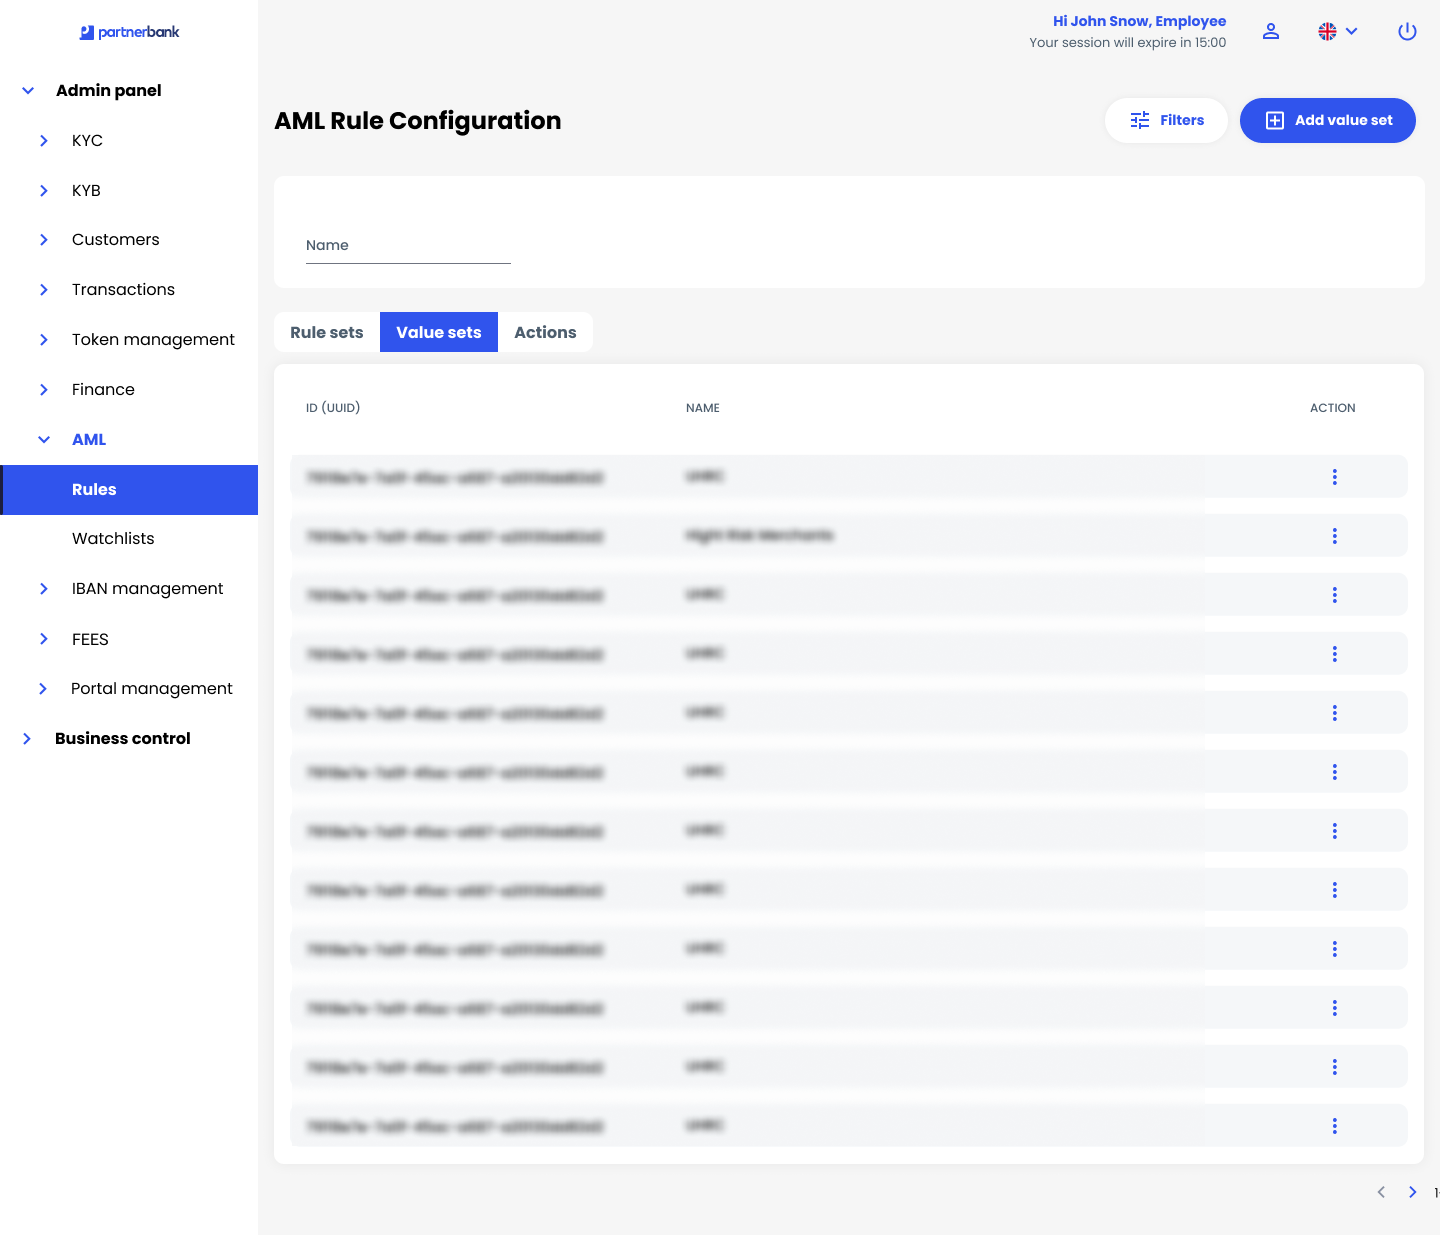
Value set details
Selecting a value set opens a detailed view where you can add or remove individual values. The elements are described below:
| Element | Description |
| Basic data | A panel summarising the value set’s ID (uuid) and Name. |
| ID (uuid) | Unique identifier of the value set. |
| Name | The name of the value set. |
| Value set | The list of values stored in the set. Each value appears as a tag with an option to remove it; new values can be added using an input or the add value + button. |
| Edit button | A button in the top‑right corner that opens the value set edit form. |
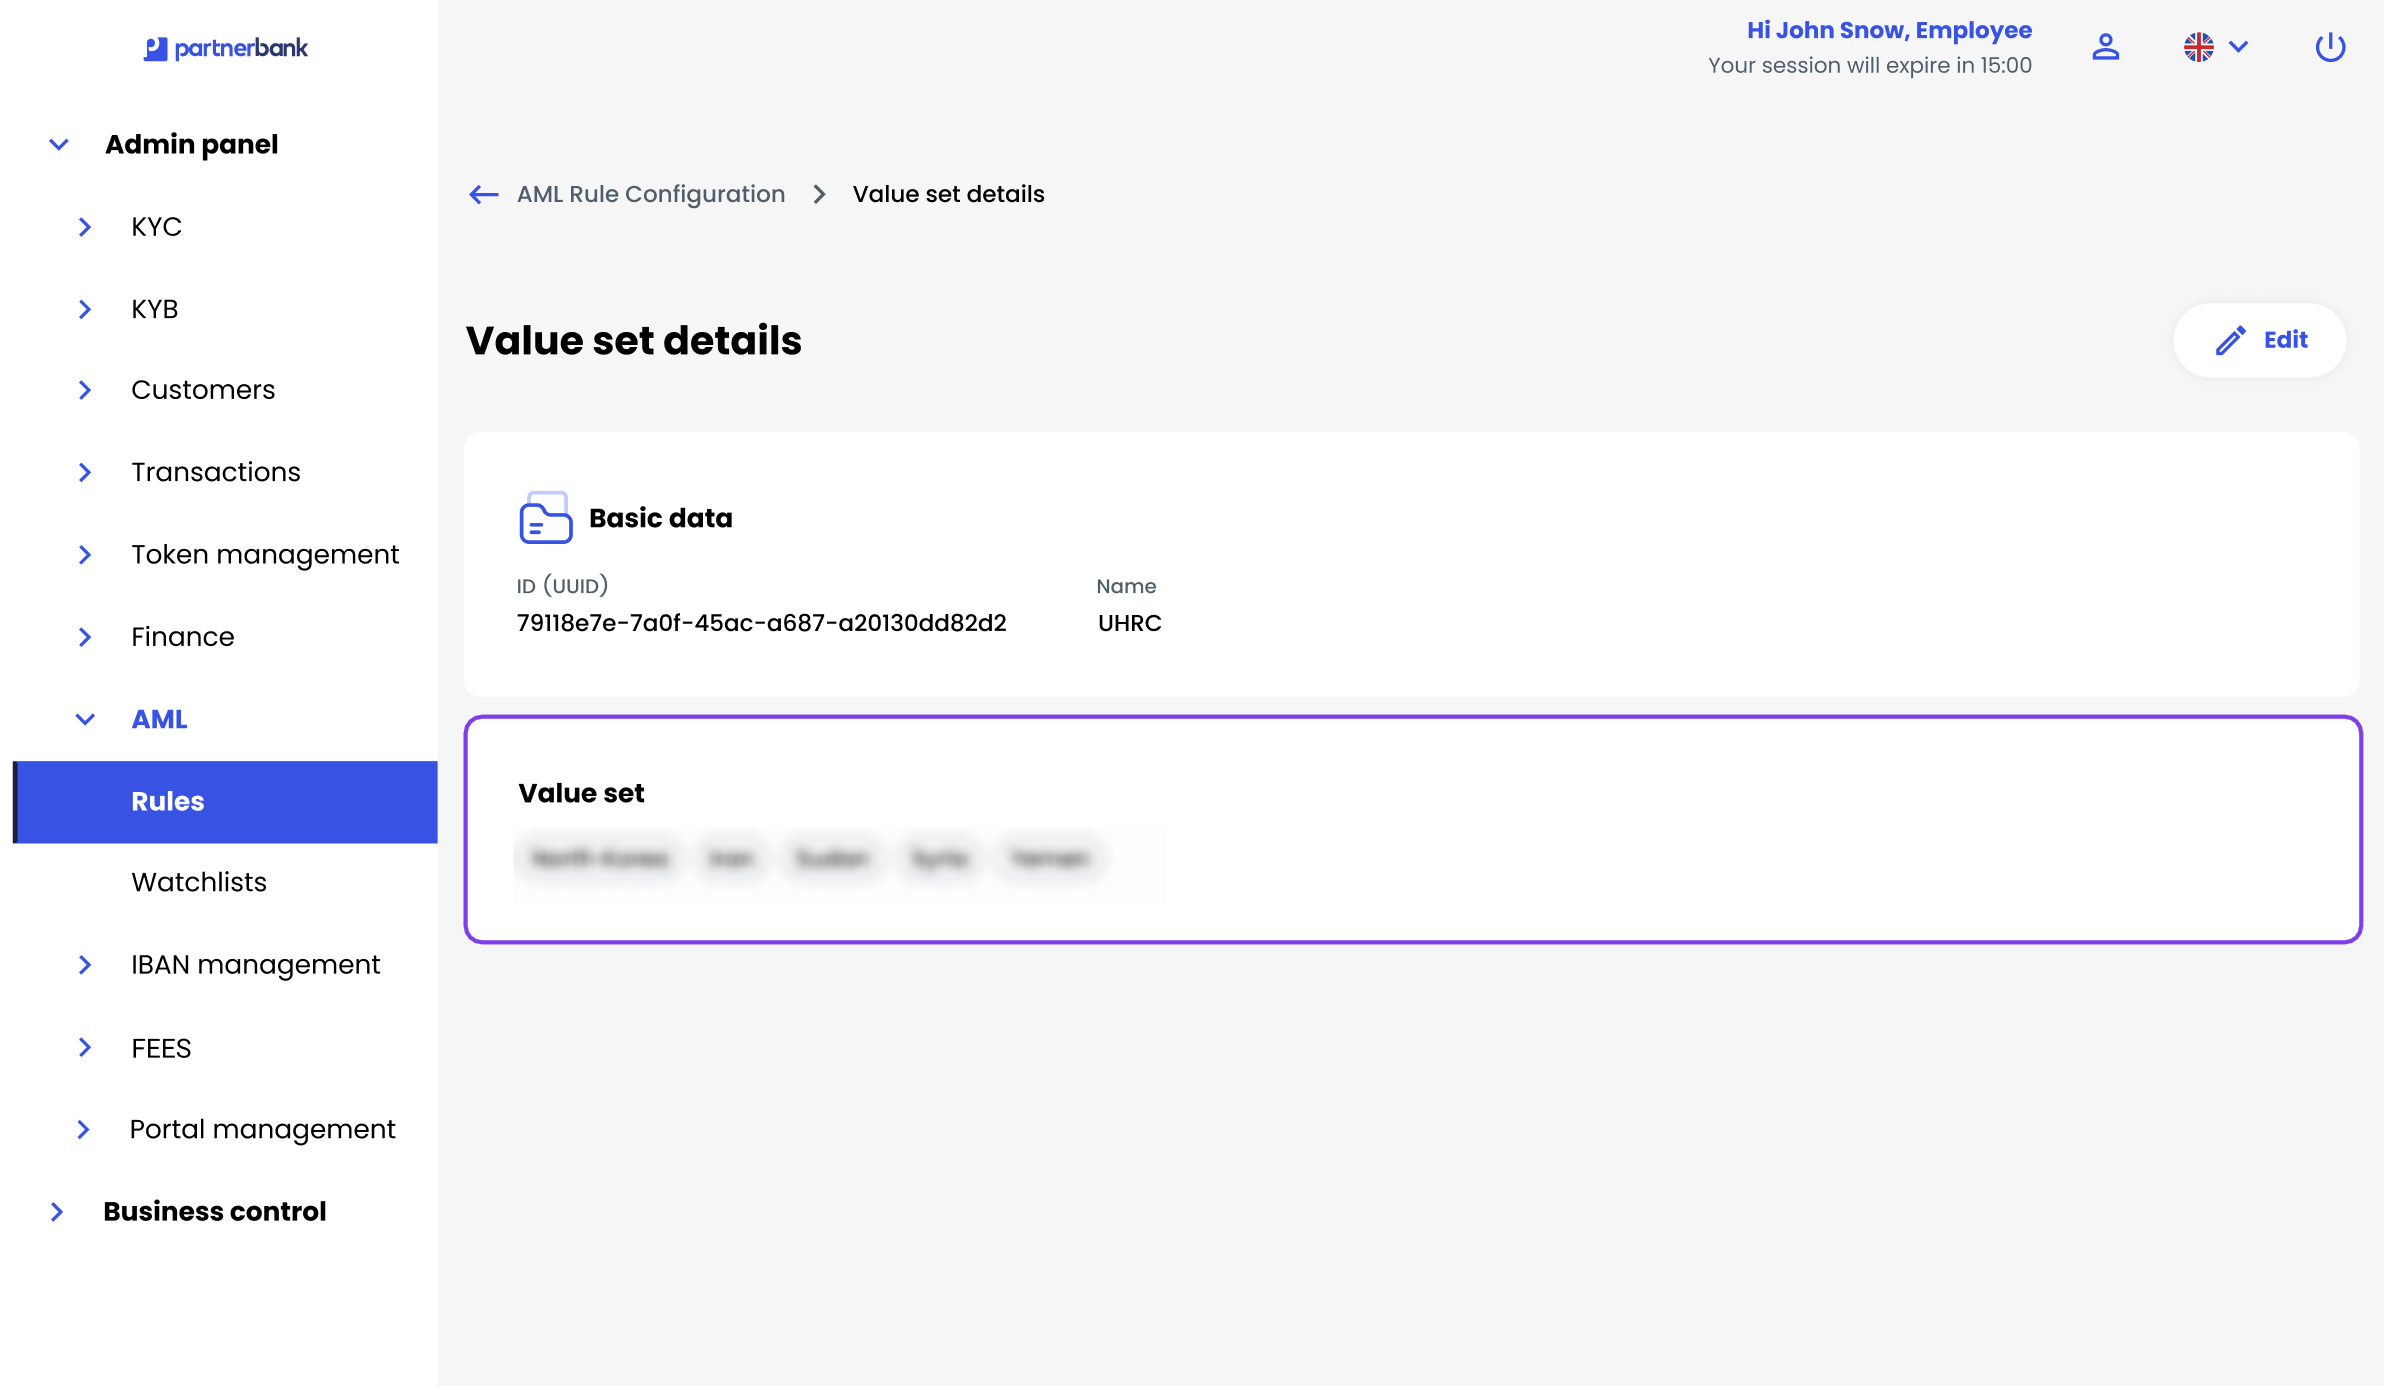
Actions
Defining an action
The table below outlines the steps for creating a new action. A screenshot of the “Add action” page can be placed in the right column.
|
|

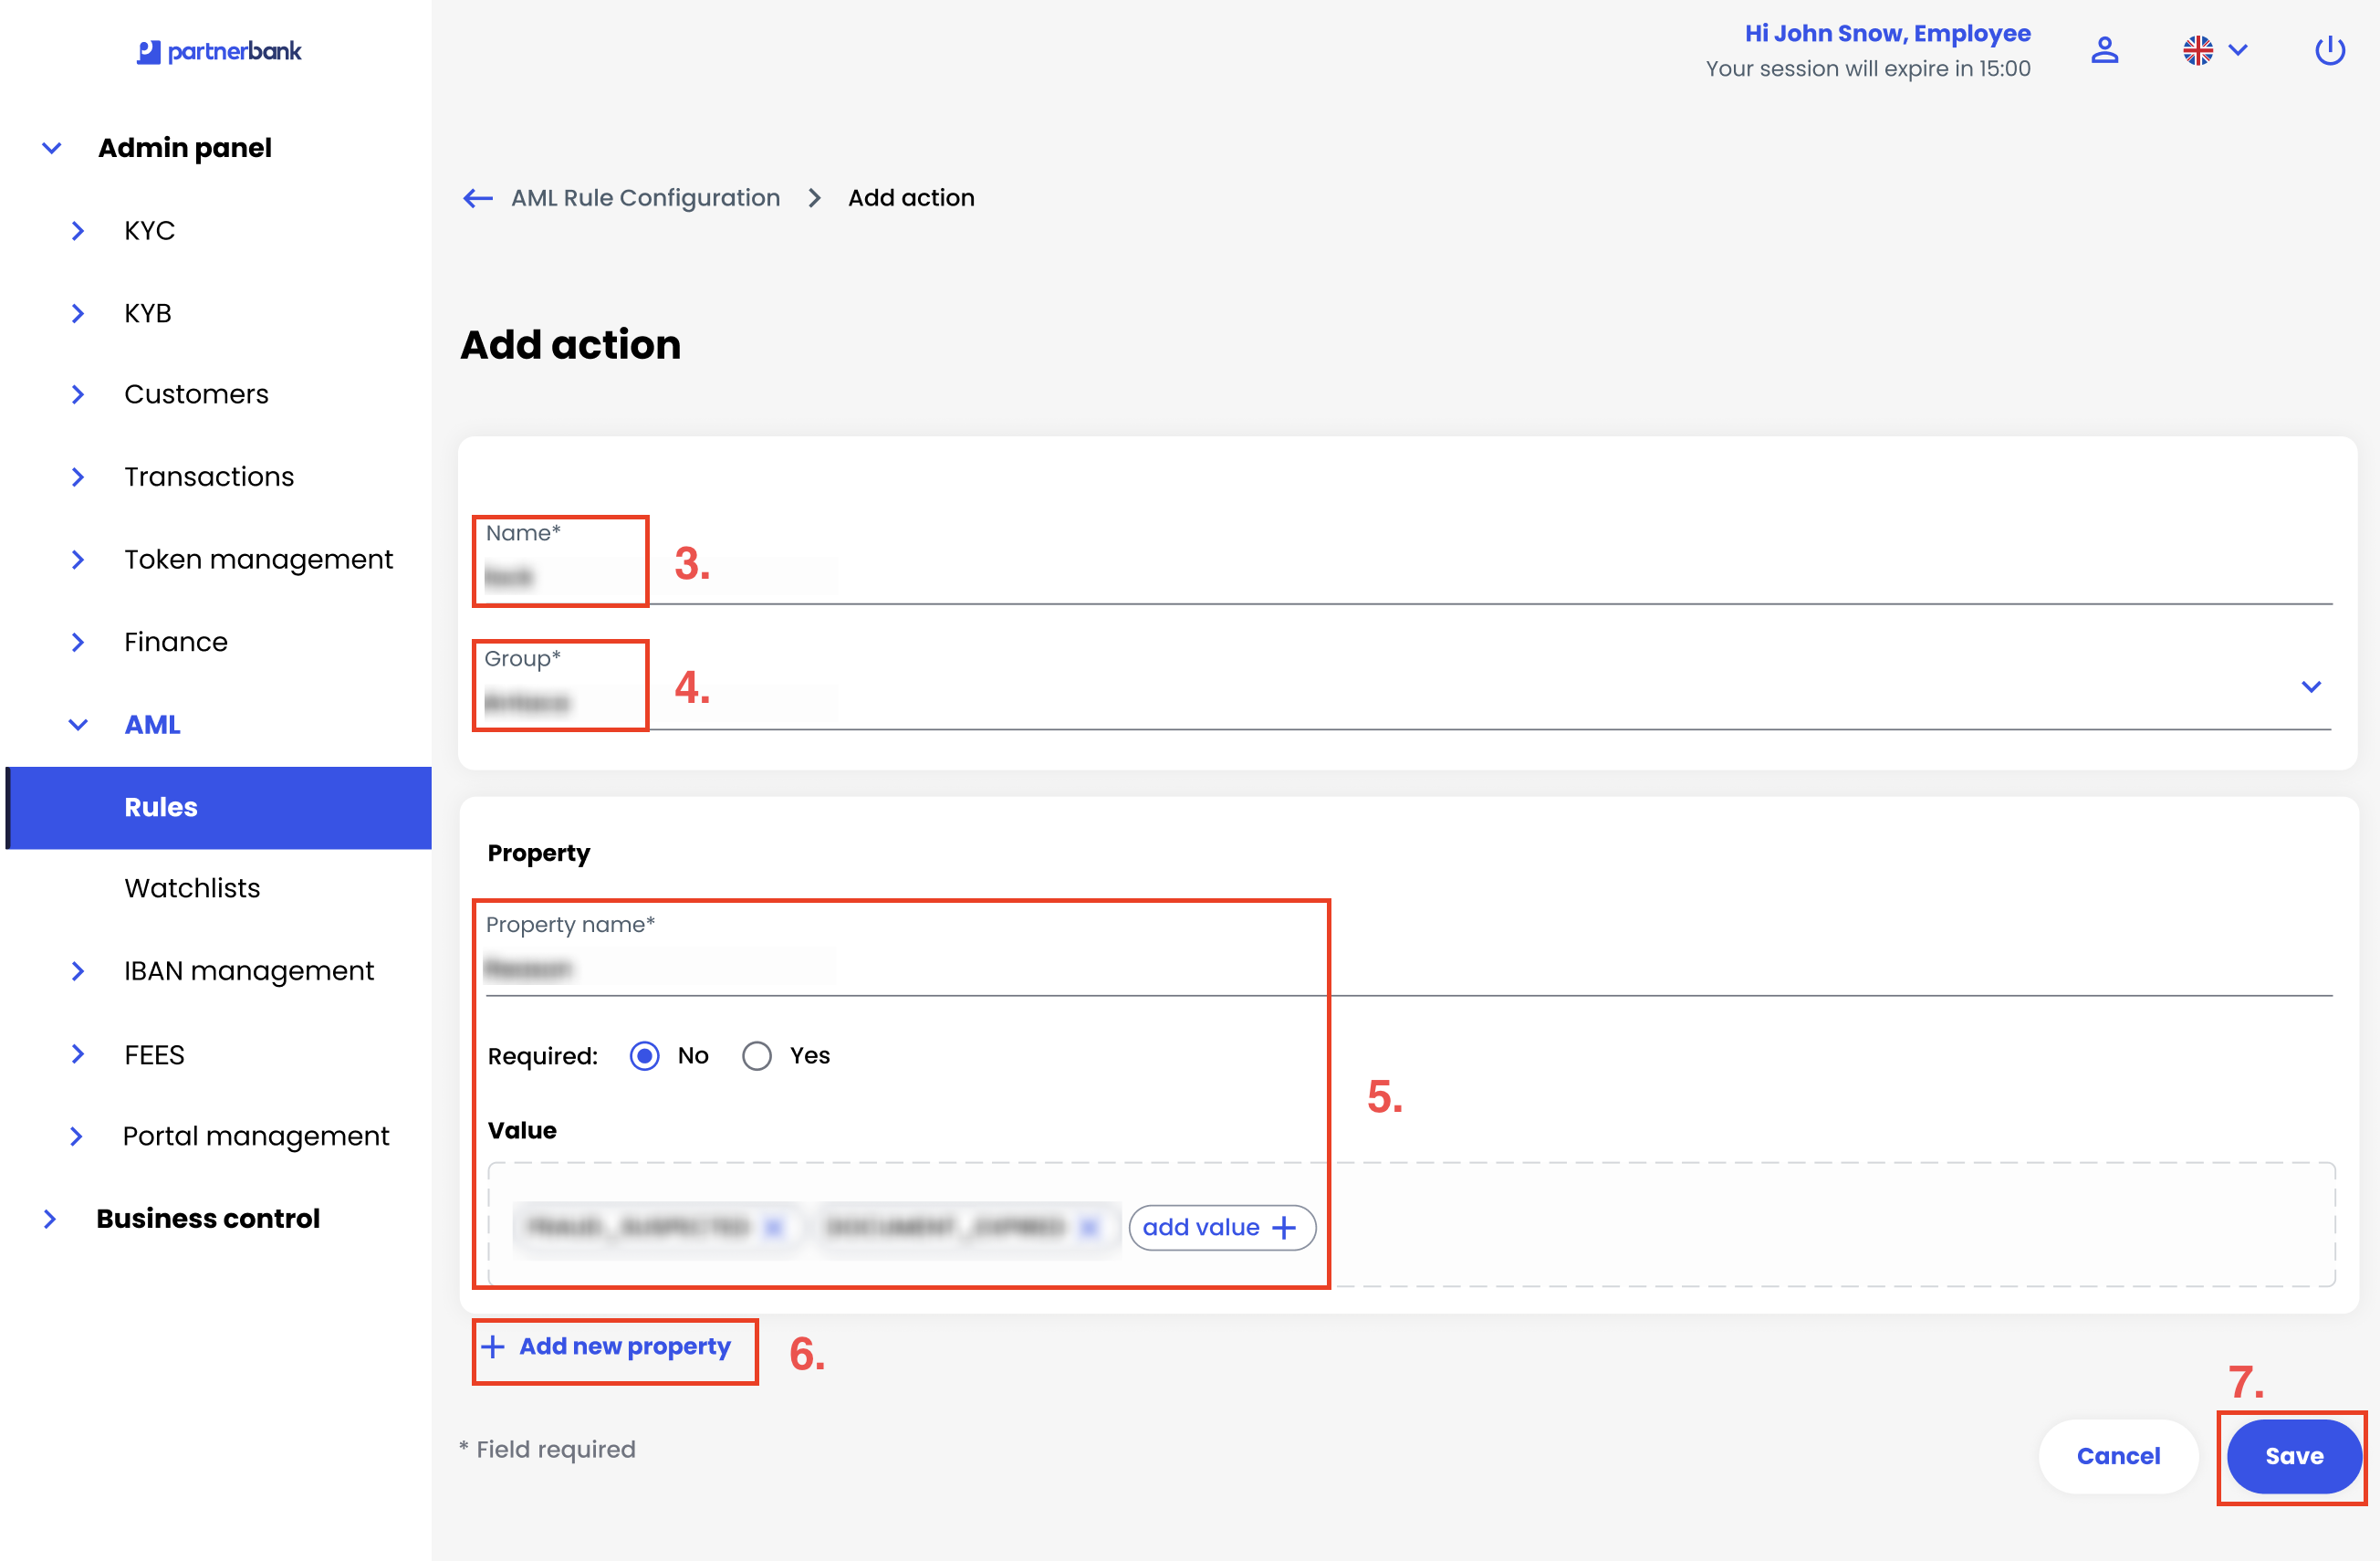
Action list
The Actions tab lists all configured actions. Each row shows:
| Column | Description |
| ID (uuid) | Unique identifier of the action. |
| NAME | The name of the action. |
| GROUP | The group to which the action belongs. |
| ACTION | Menu containing available operations such as view details, edit or delete. |

Action details
Clicking an action opens a details page that displays its configuration. The table below describes each element.
| Element | Description |
| Basic data | A panel summarising the action’s ID (uuid), Name and Group. |
| ID (uuid) | Unique identifier of the action. |
| Name | The name of the action. |
| Group | The group to which the action belongs. |
| Property | Details for each property defined in the action. Each property contains a name, a required flag and a list of values. |
| Property name | The name of the property (e.g. resource_type). |
| Required | Indicates whether the property is mandatory (true) or optional (false). |
| Values | The allowed values for the property, shown as tags (e.g. FRAUD_SUSPECTED, DOCUMENT_EXPIRED). |
| Edit button | A button that opens the action edit form. |
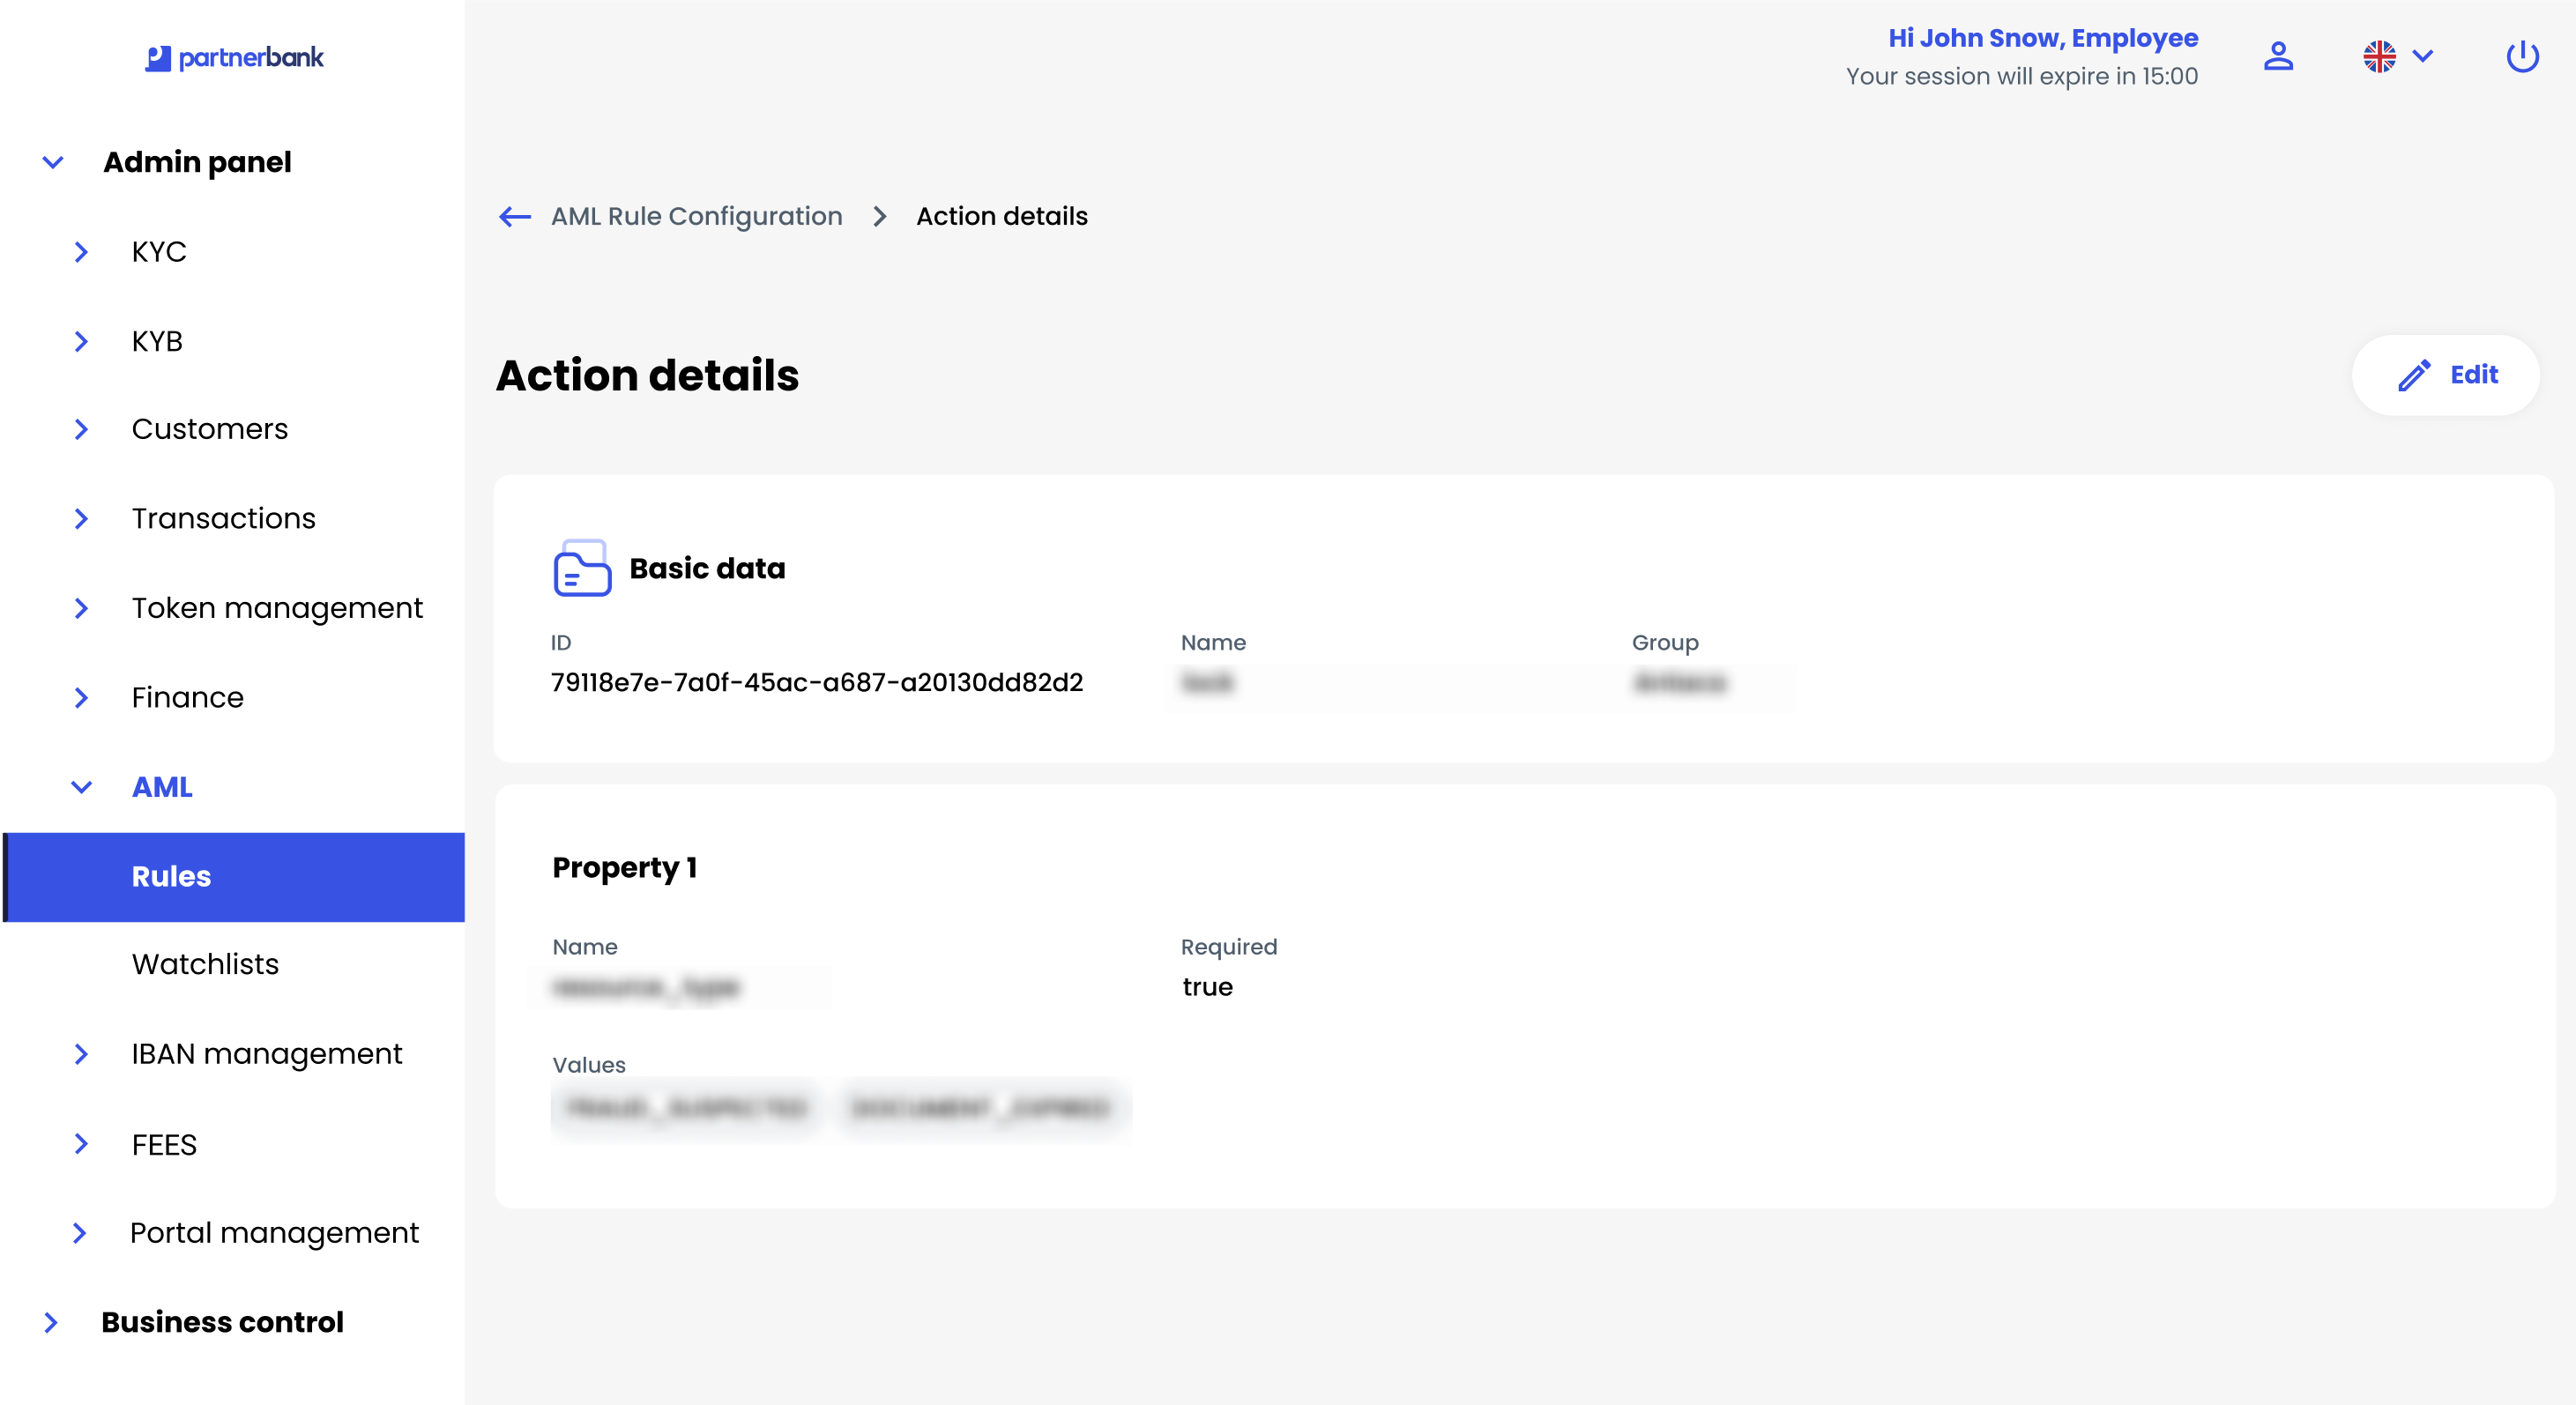
WATCHLISTS
The system supports two watchlist types: Blacklist and Greylist. Both lists are managed identically; you can switch between them using the tabs at the top of the watchlist management page.
Blacklist
Adding a user
|
|
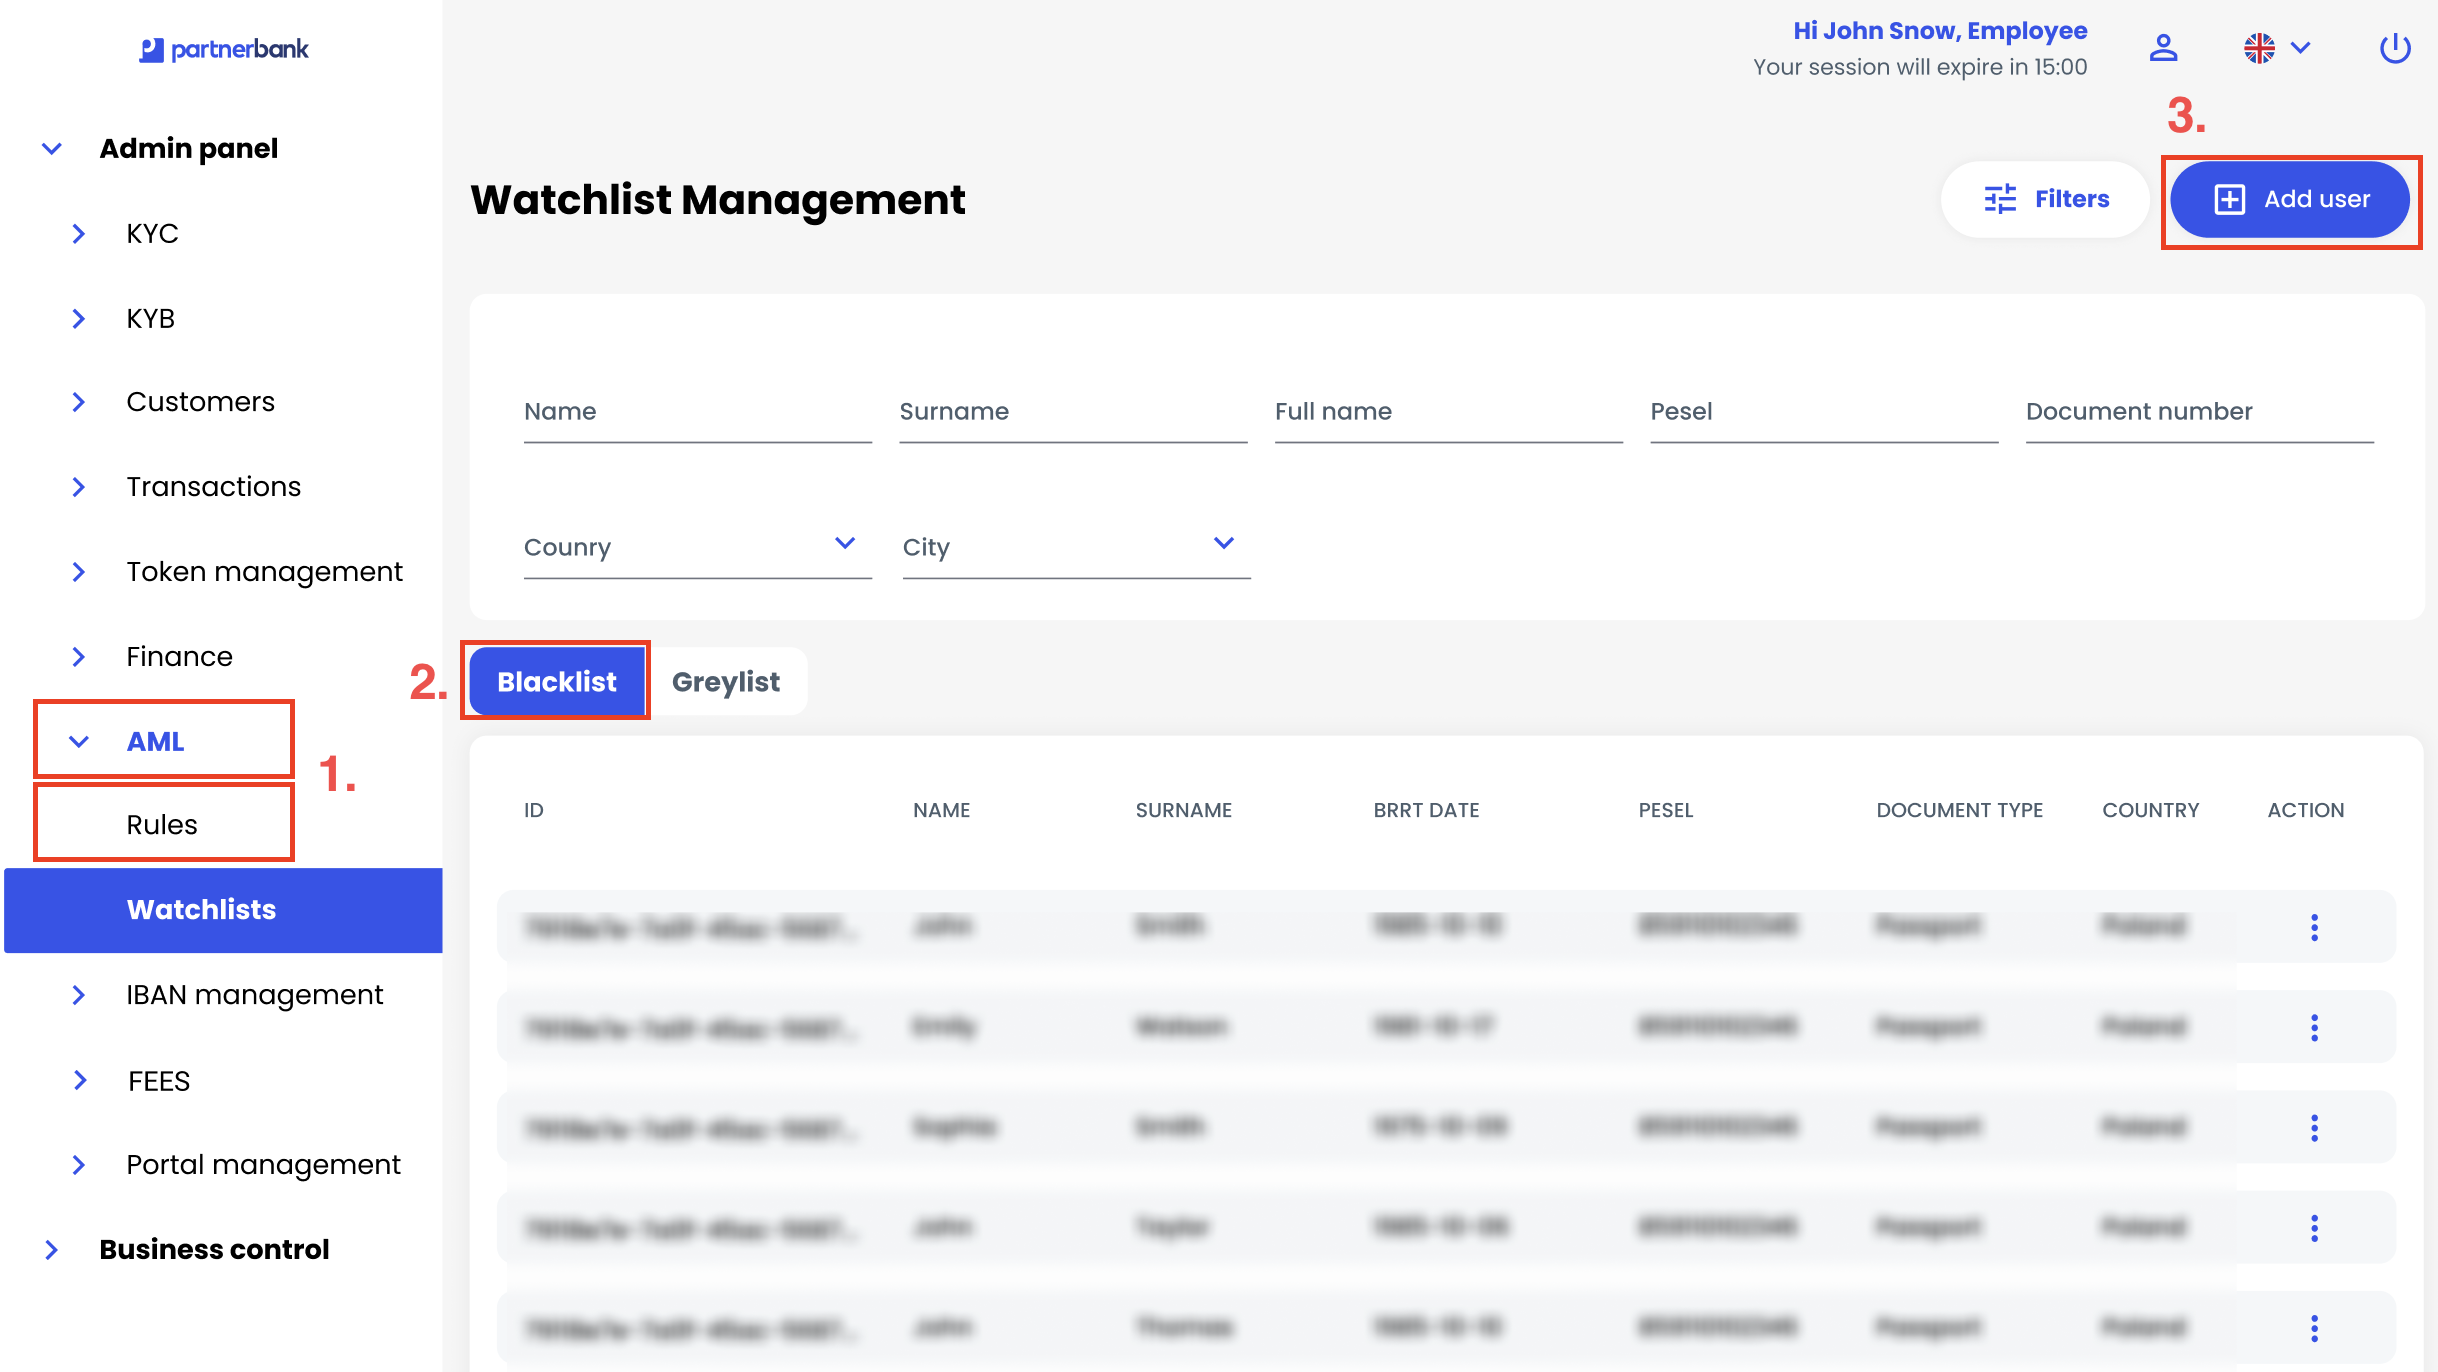
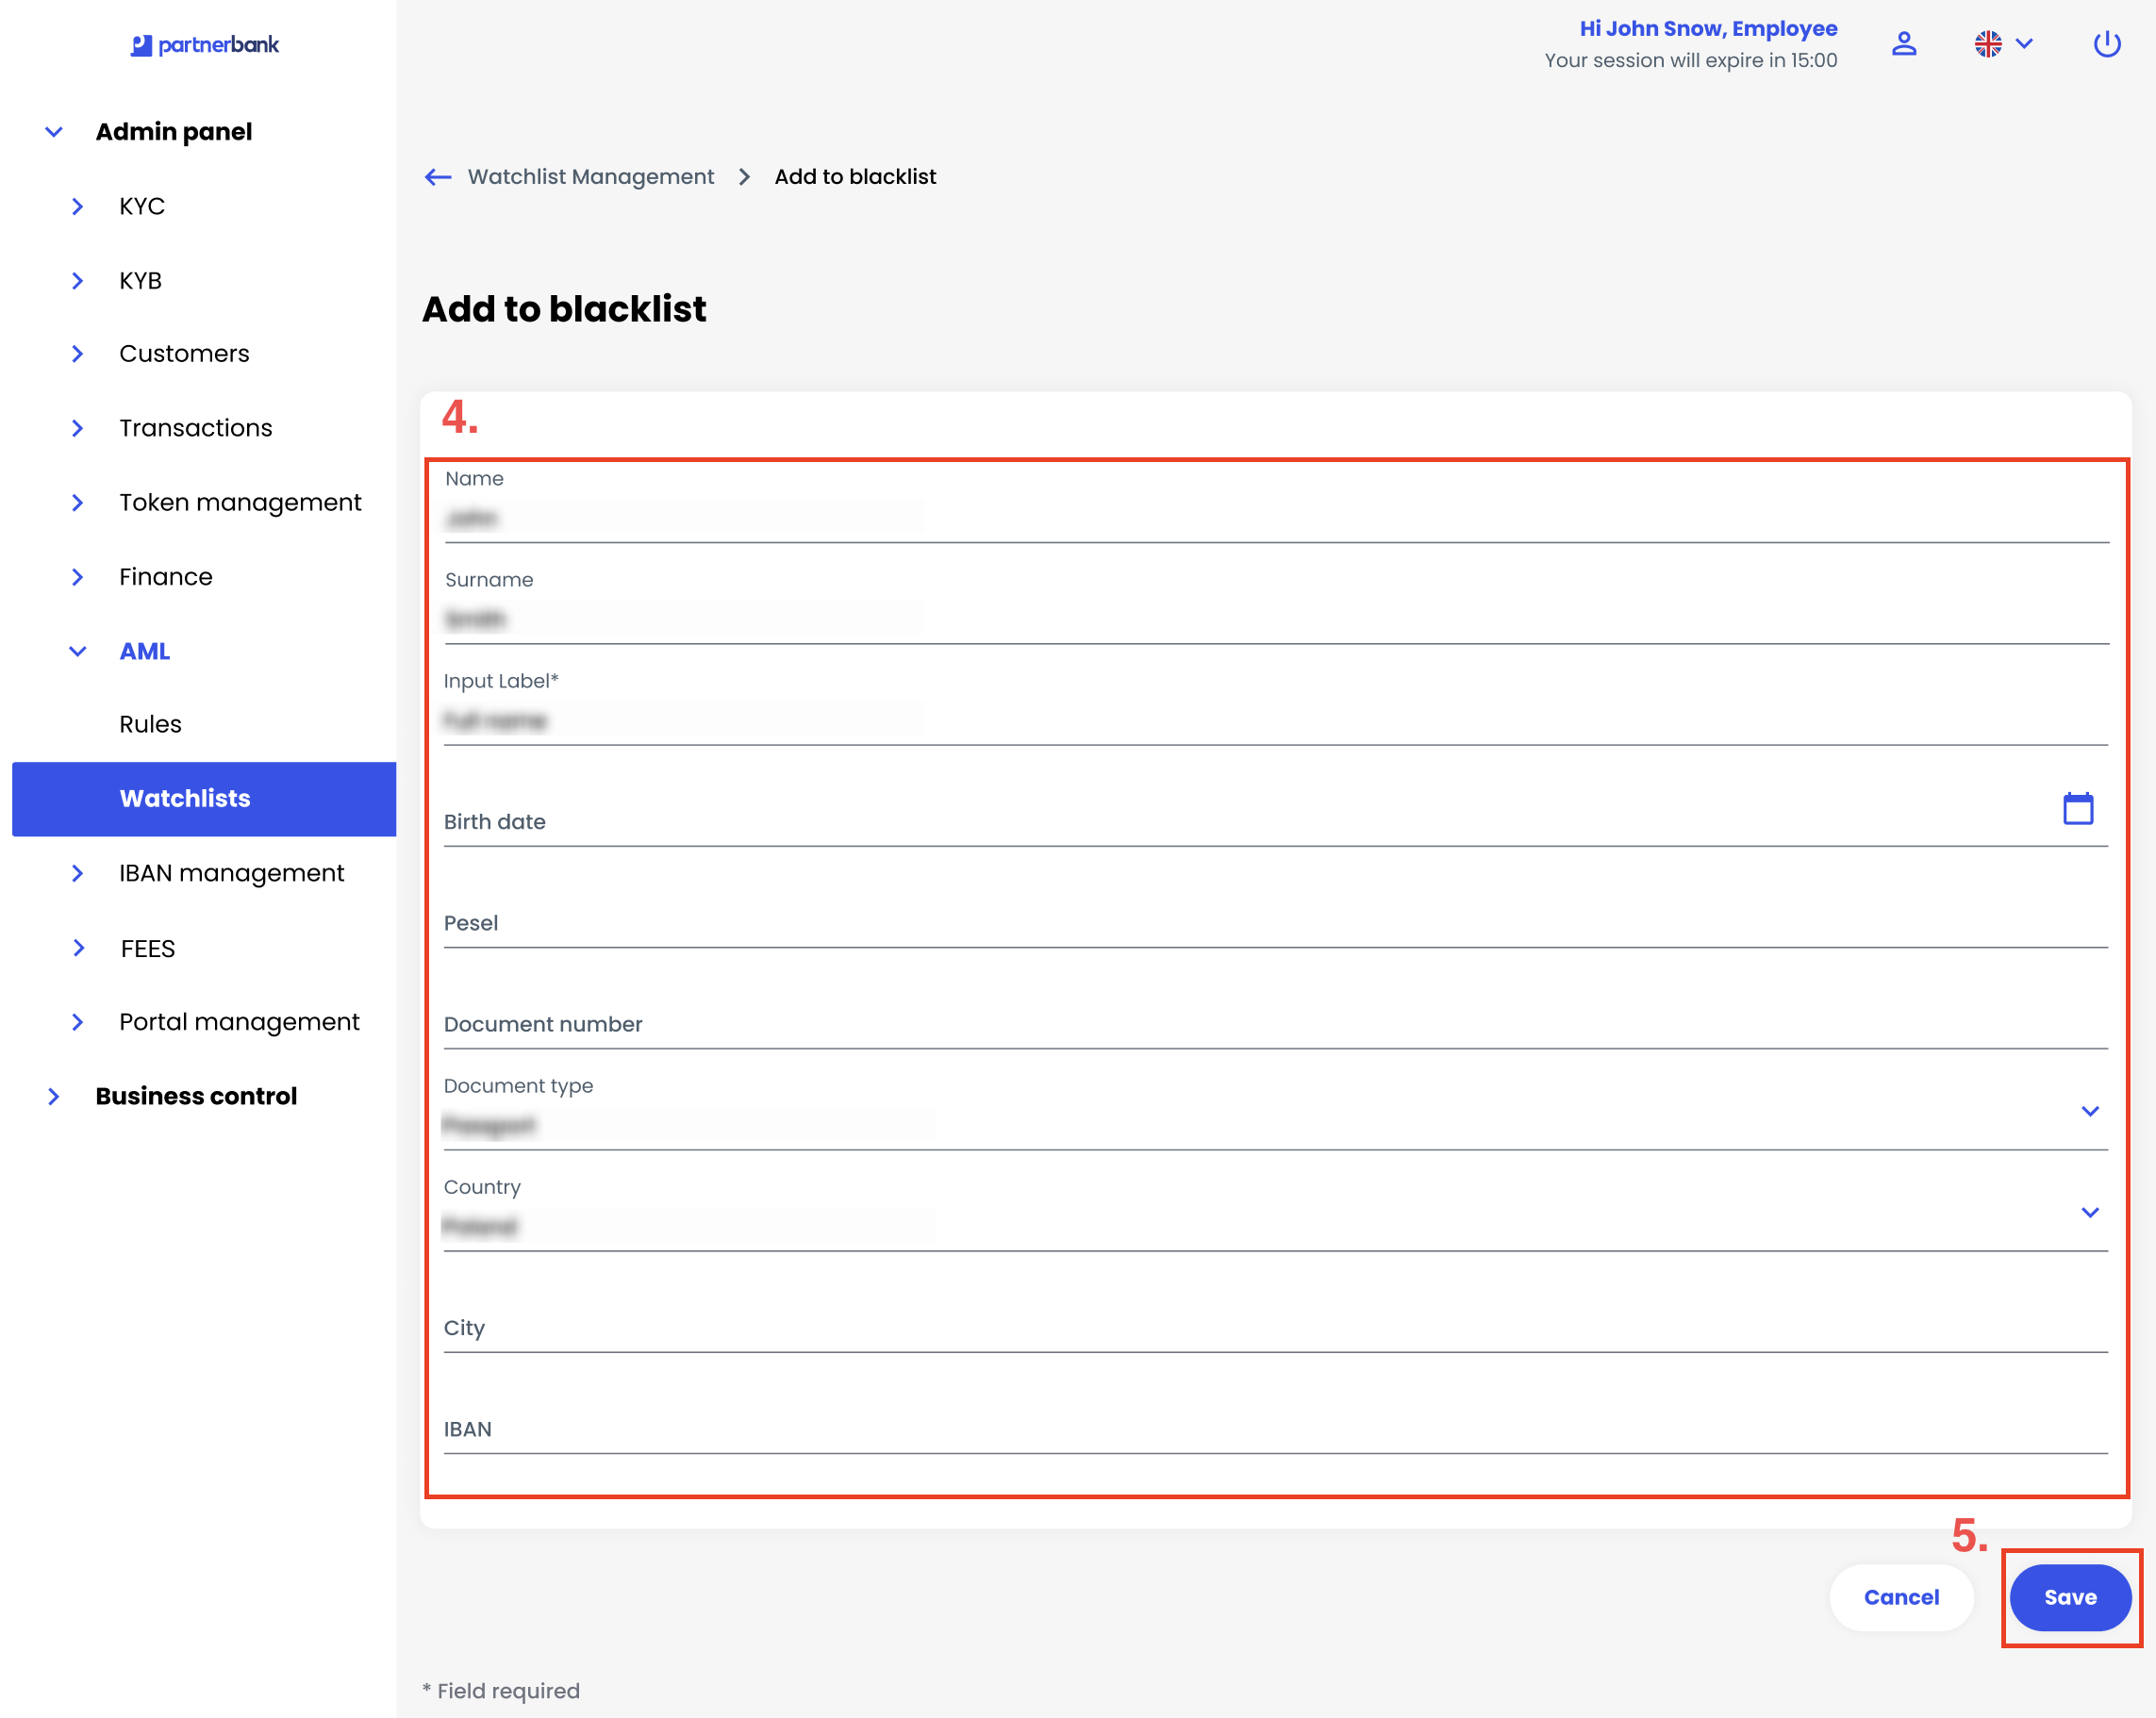
User information fields:
| Field | Description |
| Name | User’s first name (required). |
| Surname | User’s surname (required). |
| Full name | The person’s full name (first and last names together). |
| Birth date | Date of birth (required). |
| Pesel | Personal identification number (PESEL) (required). |
| Document number | Identification document number (required). |
| Document type | Select from dropdown (Passport, ID card, etc.). |
| Country | Select country from dropdown. |
| City | Enter city name. |
| IBAN | Bank account number (if applicable). |
Important: Adding a user to a watchlist does not automatically trigger any actions. A ruleset must reference the watchlist to determine whether to approve, decline or place a transaction on hold.
Removing a user
|
|
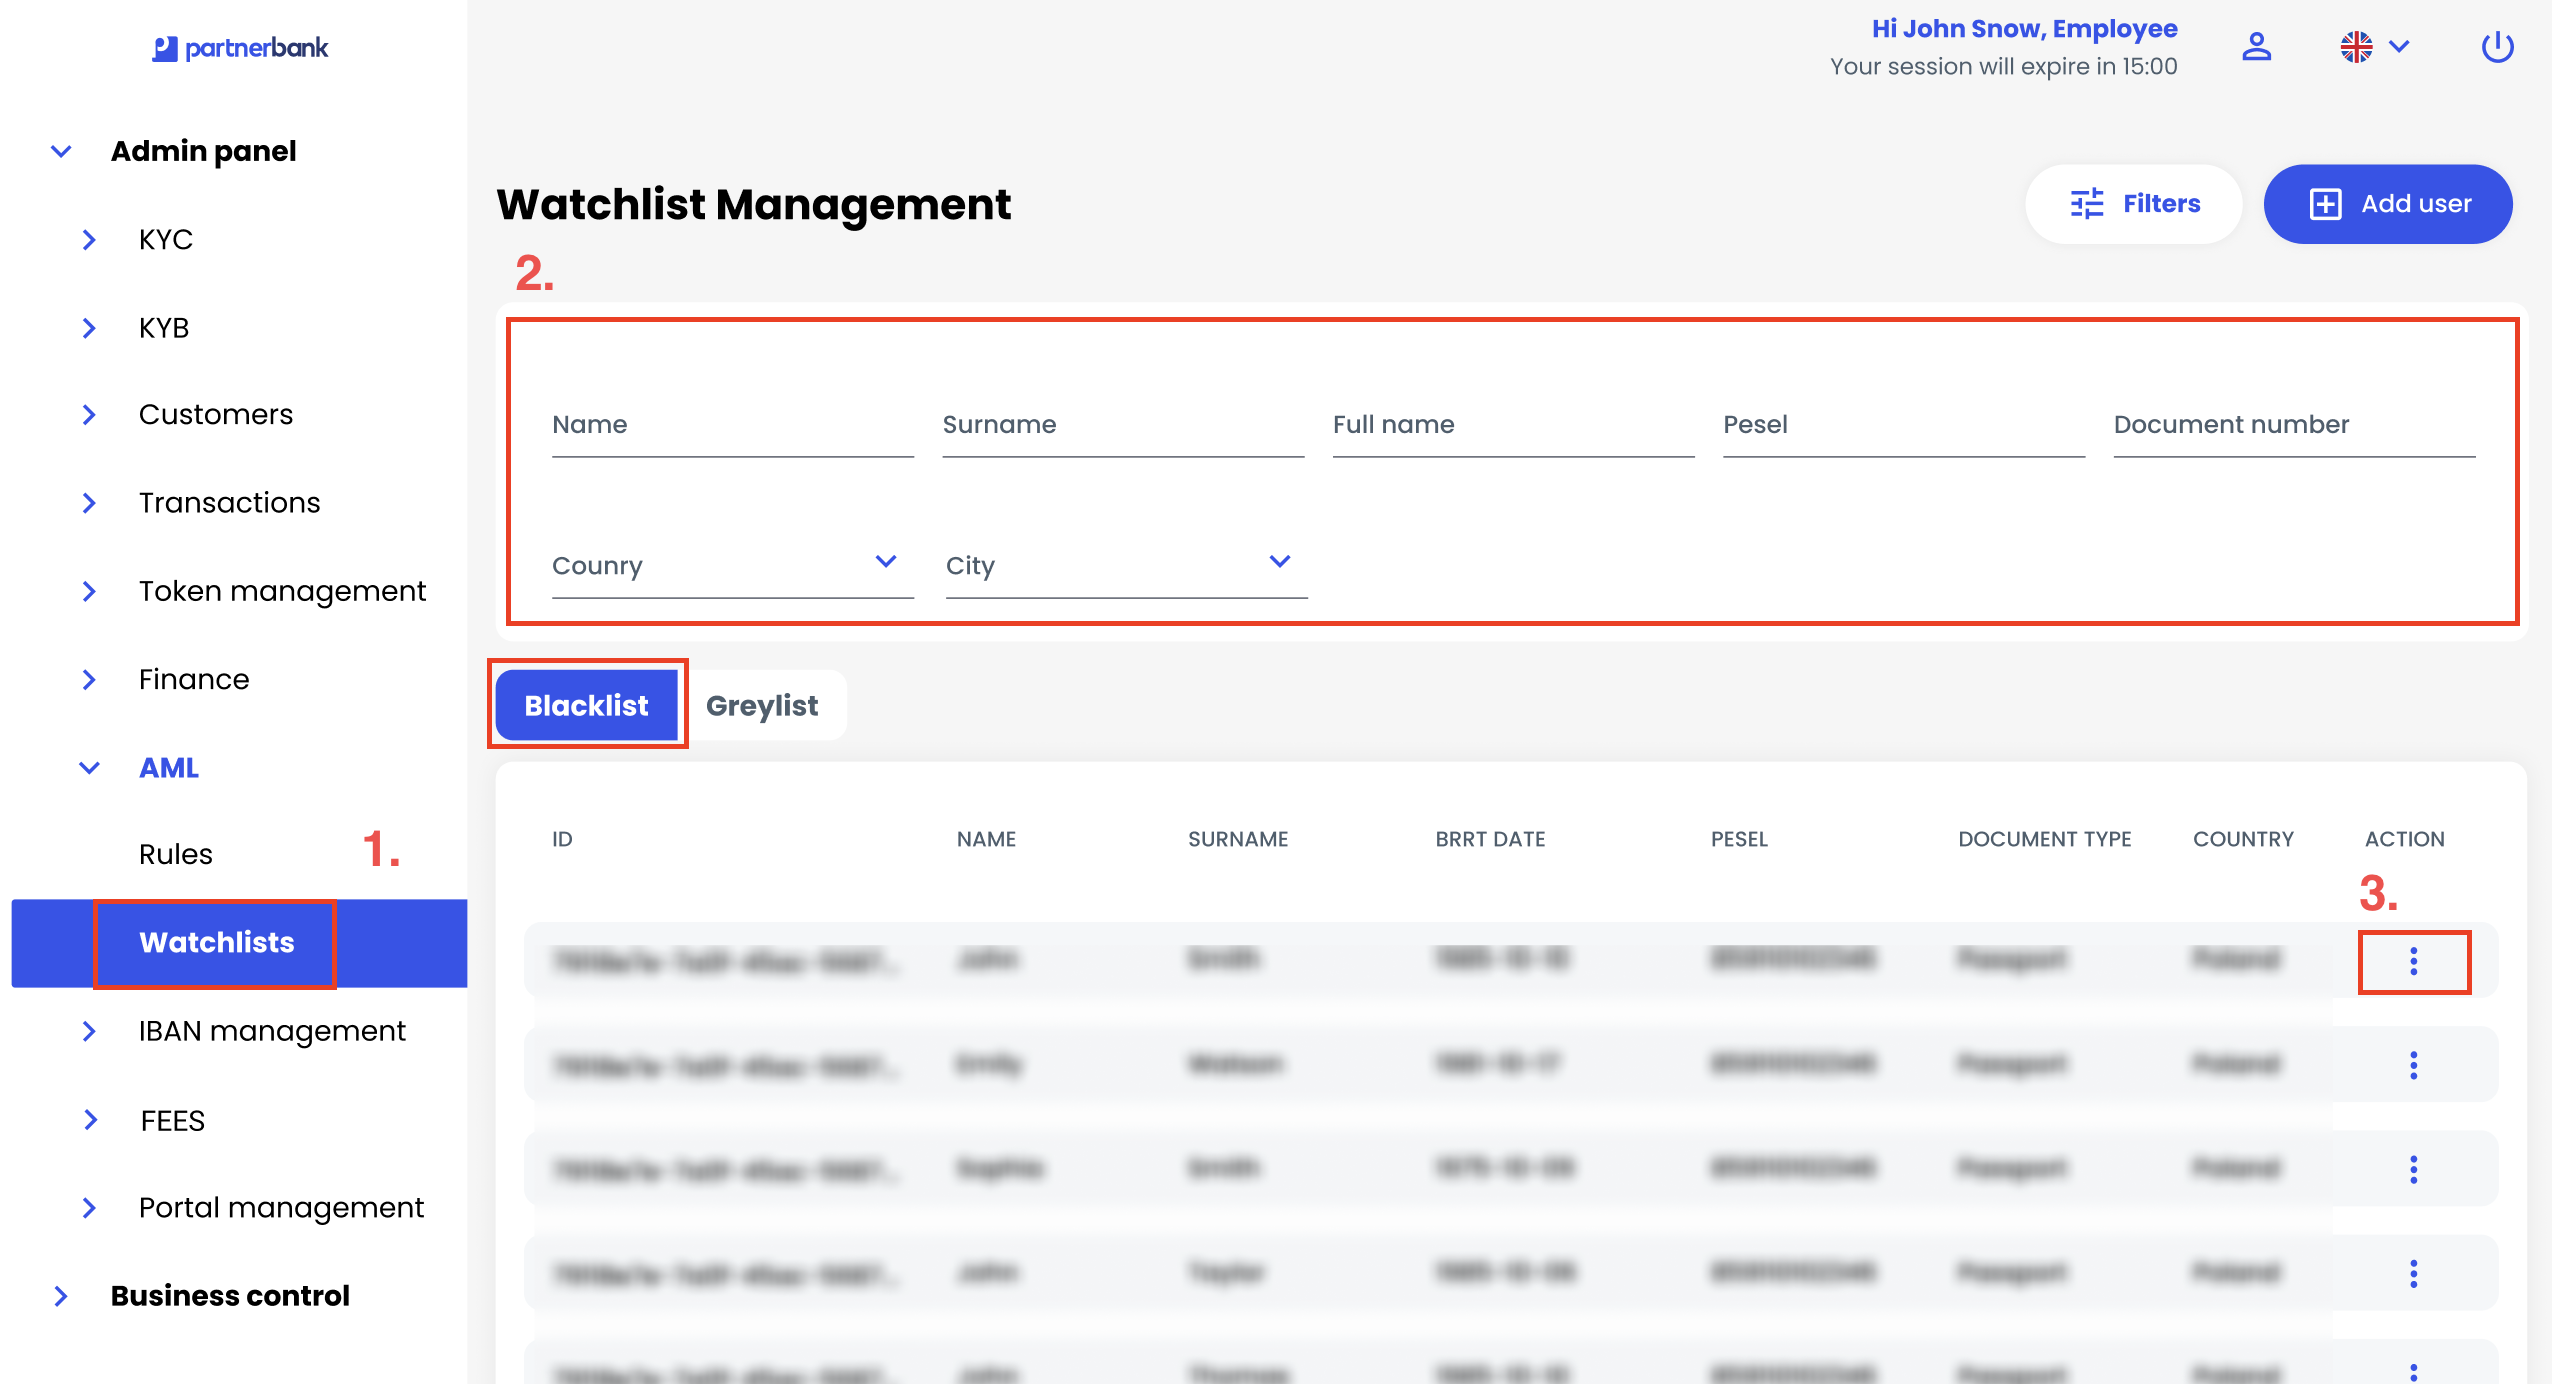
Searching and filtering
The watchlist management page includes filters to narrow down the list of users:
| Filter | Description |
| Name | Filter by name (first name). |
| Surname | Filter by surname. |
| Full name | Filter by full name (first and last names together). |
| Pesel | Filter by personal identification number (PESEL). |
| Document number | Filter by identification document number. |
| Country | Filter by country (dropdown). |
| City | Filter by city. |
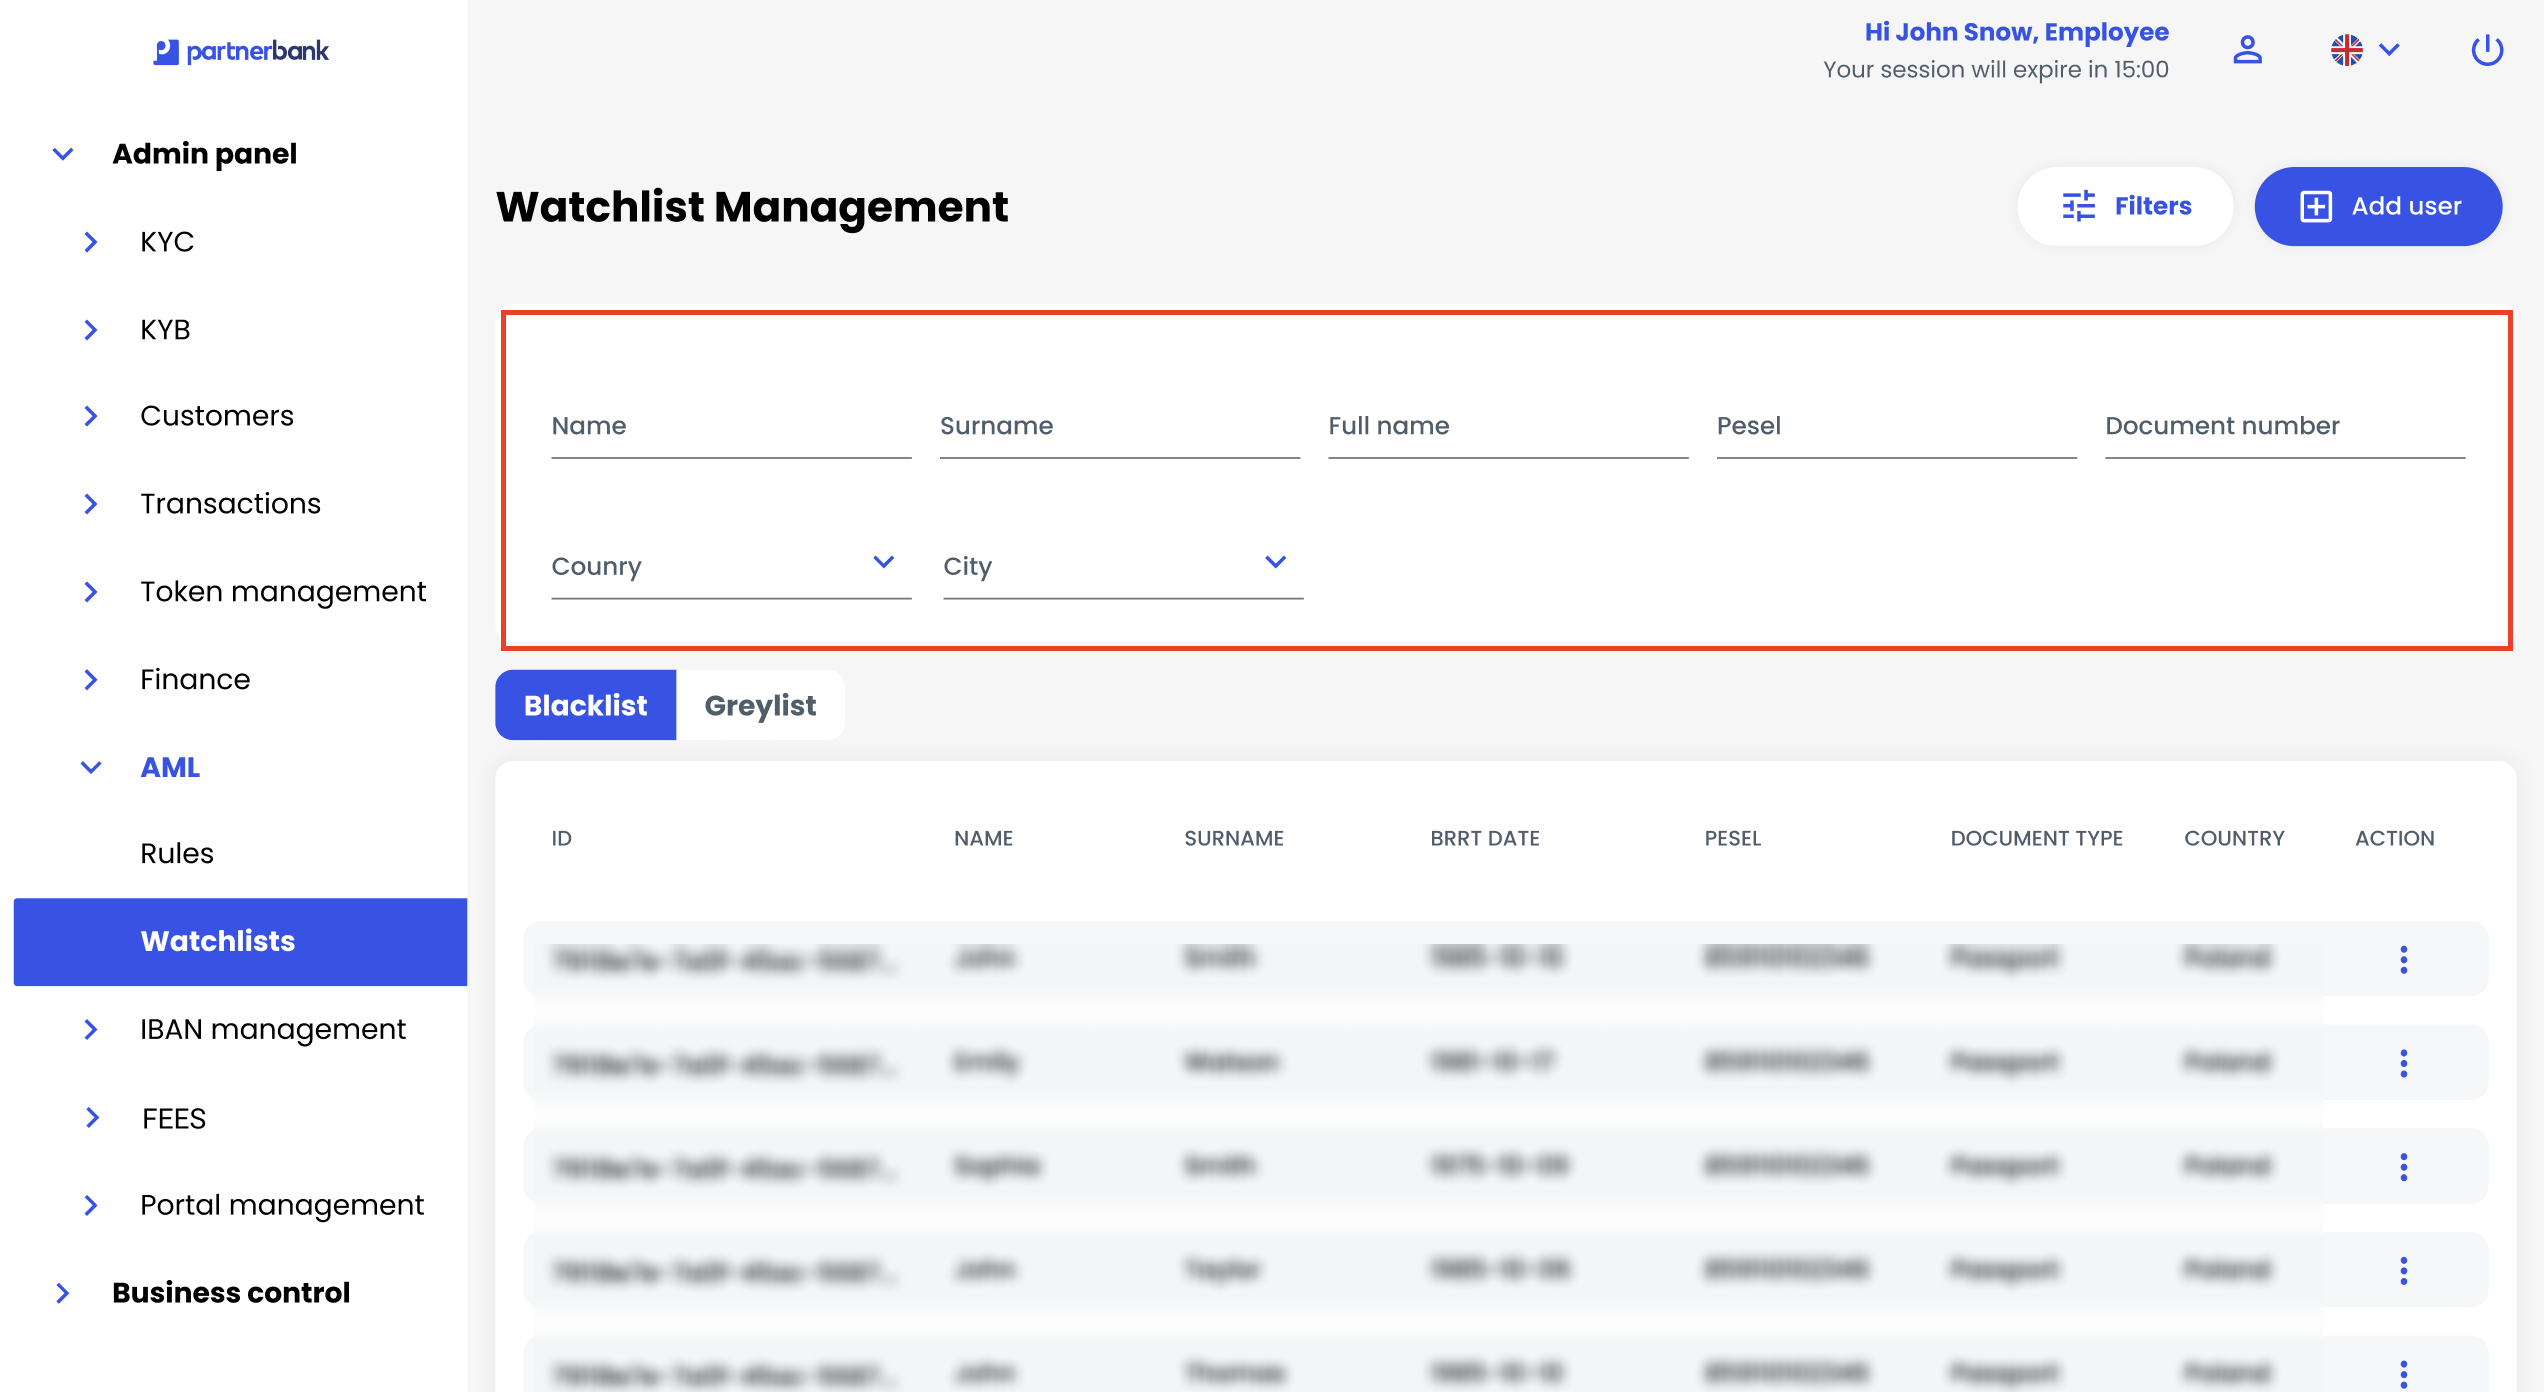
Blacklist table
The blacklist displays the following columns for each entry:
| Column | Description |
| ID | Internal identifier for the entry (UUID shown truncated). |
| NAME | First name of the user. |
| SURNAME | Surname of the user. |
| BIRTH DATE | Birth date of the user. |
| PESEL | Personal identification number (PESEL for Polish users). |
| DOCUMENT TYPE | Type of identification document. |
| COUNTRY | Country. |
| ACTIONS | Menu for managing the entry (delete). |

Blacklist record details
To view detailed information about a specific entry on the blacklist, click on the row in the table. An expanded section will appear below the row showing additional details about the user:
| Field | Description |
| Full name | The user’s full name. |
| Document number | The identification document number associated with the user. |
| City | The user’s city. |
| IBAN | The user’s bank account number, if provided. |
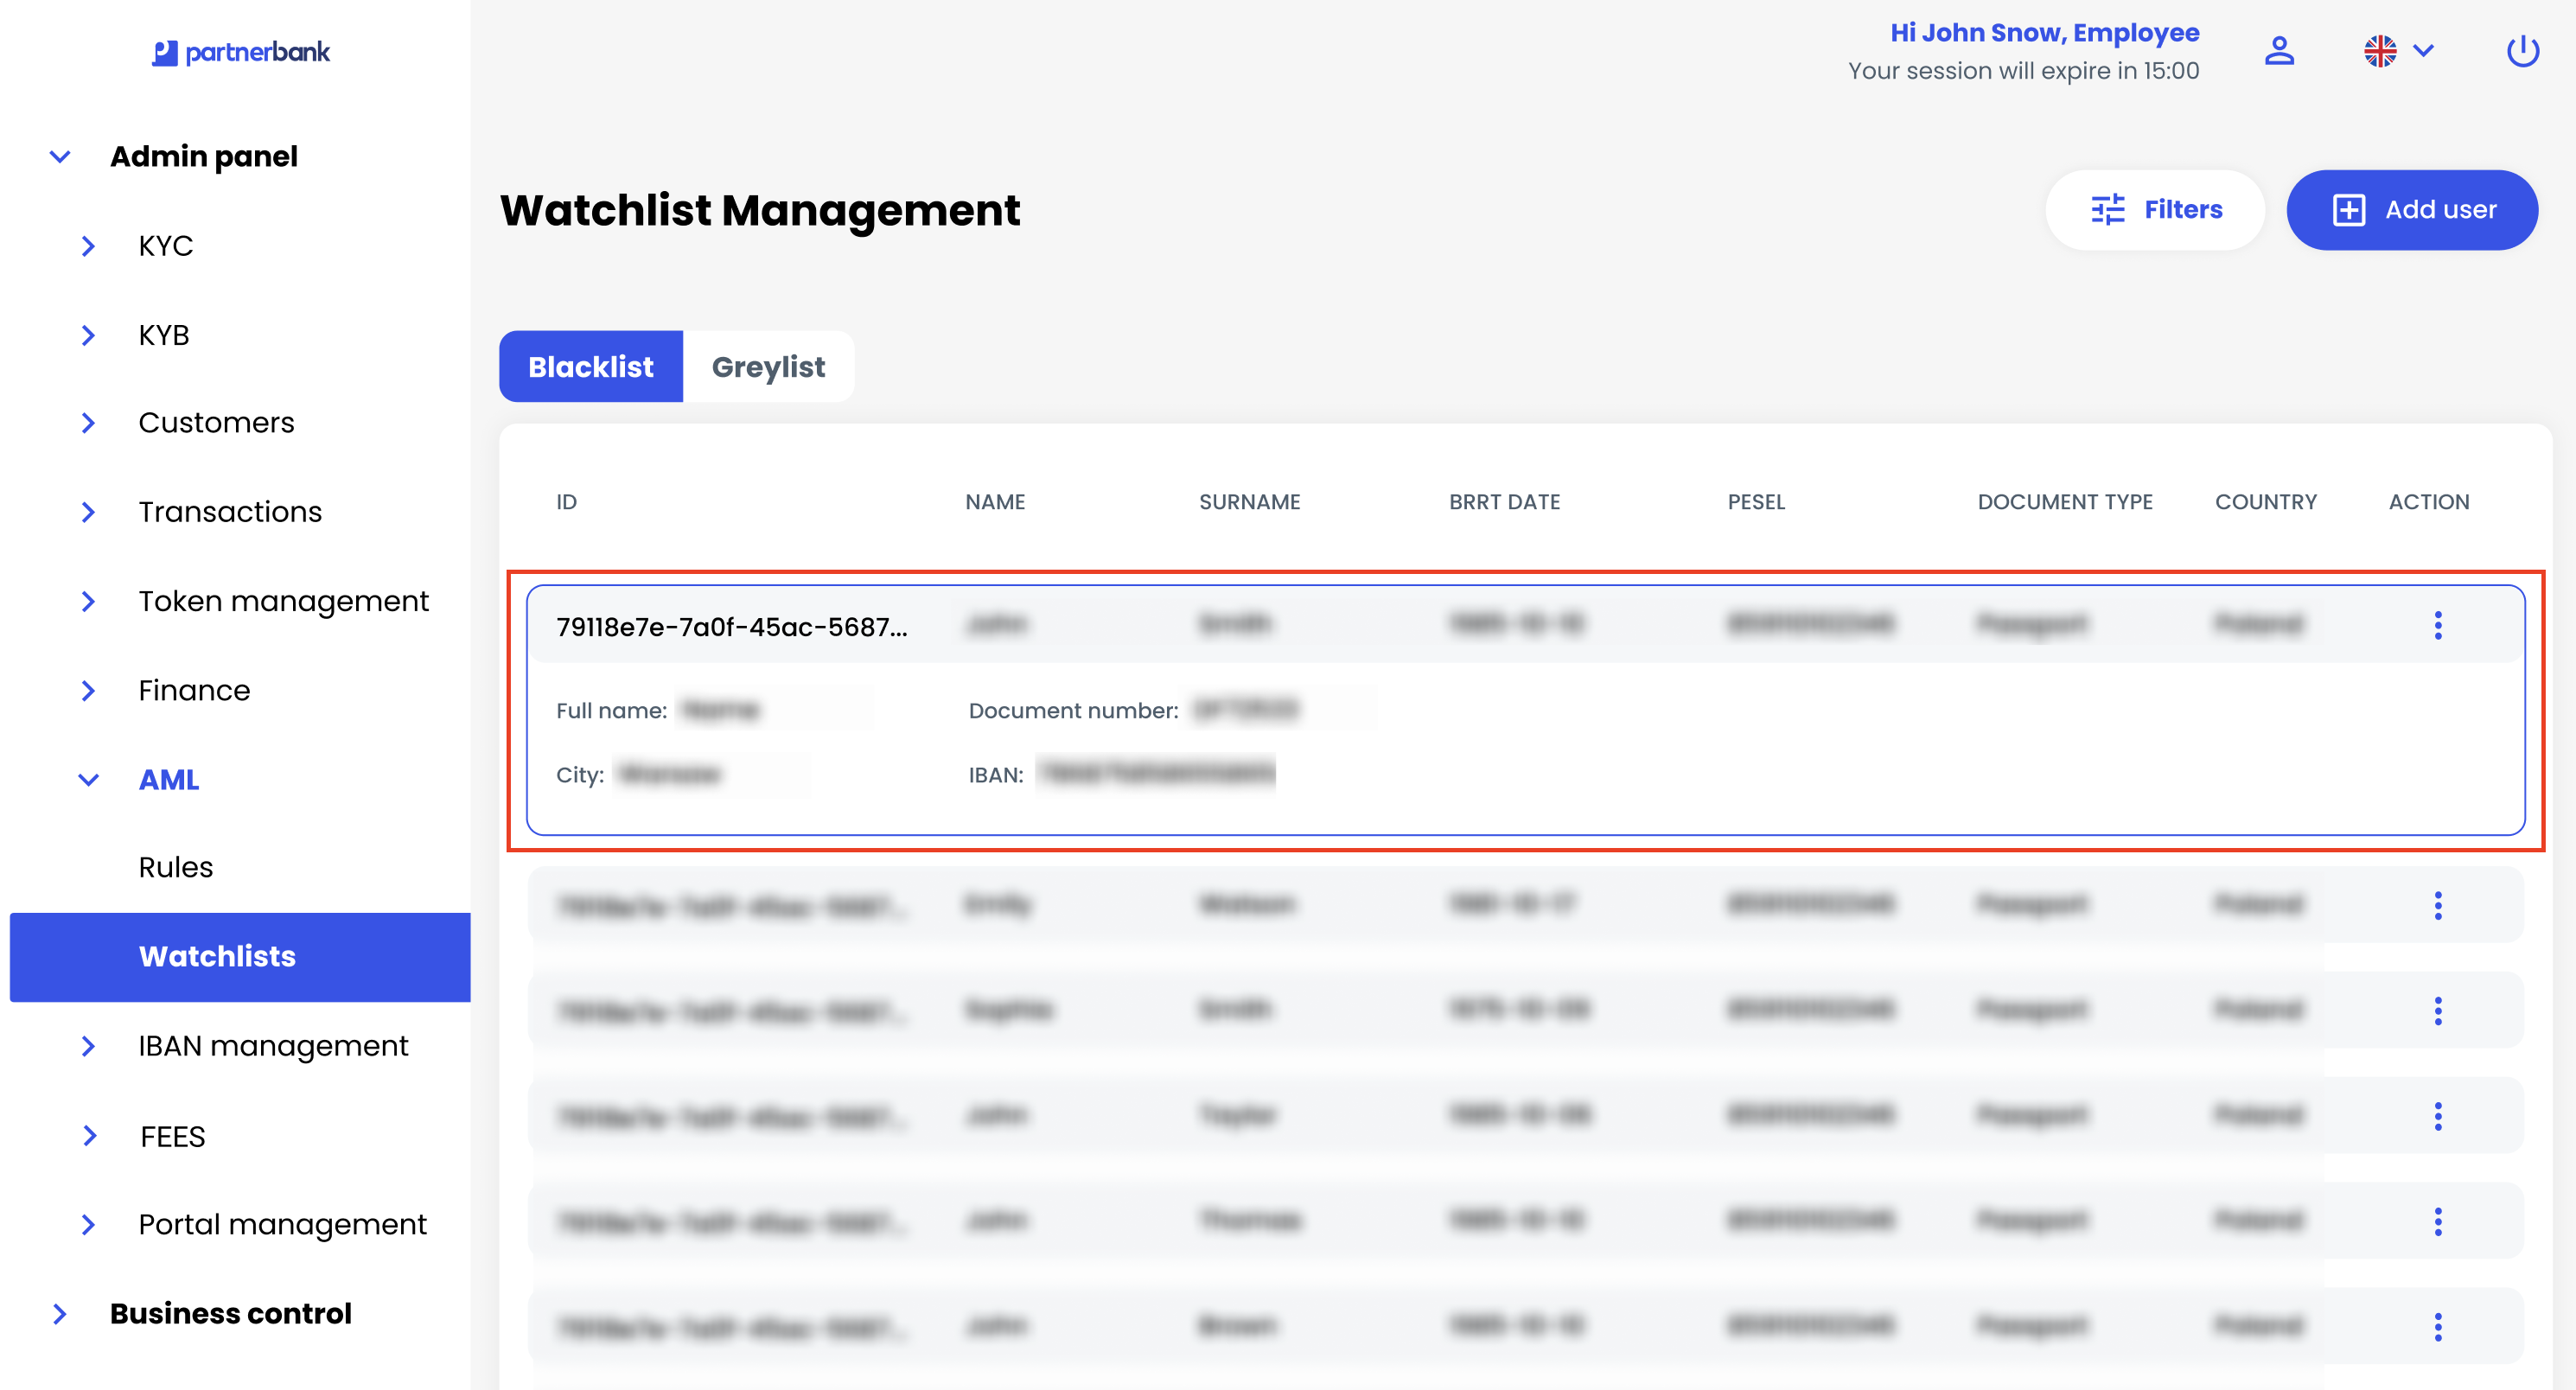
Greylist
The greylist is functionally identical to the blacklist.
All operations — adding users, removing users, filtering and managing entries — are the same.
Refer to the Blacklist section above for full instructions.